Ecommerce is very popular these days because you can easily create an ecommerce website on WordPress and potentially earn 6 figures a month without putting up a brick and mortar business and spending high overhead costs. Now, to create an ecommerce website, the main problem for many of you is the expensive monthly re-occurring fees of most Ecommerce platforms such as Shopify. If you’re just beginning your e-commerce business, you want a more affordable and easiest solution, so you can spend more on things like marketing and advertising.
For you, the good news is you don’t need to spend high monthly charges with Shopify in order to sell products over the internet. If you are searching for an alternative to Shopify or eBay alternative, this comprehensive and step-by-step tutorial will guide you to create an awesome online store for free.
Firstly, you need a web hosting account and a little bit of self-effort, and you will be able to create an Ecommerce website in no time.
Let’s get started!
Table Of Contents
- Tools You Need to Create an Ecommerce Website
- Step 1. Purchase a Web Hosting and Domain Name
- Step 2. Install WordPress and SSL Certificate
- Step 3. Install Astra Theme and Astra Sites
- Step 4. Customize Your Website
- Step 5. Customizing Your Ecommerce Store
- Step 6. Set up WooCommerce
- Step 7. Add products in WooCommerce
- Final Words
Tools You Need to Create an Ecommerce Website on WordPress
Here is a list of essential tools required to create an efficient ecommerce website on WordPress.
- Hosting: I recommend InMotion Hosting.
- A domain name: If you need it separately, I recommend Namecheap or GoDaddy.
- WordPress Theme: For this tutorial, we use the free Astra Theme.
- WordPress Page Builder: For this, we use the free Elementor page builder.
- WooCommerce: The best Ecommerce WordPress plugin. It adds Ecommerce features to WordPress.
Step 1. Purchase a Web Hosting and Domain Name
If you’re new to the world of website building, let’s begin by discussing web hosting and domain names and their importance in creating an ecommerce website on WordPress.
What is a Hosting?
A hosting service is a type of internet service that allows individuals and organizations to make their websites accessible via the World Wide Web. It provides the storage space and technology needed to make a website available on the internet. In other words, a hosting service provides a physical location where the files that make up a website are stored and served to users who access the site.
There are different types of hosting services, including shared hosting, dedicated hosting, VPS hosting, and cloud hosting. Each type of hosting service has its own advantages and disadvantages, and the choice of hosting service depends on the website’s specific needs.
What is a Domain Name?
A domain name is the unique name that identifies a website on the internet. It is an easy-to-remember address that users can type into their web browser to access a website. A domain name consists of two parts: the name itself and the domain extension. For example, in the domain name “www.google.com”, “google” is the name, and “.com” is the domain extension.
A domain name is registered with a domain registrar, which is a company that manages the registration and ownership of domain names. Once a domain name is registered, it can be used to create an ecommerce website and linked to a hosting service so that the website can be accessed on the internet using the domain name.
InMotion Hosting: My Recommended Web Hosting Service
You can use any high-quality web hosting service to create an Ecommerce website, but in this tutorial, we’re going to use InMotion Hosting.
InMotion is a highly recommended web host online because they provide very affordable prices and have catered to the WordPress community/users. They are one of the most known hosting providers for their superfast performance and equally fast support.
Here are InMotion Hosting’s key features:
- Free SSL Certificate
- FAST Support
- WordPress Staging Environment
- Free Website Migrations
- Free Website Builder
InMotion Hosting is a solid choice for your web hosting needs. They cater to WordPress websites and offer a lot of resources than their competitors.
Once you visit their homepage, you’ll see their four different types of hosting:
Choose WordPress hosting on cPanel and click Get Started. You’ll then see four pricing plans:
Select one that fits your needs and budget. You can also check out the comparison of each hosting plan to have a better idea of which plan most suits your needs.
Once you’ve decided on a plan, click on Select button. You’ll then be taken to a new page called Customize Your Core, you don’t need to do anything here just click on “No, Thanks” options and click on continue to proceed to the next step.
If you already bought a domain name, select “I already own the Domain I want to use”. But if you don’t have a domain, select “I Would Like to Purchase a New Domain” to buy a domain right inside InMotion Hosting.
Once you have a domain name that you like and is available, Go to the Next Step.
3. Install WordPress and SSL Certificate
In this section, we’ll show you how to create an Ecommerce website with WordPress.
But why WordPress?
WordPress is a popular content management system (CMS) that powers millions of websites around the world. There are several reasons for its popularity:
Ease of use: WordPress is easy to use, even for beginners. You don’t need to have technical knowledge or programming skills to create an ecommerce website with WordPress.
Customizability: WordPress is highly customizable, allowing users to create websites with unique designs and functionality. There are thousands of themes and plugins available that can be used to add new features and functionality to your website.
Open-source: WordPress is an open-source platform, which means that it is free to use, modify and distribute. Anyone can contribute to the development of WordPress, which has helped to create a vibrant community around the platform.
SEO-friendly: WordPress is designed to be SEO-friendly, making it easier for websites built on the platform to rank well in search engines. WordPress has features like permalinks, categories, and tags that can help improve your website’s visibility in search engines.
Large community: WordPress has a large community of developers, designers, and users who contribute to the platform. This community provides support, advice, and resources that can help you build and improve your website.
There are a ton of things I love about WordPress, and if you read my tutorials and reviews you will find out the reasons why I think WordPress is the best tool for creating websites for beginners.
InMotion Hosting actually offers a one-click WordPress installation that performs all the hard work of installing and setting up WordPress for you.
Once you complete the Domain Purchase step, it will take you to the WordPress hosting installation screen.
In the next step, you need to provide personal and billing details to complete the purchase. Provide your details, review your order and then Pay. You now have reliable and secured web hosting along with a domain name.
Installing an SSL Certificate
The security certificate is already included in your InMotion hosting account.
To install, follow these steps
- Login to your Account Management Panel (AMP).
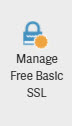
- Click on the icon for Manage Free Basic SSL.
- If the switch under Enable Free SSL is in the OFF position, click it so that it moves to the ON position.
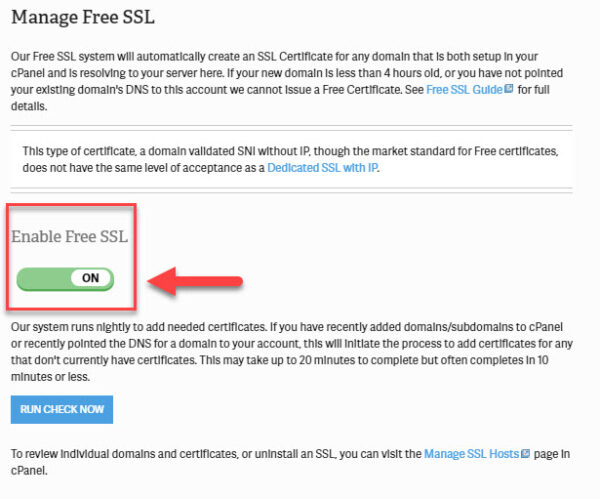
- Go ahead and click the blue Run Check Now to automatically add SSLs to any valid cPanel account.
Log in to Admin Dashboard
Click on the Log in Admin option to log into your WordPress dashboard
You can also login by typing ‘yourdomain.com/wp-admin’ in your browser’s URL bar.
Remember your login page URL. You will be able to access your site directly by typing the URL into your address bar without having to log in to InMotion Hosting Dashboard.
For instance, if your domain is onlineshop.com, then your WordPress login page will be onlineshop.com/wp-admin.
The login screen looks like this:
Enter the username and password that you set up to log in to the WordPress admin panel.
3. Install Astra Theme and Astra Starter Templates
Astra is the best-suited theme that we are going to get our WordPress Ecommerce website looking pretty and professional as quickly as possible. You can use other themes if you have deep knowledge and preference, but for this tutorial, we will use Astra.
Astra is a good theme for WordPress that offers a range of features and benefits that make it easy to create a fast, customizable, and mobile-friendly website. There is also a Pro version available that makes Astra the perfect choice.
With its Starter Templates plugin, you can have a beautiful Ecommerce website.
The best part is that you can install a ready-to-go website template in just a few clicks!
We’ll be using one of the Astra Starter Templates designed for Ecommerce to reduce our website creation time in half.
Pick a Starter Site to Import
Let’s import a starter site. Go to the options for Astra theme by clicking on Appearance > Starter Templates.
There are a number of beautiful Ecommerce templates that you can use. Take your time in choosing the template that you want.
Note that these templates are fully editable with the page builder that you selected. This means you’ll be able to customize every part and element of your Ecommerce store like the heading, images, colors, logo, etc.
For this tutorial, I’m going to use the Custom Printing starter template because it looks amazing and is Ecommerce oriented.
To install the template, you just have to click on it. Here you can choose to customize the colors and logo now.
But for this tutorial, click Skip & Continue.
You’ll come across a box that asks you to fill in your details (that you can choose to leave as blank) and install the custom data that’s added to the website.
So in this step, just click on Submit & Build My Website.
Now the Astra importer will install all of the required plugins for the theme to look exactly the way it is.
At this step, for the Custom Printing theme, it will install Elementor, WooCommerce, and WPForms Plugins. This saves us so much time because We won’t have to install these plugins one by one anymore.
Everything’s done for me.
Once the website is ready, you’ll see this message.
Congratulations, if you visit your website homepage, you will see that your eCommerce store website is almost ready. Isn’t that simple?
4. Customizing Your Ecommerce Website on WordPress
Your Ecommerce store website now looks amazing, but you’ll want to make it your own. The first thing you want to do is choose your color palette. If you already have your brand color, this is going to be easier.
Setting a Logo
You’d also need a brand logo to set on your website to make it unique and establish your brand identity. There are a number of ways to setting a logo. You can try and do it yourself using an amazing design tool called Canva. It’s quite popular as it makes graphics designing really easy even for beginners.
Canva comes with a lot of logo templates that you can modify to make your own. However, that if you want to export the logo with a transparent background, you’d have to upgrade to Pro (which has a one-month free trial). You can always go in Photoshop or Photopea to remove the background, but that just adds one extra step to the process.
If you want to save time, you can just hire a freelance logo designer to do it for you. You can try websites like Fiverr.com or 99design, but you have to be careful in choosing an artist based on their style, track record, reviews, ratings, and more.
Customizing the Appearance of Website
Now it’s time to use those colors, fonts, and logos for your website. If you’re in the WordPress backend dashboard, go to Appearance > Customize to open the theme customizer settings.
If you’re on the frontend of your website and there’s a black bar at the top, you can click Customize to open the customizer.
This is what the theme customizer looks like:
The base colors are your website’s theme, link, text, and link hover color.
If you want to change the theme color, click the color to its right.
You’ll see two ways to select a color.
First, you can paste a hex color code in a box. So if you found a color in Coolors.co or any other place, you can paste the hex color code here.
You can also select a color in a built-in selection tool.
To change your site fonts, go to Global >Typography. You’ll be able to change base color, breadcrumb, content, and blog typography.
Next is adding your logo. To upload your logo, go to Header Builder > Site Title and Logo.
Next, Under the Logo section, click the Change Logo button and upload your logo.
Astra also allows you to adjust your logo width, so you can change how big or small you want it to appear.
If you scroll down, you will also be able to change the title of your website, add a site tagline, and a site icon or favicon.
You can do more in the customization area of Astra like changing your site content width, changing the blog structure, customizing your footer and header areas, and more.
You can explore your options here to see what you like the best for your online store.
Once you have done customization, don’t forget to click Publish to make your changes live.
Step 5. Customizing Your Ecommerce store
At this step, you’ve learned the customization basics like changing the site color, and typography, adding a logo, and all that things. Now it’s time to get down to the details and start using Elementor (or any page builder you prefer) to completely change the outlook of your online store.
As I mentioned before, I’m going to be using Elementor in this tutorial because I simply think it’s the best, but you can use any page builder that you’re comfortable with.
Inside Elementor, you can do a lot of customizations with your website without coding or hiring a web developer. Adding elements is a simple drag-and-drop process.
There are two methods to edit a page with Elementor. First, if you’re in the WordPress backend, click Pages and you will see a list of all the pages of your website, including those that were automatically created with the Astra Starter template. Pages that were made with a specific page builder (e.g. Elementor) will be labeled as such:
To edit a page with your page builder, hover your mouse over it and click Edit with (page builder). In my case, it will be Edit with Elementor.
Once you click that, you’ll be taken inside Elementor.
Another way is if you’re on the frontend of your website, go to the page that you want to edit and click Edit with elementor on the black bar at the top:
After you click on it will take you inside Elementor. Once inside Elementor, you’ll be able to use different images for your heading, change fonts & texts, change icons, and more. You can start by changing the text and image in the heading to suit your requirement. Here are a few things you can do with texts inside Elementor:
As you can see, you can change the text in the content editing area, and change the size, weight, color, and typography family. You can also add animations like simple fades, zooming, and more. There are a ton of things you can do here to add spice to your Ecommerce store.
You would also want to change your website’s images to match the category of your business. Changing the images on Elementor is very easy to do. Just click the image and the options will appear on the left sidebar. You can upload a new image, change its size, add a border or shadow, add an animation, and more.
Inside Elementor, you can also change button texts, customize the testimonials area, add more elements/blocks like texts, images, buttons, videos, and more.
Elementor Pro comes with a whole lot more features like the ability to add forms (which usually requires a third-party plugin), the ability to upload your own fonts, add sliders, add price tables and price lists, customize your headers and footers (which is off-limits to most page builders), and so much more.
Step 6. Set Up WooCommerce.
Let’s set up WooCommerce. WooCommerce helps you create an Ecommerce website with WordPress.
It lets you add products, accept online payments, create coupons, set shipping and taxation, and so much more.
WooCommerce was already installed for me by the Custom Print Astra Site theme, so now I have to go in and set it up. If you don’t have WooCommerce installed yet, just go to Plugins > Add New and search for WooCommerce.
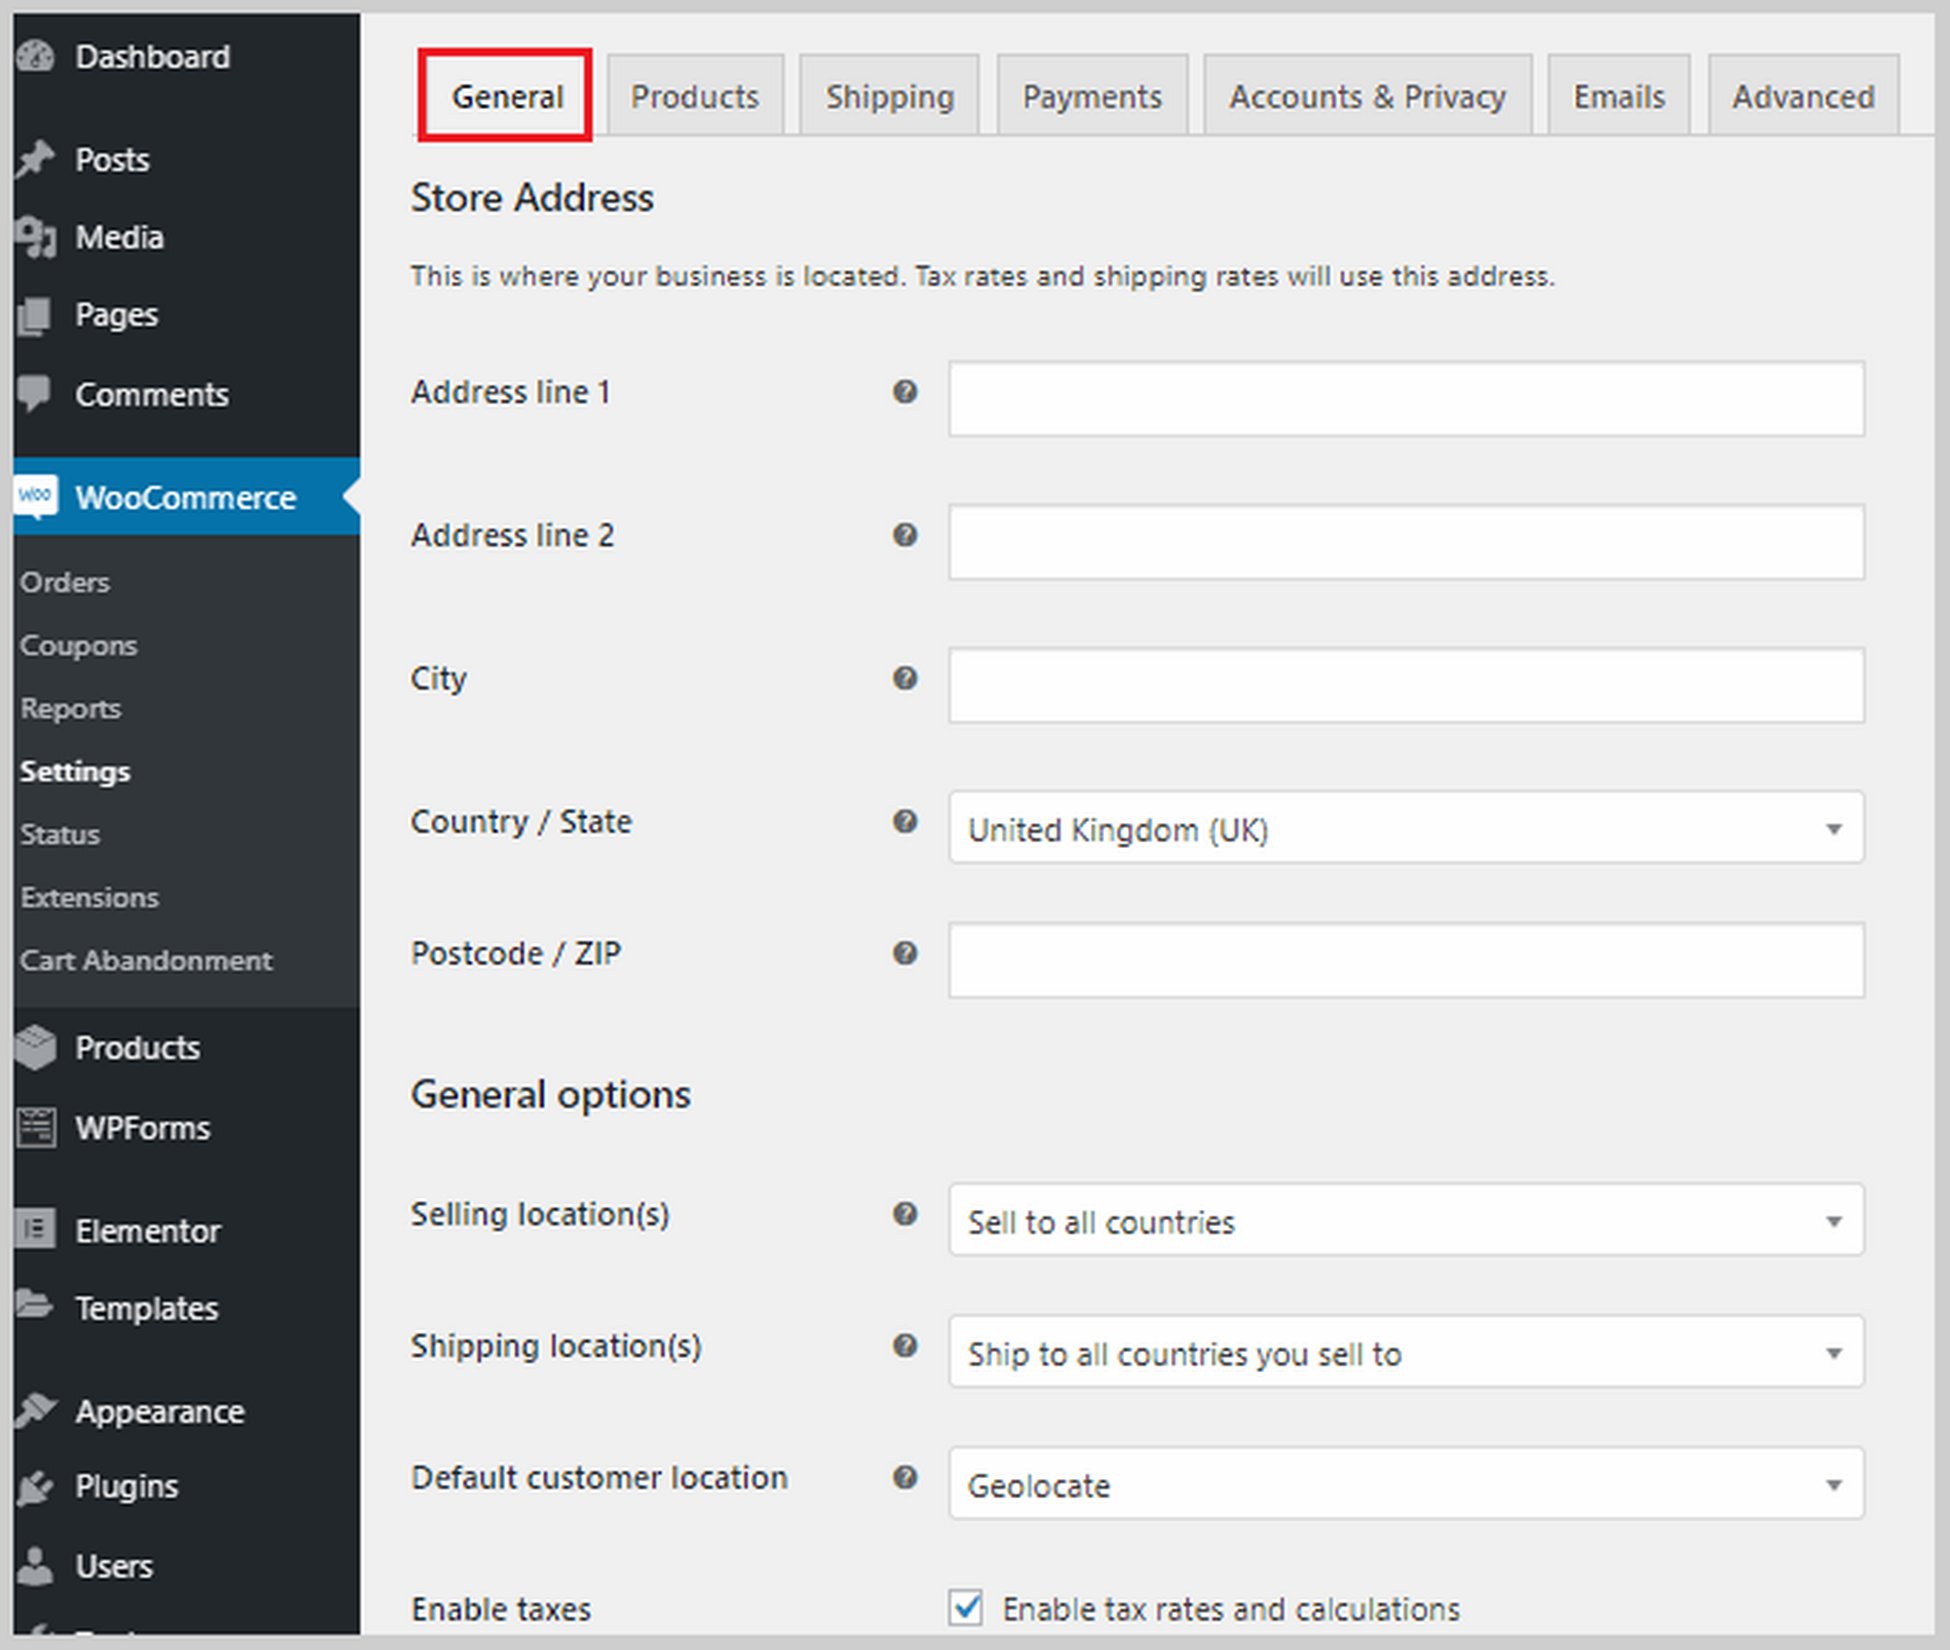
The first thing we have to do is go to WooCommerce > Settings. You will see 7 tabs: General, Products, Shipping, Payments, Accounts & Privacy, Emails, and Advanced.
Let’s first take a look at the General tab. In this tab, you’ll be able to set your store address, in which countries you will sell and ship, and enable tax rates.
If you scroll down, you will also see options to enable coupons and customize how prices are displayed on your website including the currency, where it will be displayed, etc.
Next is the Products tab, where you can set product-related options. You can set which page will be your Shop page, what happens when visitors add a product to your cart, set product dimensions, enable and configure customer reviews, and enable star ratings.
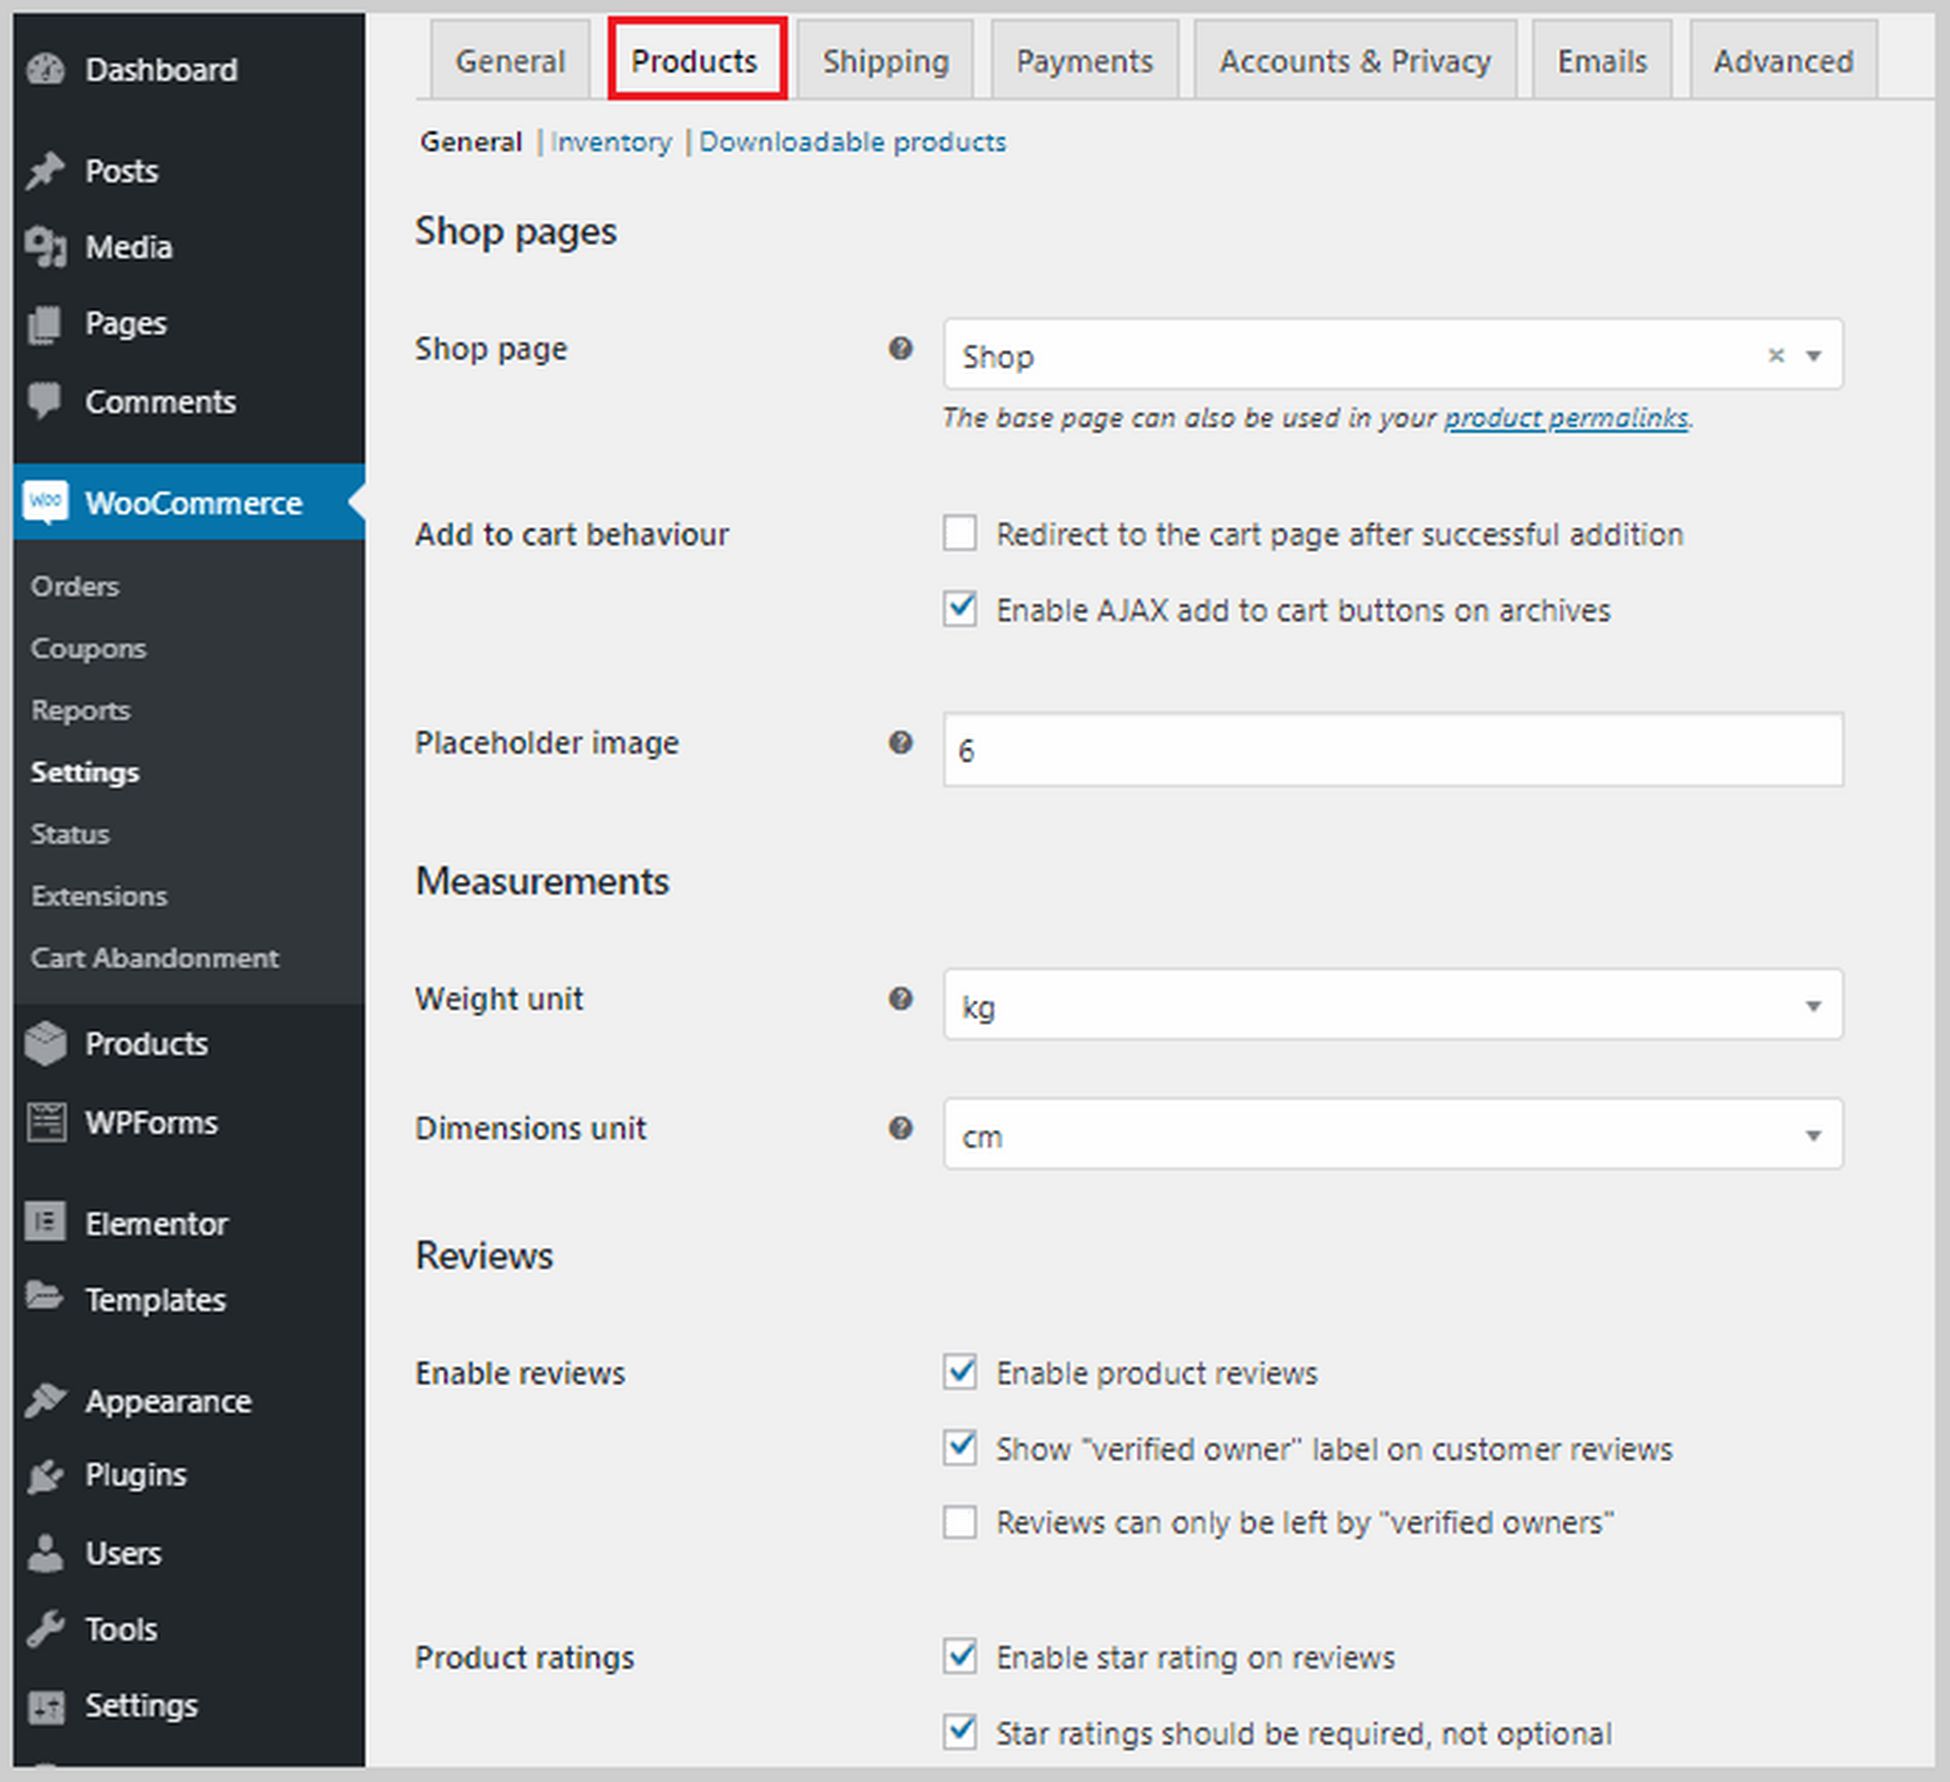
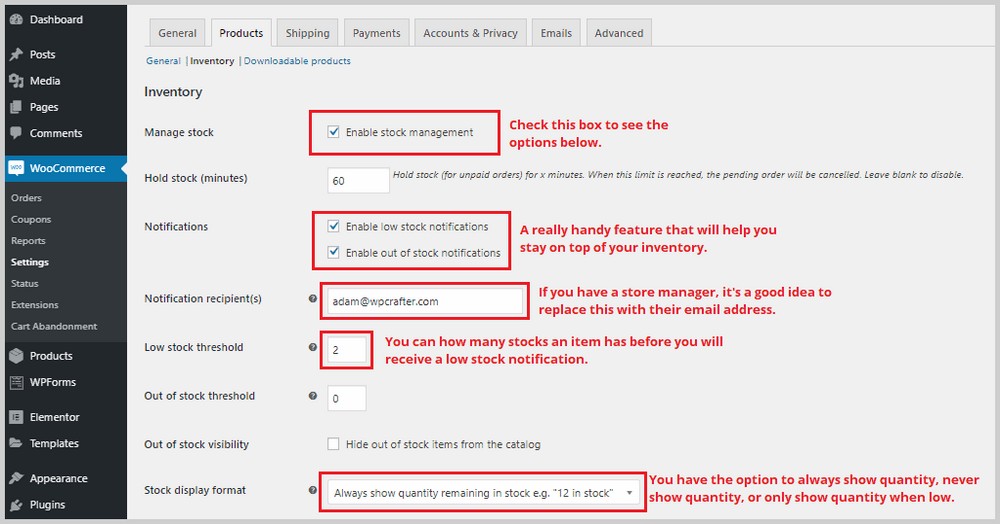
At the top part of this section, you also have options for Inventory and Downloadable products. In the Inventory section, if you check the box beside Enable stock management, you’ll see a list of options that will help you manage your inventory. For example, you can set the low inventory threshold so that when your stock reaches that number, you will be sent a notification. You can also choose to hide stock items from your website.
As for the Downloadable products section, this is only relevant if you’re selling downloadable content on your website, so if you’re selling purely physical products, you can skip this one. You’ll have the option to require buyers to log in before being able to download your products. You can also give access to downloads after payment.
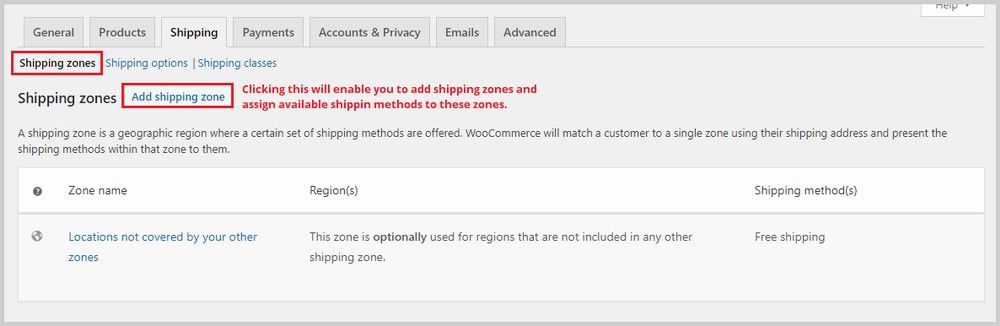
The next tab is Shipping. This is only relevant if you’re selling physical products that will be shipped out to buyers. Inside this tab are three sub-sections: Shipping zones, Shipping options, and Shipping classes.
In Shipping Zones, you’re going to need to add shipping zones and assign available shipping methods to these zones. This is going to take a while if you’re shipping to several countries.
If you need more help with shipping zones, you can check out WooCommerce’s shipping zone documentation.
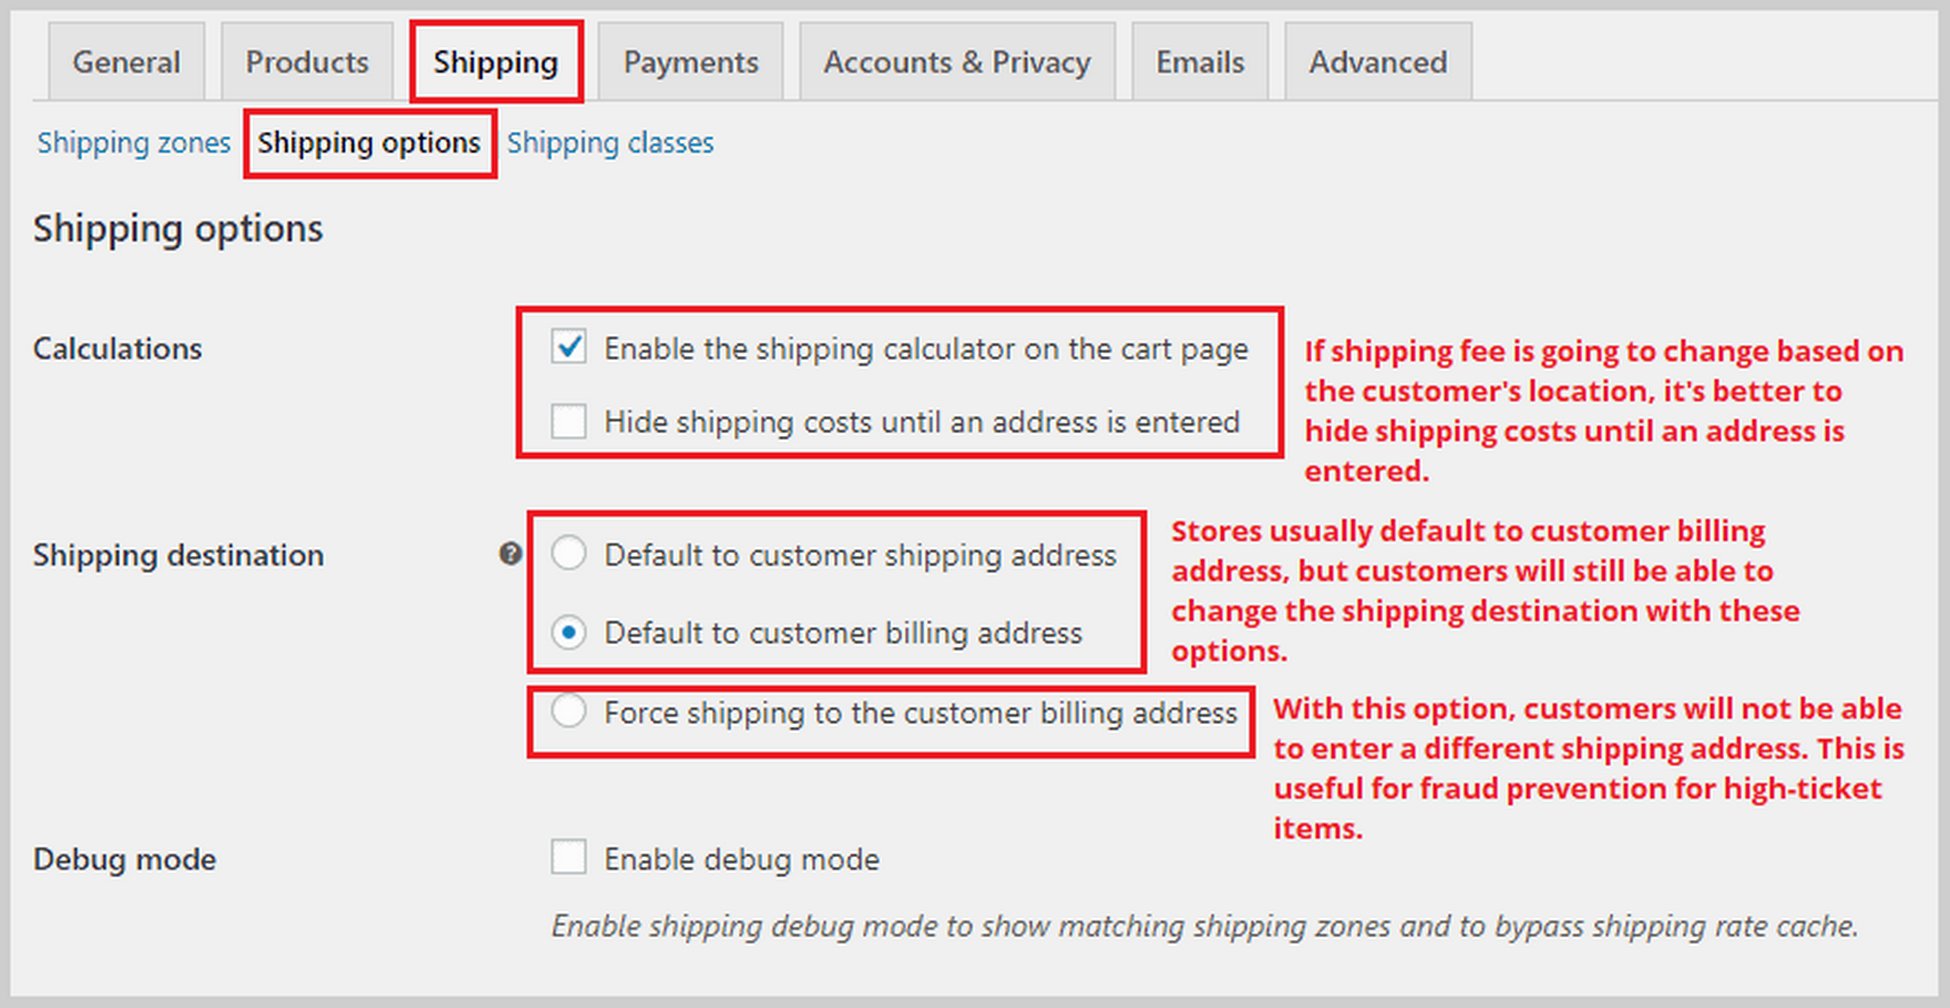
Next is the Shipping options section. In this section, you can control how shipping rates are displayed on your website and set a default or the required shipping destination.
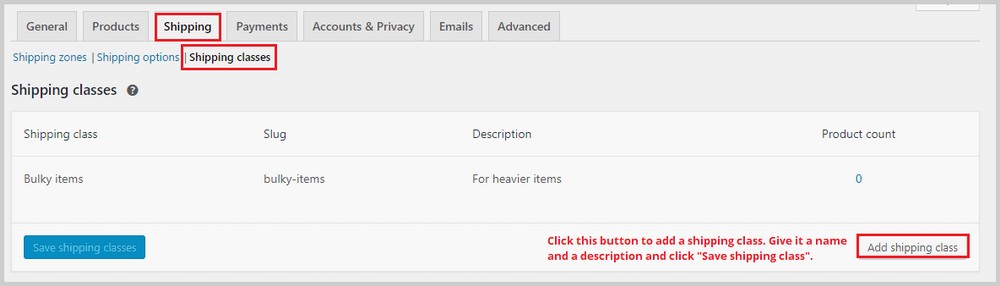
The last section in Shipping is Shipping classes. With shipping classes, you can assign different shipping rates to a group of products, for example, heavier products that need more postage.
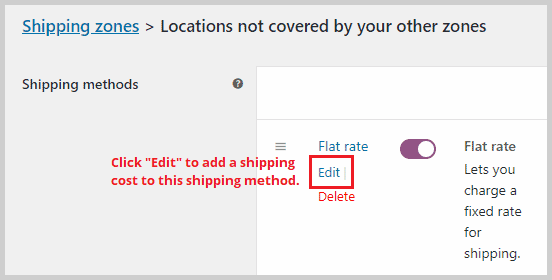
To set your shipping rates, go to Shipping Zones and create or edit an existing shipping method like “Flat Rate”.
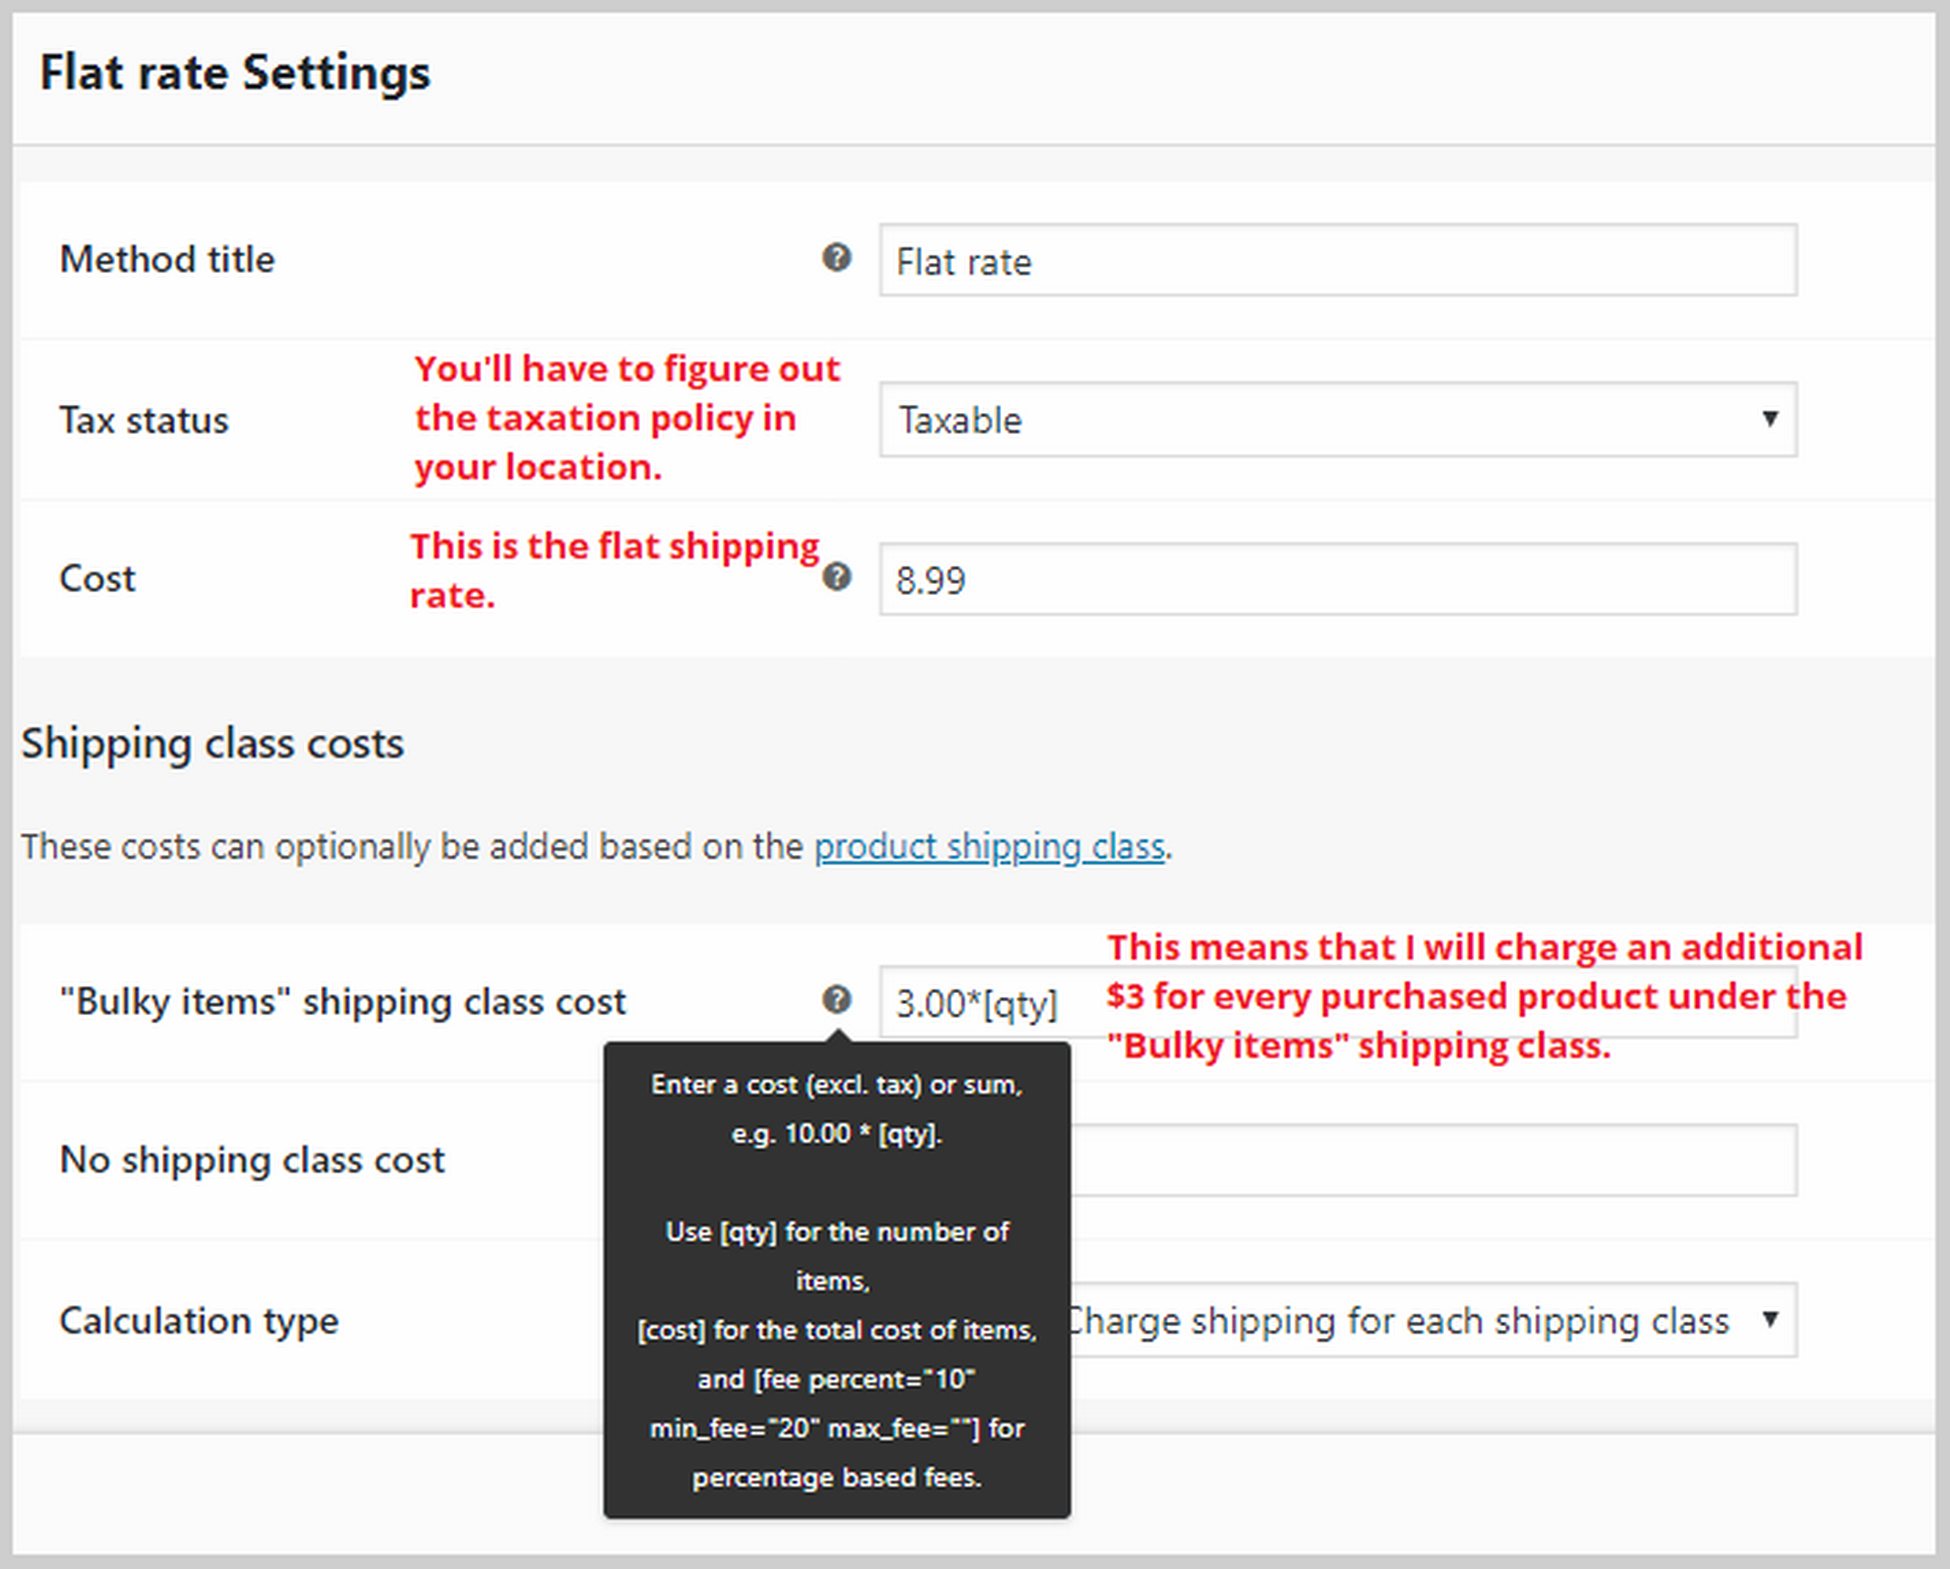
Once you click Edit, a popup window will appear. Here, you will be able to add the flat shipping rate and the additional cost for the shipping class you just created.
If you need more help with configuring your shipping settings, you can check out WooCommerce’s documentation for shipping.
Now let’s move on to Payments. In this tab, you’ll be able to enable or disable payment gateways like PayPal, direct bank transfer, cash on delivery, and more. Once you enable a method, click Set up to link your accounts and start accepting payments.
If you want to be able to accept Stripe payments with your Ecommerce website, you can install a plugin called Checkout Plugins – Stripe for WooCommerce. Just go to Plugins > Add New and search for the plugin. Installing and activating this plugin will enable Stripe payment method in WooCommerce, but you have to go into WooCommerce > Settings > Payments to set it up.
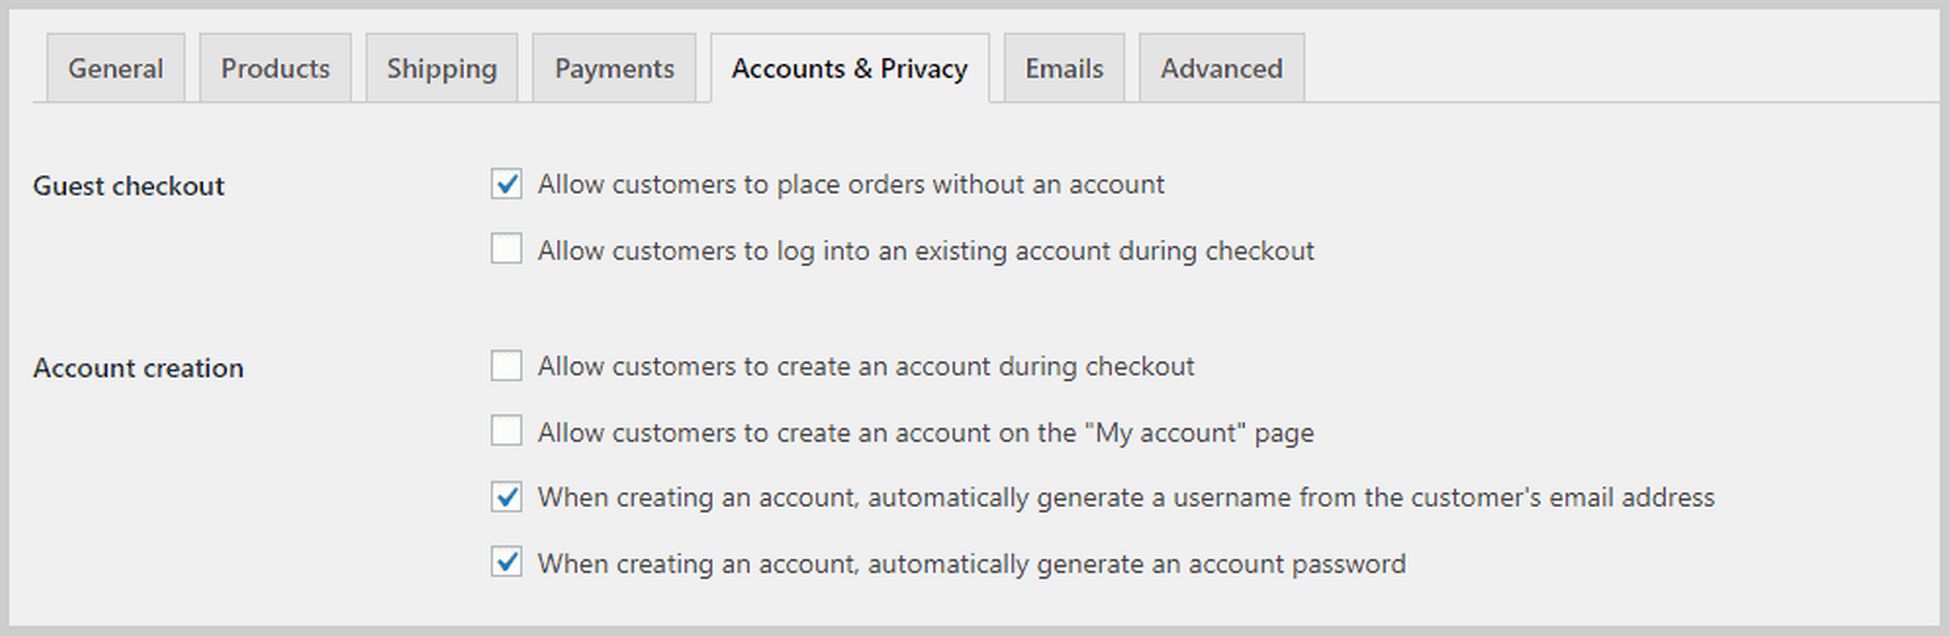
In the Accounts & Privacy tab, you’ll be able to configure settings related to account creation and user privacy. You can choose to allow guests to purchase without creating an account, set your privacy page and policy pages, and choose how long user data will be retained.
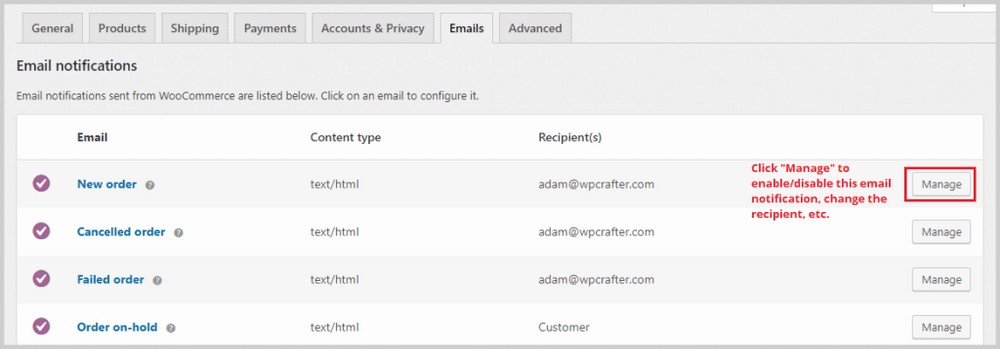
Next is the Emails tab where you’ll see a list of emails that WooCommerce automatically sends based on certain conditions. For example, an email can be sent to an email address of your choice whenever a new order is made. You can also see emails with updates about customers’ orders such as refunded or completed orders.
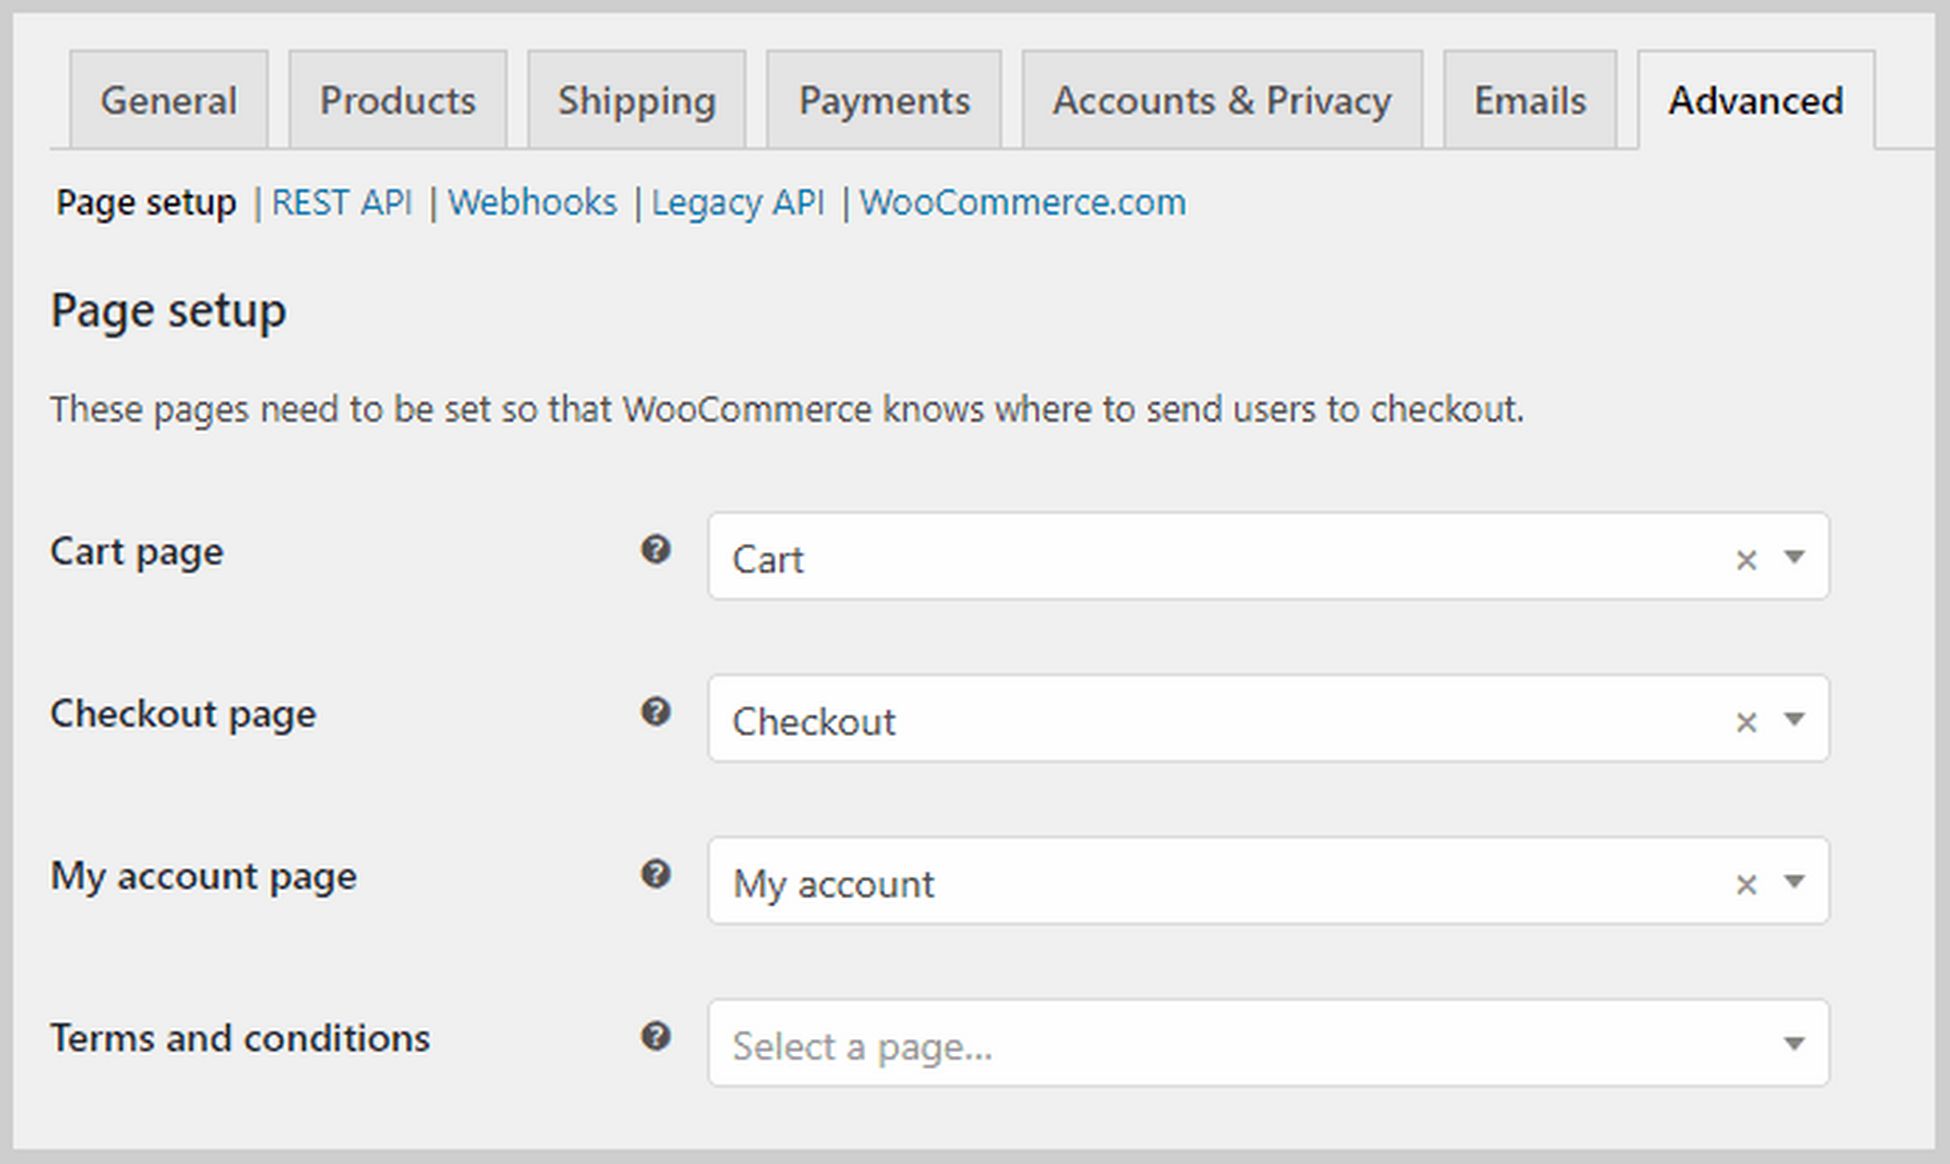
Finally, the Advanced tab, which replaced the API tab, lets you configure more technical details like page setups where you can tell WooCommerce which page is going to act as your cart page or checkout page.
If you scroll down, you’ll be able to modify what WooCommerce calls as end-points which are appendages to the URL that allows them to display different content without the need for a new page.
Step 7. Add products in WooCommerce
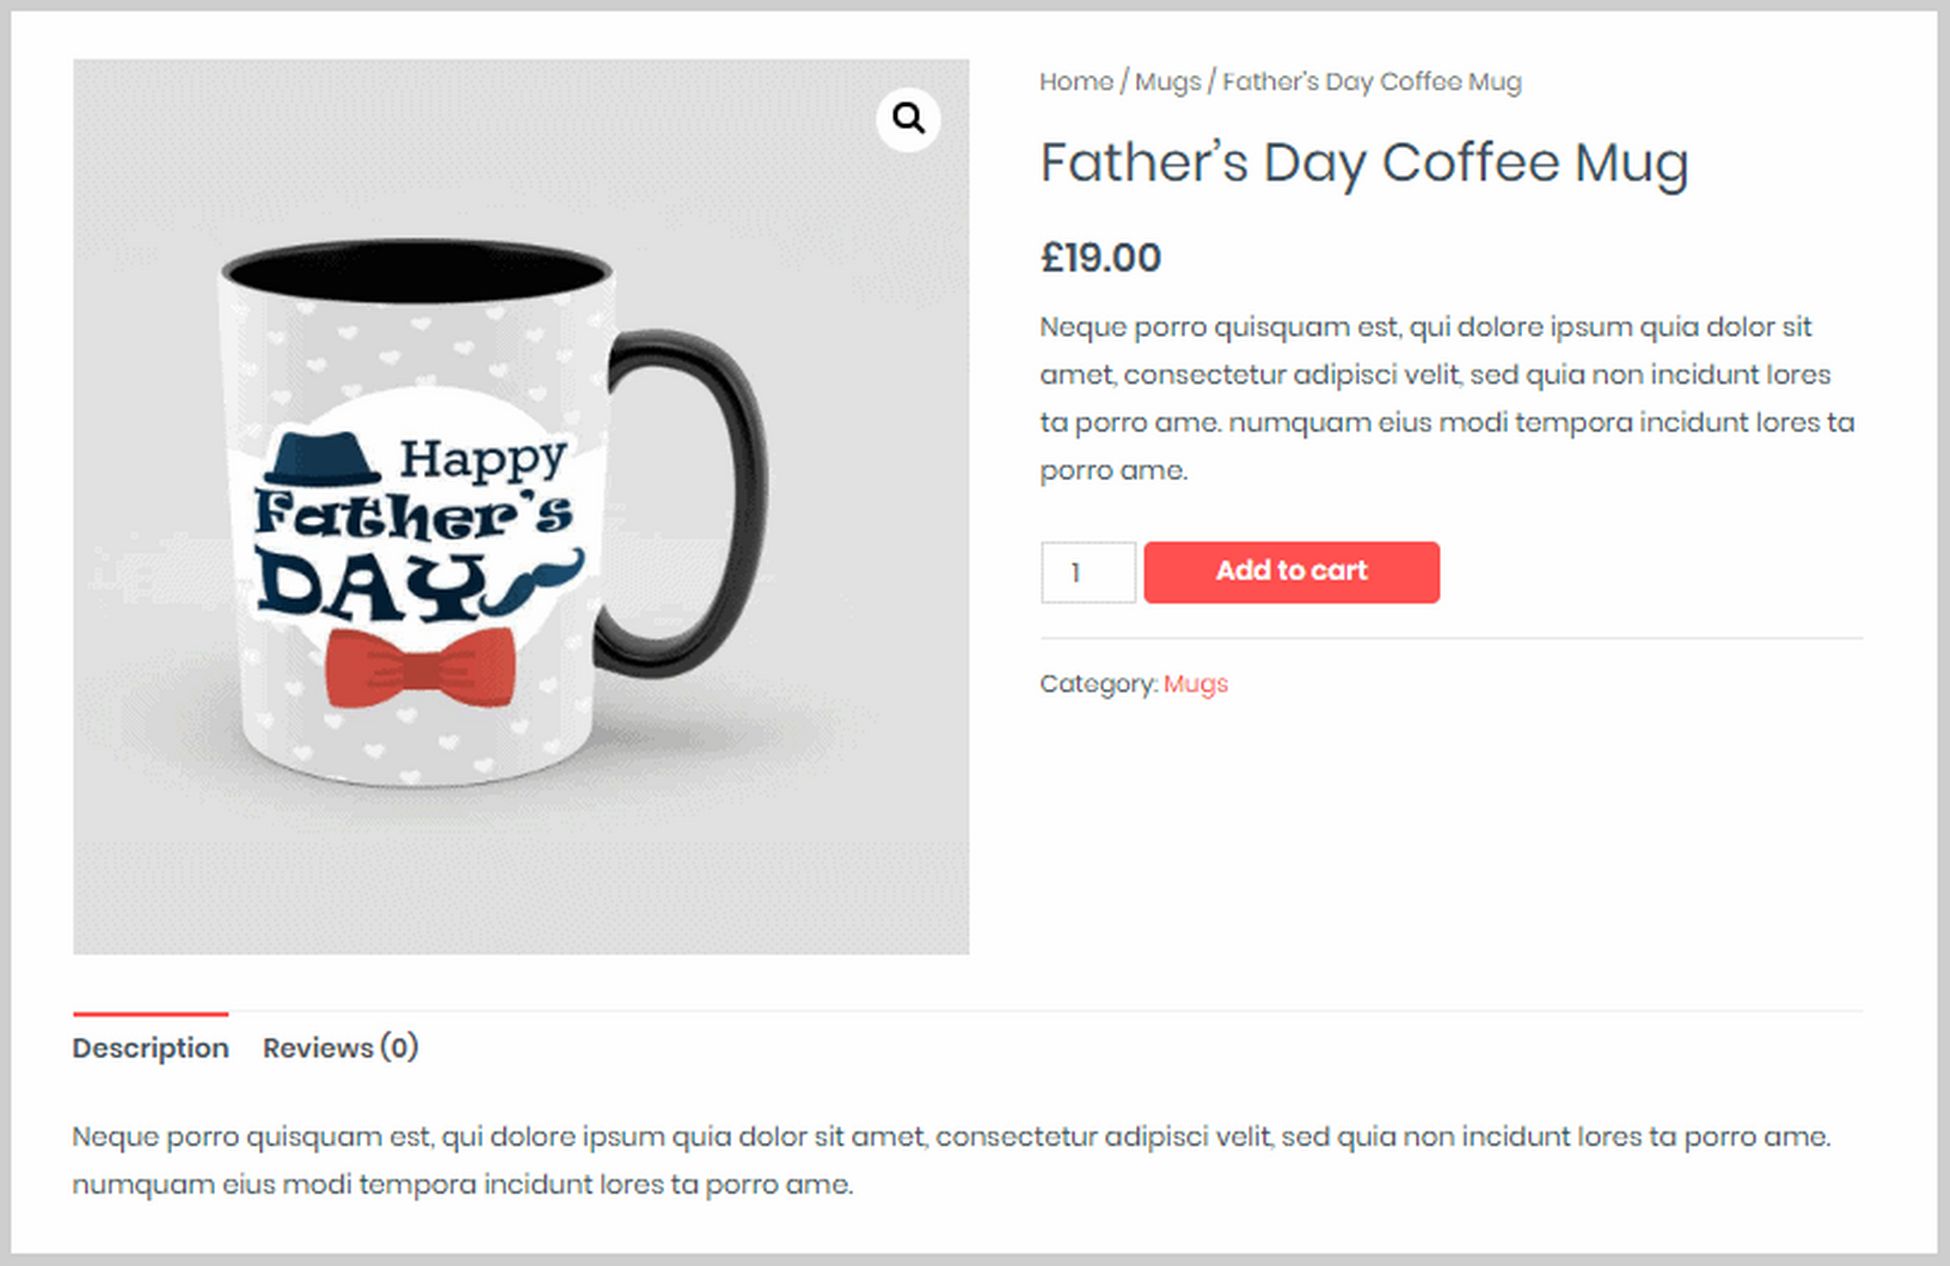
Once you’re done with the basic WooCommerce settings, it’s now time to add products. The Astra Site theme that we used in this tutorial already comes with sample products, and this is how a product page looks like on the frontend:
Let’s now take a look at how we can change this and add our own products on the backend.
To add a new product or edit an existing product, just click the menu option Products on the left sidebar in the WordPress dashboard. You’ll then see a list of all the products you have. Alternatively, if you’re on the front end of a product page, you can click Edit product on the black bar at the top of the page. This will take you directly to the product editor.
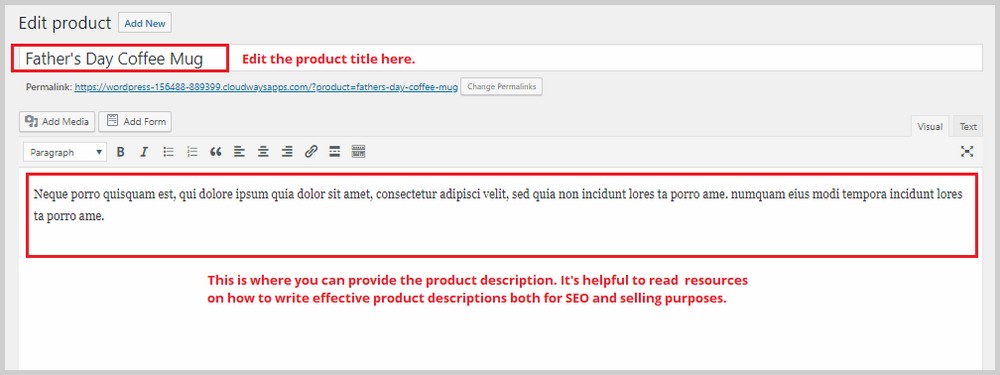
This is where you can change the product title and product description. If you scroll down, you will see a section called Product data. This is where you’ll spend most of your time. Here, you can select the type of product, and from there you can configure other product settings.
WooCommerce lets you add these types of products:
- Physical, downloadable, and virtual. A virtual product doesn’t necessarily need to be downloaded. An example is an appointment or one-on-one coaching session.
- Simple product. This is a single-item product.
- Grouped product. This is a bundle of different products.
- External product. Products that are purchased outside your website like an affiliate link.
- Variable product. A variable product has variations like colors and sizes.
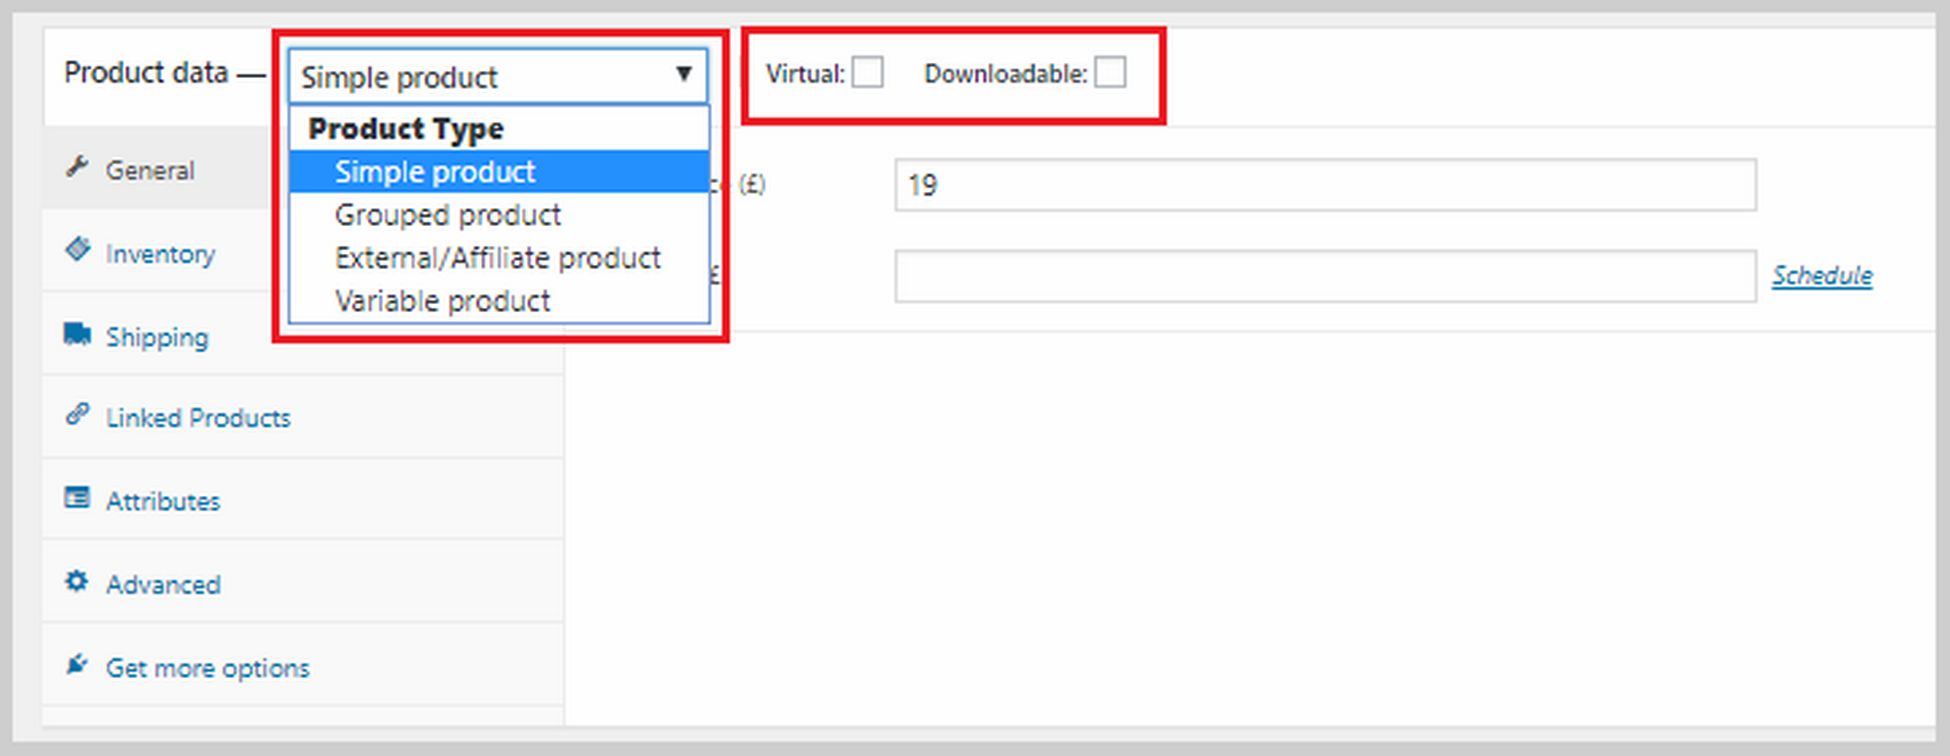
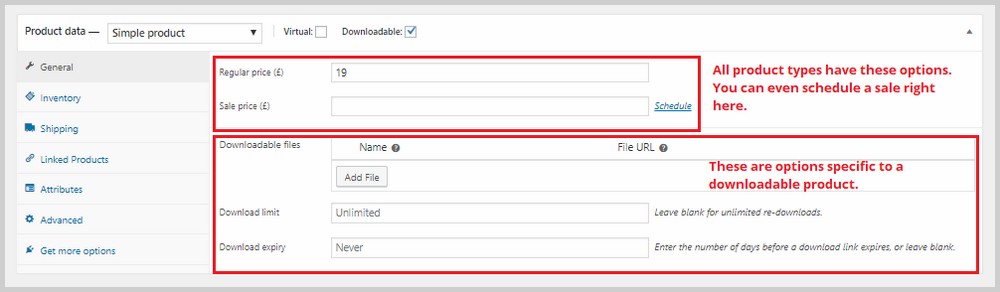
Whenever you create a new product, the first step is to choose its type. Each type comes with a different set of options. For example, a downloadable product will have these options:
On the left side of this section, you’ll see more options for inventory, shipping, linked products, and more.
In Inventory, you’ll be able to add the SKU, provide a specific number of stocks for this particular product, set the stock status, and more.
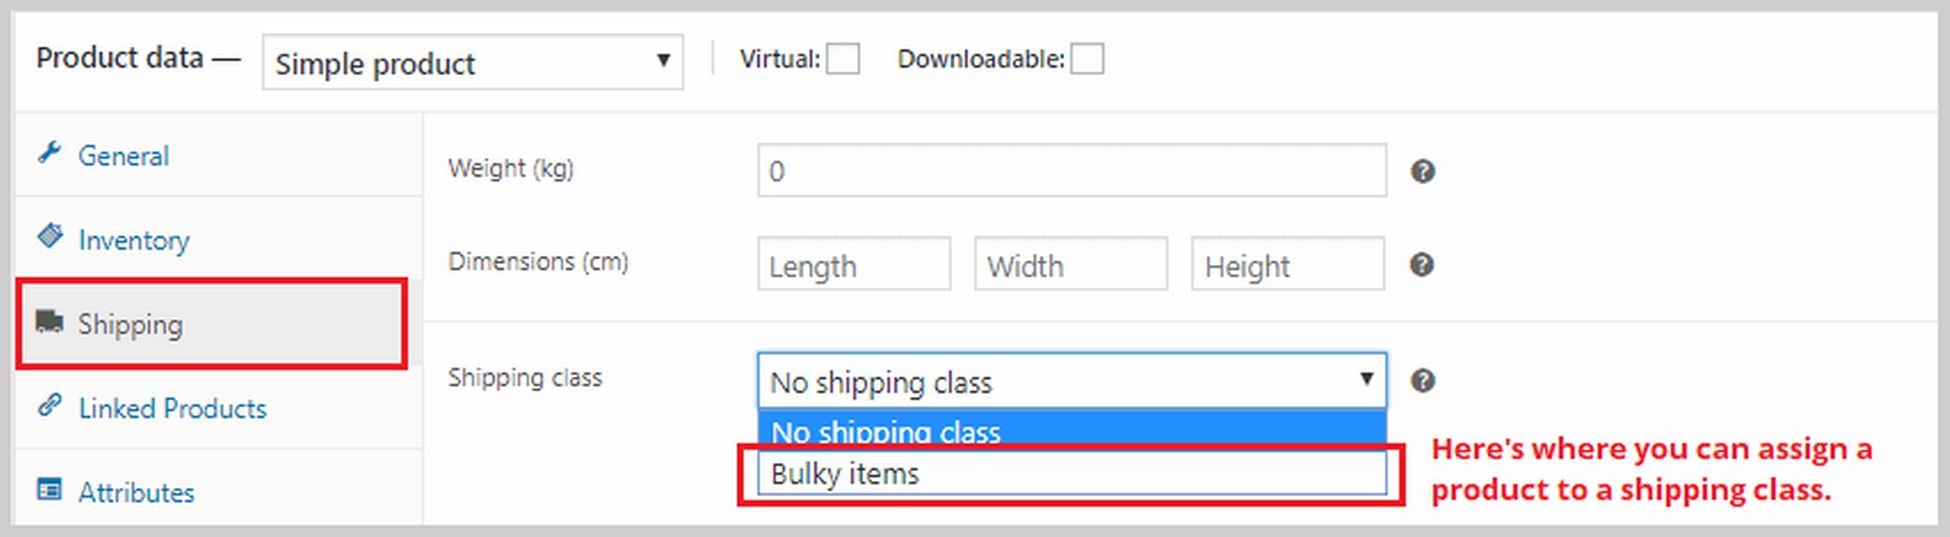
In Shipping, you can specify the weight and dimensions of the product as well as assign a shipping class which we created in the previous step.
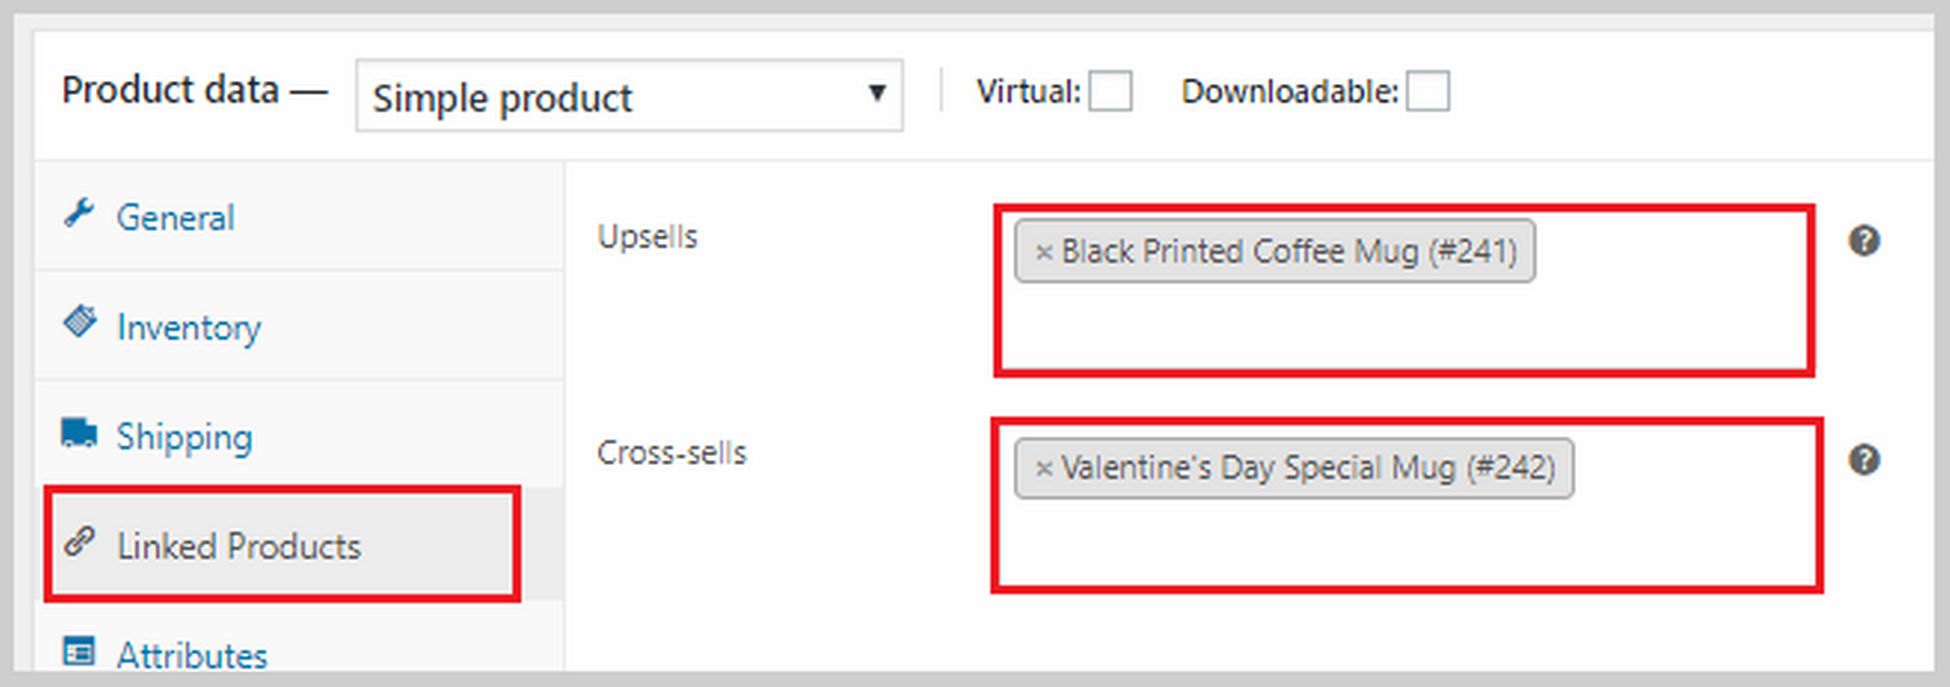
In Linked Products, you can assign an upsell and cross-sell item to a product. An upsell is a product that you recommend instead of the current product because it has a higher price. Cross-sells are products you’ll recommend in the cart based on the current product. If you want to add an upsell or cross-sell, type the name of the product in the corresponding boxes.
You can also add attributes to your products in the Attributes section. It can be size, color, weight, etc. Also, if you’re creating a variable product, you’d have to add an attribute here first.
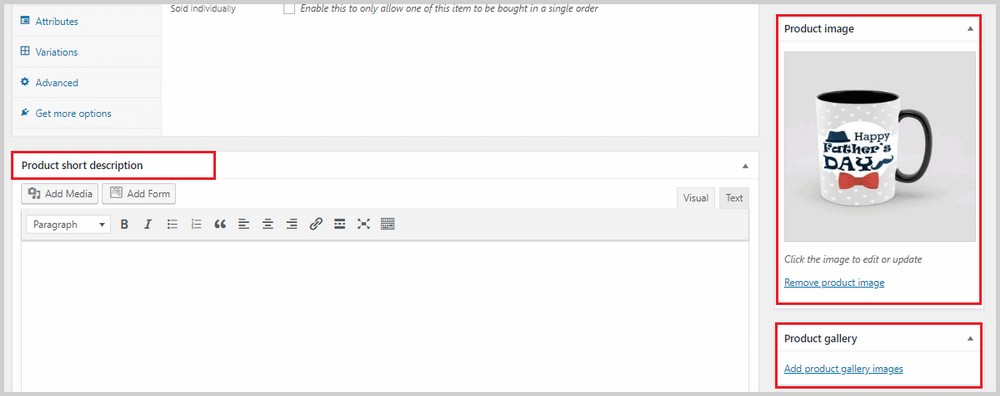
If you scroll down the Product data box, you’ll see an area where you can add a short product description. This description is going to appear beside your product and near the price. Keep it short and sweet. You can add a product image on the right side. If you have more product images, you can add those in the Product gallery section.
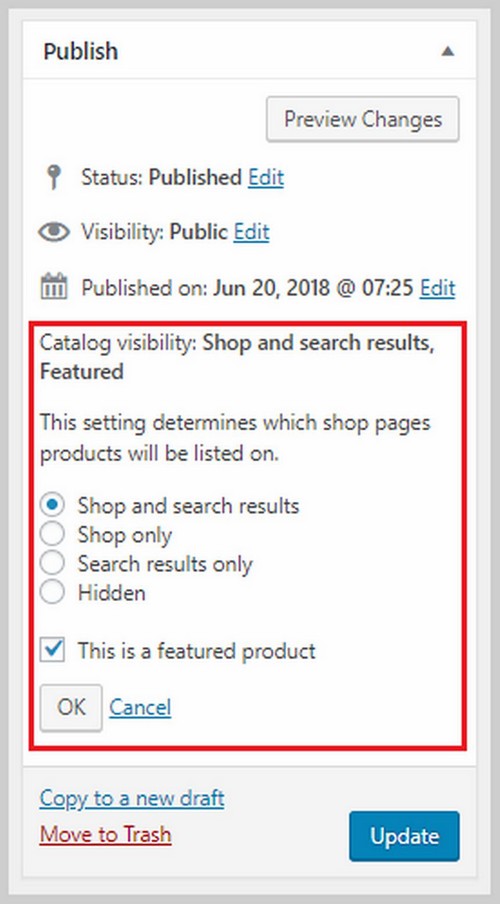
It’s also important to set the Catalog visibility, which can be found at the top part of the page under Publish. In some instances, you might want to hide certain products because maybe you’re offering them as a cross-sell with an exclusive discounted price. This is where you can do that.
Once you’re done with everything here, click Update to save all your changes.
If you want to learn more about the different product types and how you can properly create them, this WooCommerce guide is a great place to start. Keep adding more products to your website with the exact same steps I showed you here until you build up your product listings.
Conclusion: Create Ecommerce Website on WordPress
Creating an Ecommerce website with WordPress may seem complicated and overwhelming, but I hope I shed a light on it and show how you can do it all by yourself with a little help.
In this blog, I showed you how to start an Ecommerce website with WordPress, how to install the best theme, and how to customize your pages for the best user experience.
Sure, there’s a lot more to learn and implement. But this is how you get started with your first or next Ecommerce venture.
I’m excited to hear of your success stories, and if you need any help, you can reach out to me in the comments section below.