How to Install WordPress on Contabo VPS Hosting
Contabo, based in Germany, specializes in offering web hosting and dedicated server solutions. They have a significant setup with 5,000 servers in two data centers located in Munich and Nuremberg. If you’ve read my detailed Contabo review and are thinking about using their services, this blog post will guide you on how to install WordPress on Contabo VPS and connect it to your domain.
Ready to begin? Let’s get started!
In this guide, I will cover the following:
Table of Contents
- Why do you need to install WordPress on Contabo VPS?
- Get a Domain Name.
- Get a VPS Server.
- Map Server IP to Domain.
- Create a MySQL Database For Your Application.
- Uploading Files to the Server using WinSCP.
- Installing PHP Modules.
- Configure Apache to Install WordPress Website
- Managing MySQL on VPS Databases.
- Setup cronjobs.
- Secure with a Free SSLp
Why do you need to install WordPress on Contabo VPS?
Contabo VPS (Virtual Private Server) hosting is preferable to shared hosting for several reasons.
Because Contabo VPS provides better performance, customization, security, reliability, scalability, and root access. With dedicated resources and the ability to configure your server environment, VPS ensures consistent performance, improved security, and greater control.
While it may be more expensive than shared hosting, the benefits make it a better choice for websites and applications that require enhanced capabilities and reliability.
1. Get a Domain Name To Install WordPress on Contabo.
Acquiring a domain is as easy as grabbing your favorite treat. To get your own domain, you can visit a domain registrar company such as GoDaddy, InMotion, Domain.com, or Namecheap. You can even find a domain for as low as $1 per year.
I suggest choosing a domain name that matches your business. If you already have one, feel free to skip this step and proceed to get a Contabo VPS server.
Check out below my short video to learn how to purchase a domain name from Namecheap.
2. Get a VPS Server.
Now, Let’s get our VPS server to set WordPress on it.
What is a VPS Server?
When you want to publish a Website, we do what we call “web hosting” which simply means uploading the files and database into a public server, so it can be accessible Online over the internet.
Hosting Options.
Now, if you’re looking to host a web application, particularly WordPress in this case, you primarily have two choices:
Shared Hosting:
Shared Hosting means publishing your website on hosting services like InMotion, Godaddy, and Hostinger where your website will be shared with hundreds of other websites on the same server.
VPS Hosting
In VPS hosting, you host your website on your own server like Cloudways, Contabo or Digital Ocean, so you will have a server only for you! Which is called a VPS or a Virtual Private Server.
Which one is better Shared or VPS hosting?
I won’t dive deep into technical details right now, but here’s the deal: VPS (Virtual Private Server) is a better choice. With a VPS, you get your very own server, more control, and improved performance.
And if you’re thinking shared hosting is cheaper, you’re mistaken. With Contabo’s VPS services, you can start at just 3.99 € per month, which is almost the same price as 90% of shared hosting services.
The only potential downside is that it might require a bit more tech know-how to set up and configure. But don’t worry, this step-by-step guide is here to make things super easy for you!
What company should I use to install WordPress on VPS?
You have the freedom to choose any company for your VPS server. In this guide, I’ll recommend two companies, Contabo and Cloudways. I’ve personally used them for over 10 servers in my business, and they offer great features at affordable prices.
However, the choice is ultimately yours. You can also consider Hostinger, which offers competitive pricing compared to other providers. It’s important to pick the company that feels right for you.
Note: In this tutorial: I will be using Contabo
So Let’s see how we can get a VPS server from Contabo.
Get a VPS Server From Contabo.
1: Open Contabo Website.
Open your web browser and navigate to Contabo VPS Page.
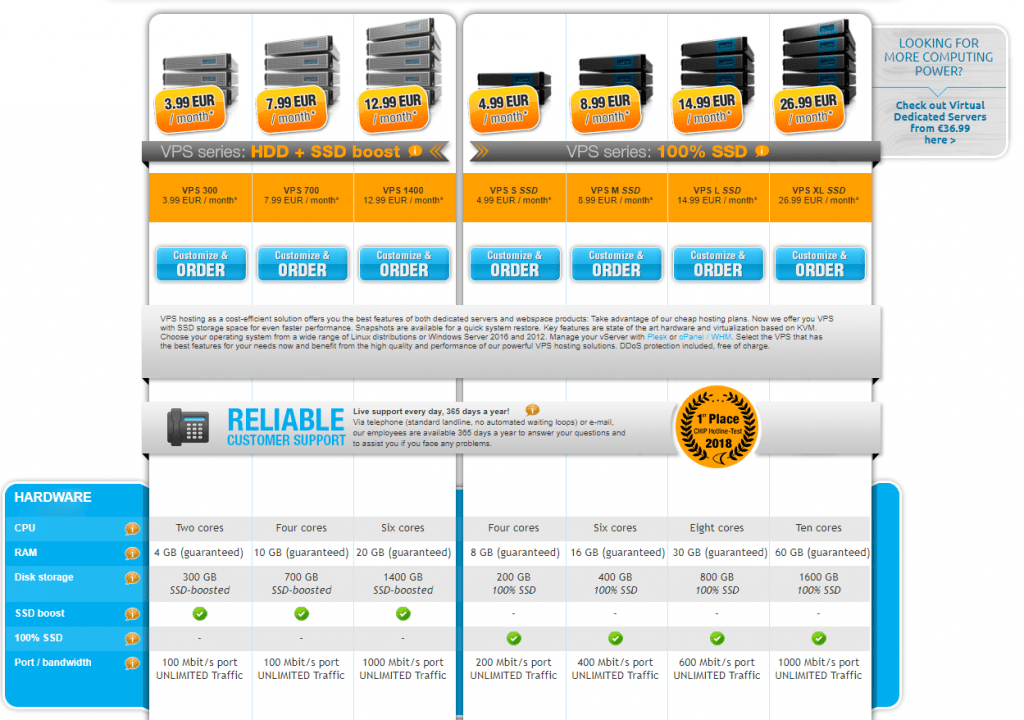
You’ll come across various VPS configurations to begin with. To set up WordPress, you can begin with the most budget-friendly option, and it will work just fine.
As your business expands, you can upgrade to a more robust VPS with greater resources.
2: Set VPS Options
On the Next Page, you will need to chooseselect some options
In the Operating System Option, Select Ubuntu 18.04
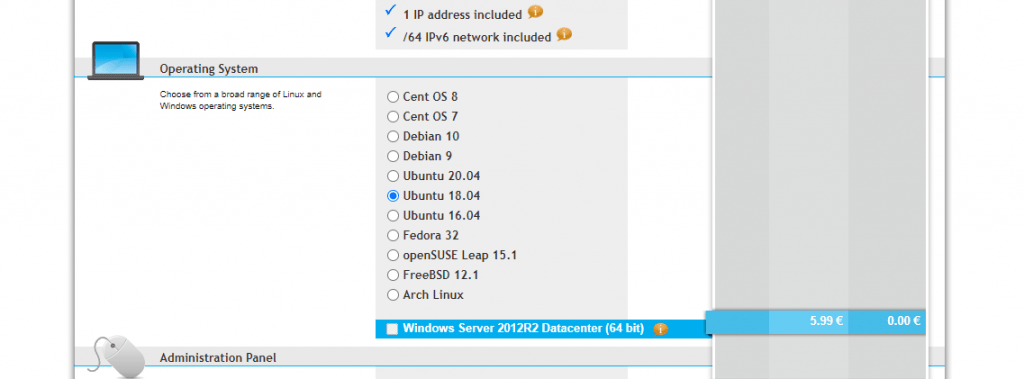
Then in the Administration Panel, Select LAMP

And last option, In the Addons, check “Individual reverse DNS”
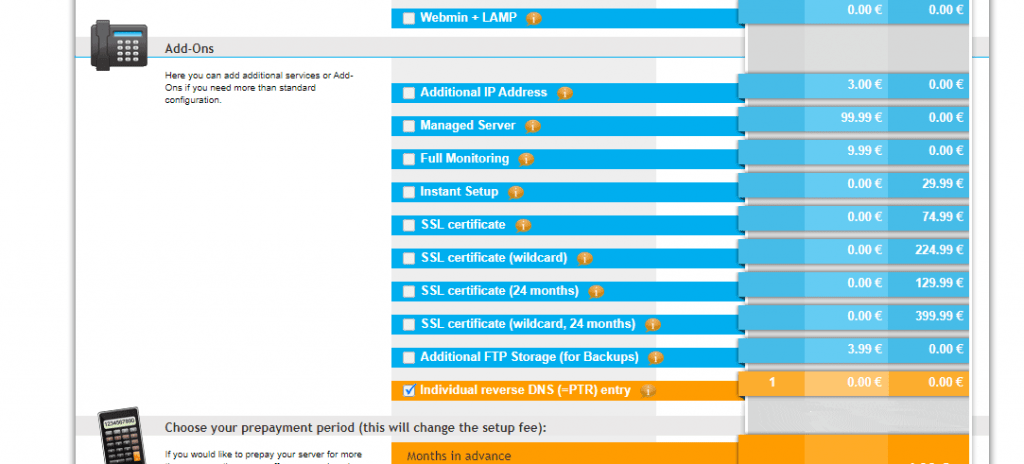
If you’ve been asked to input the PTR record, just enter your domain name, and that’s all you need to do.
Next, proceed to the billing page and confirm your order. I believe the remaining steps are straightforward and easy to follow.
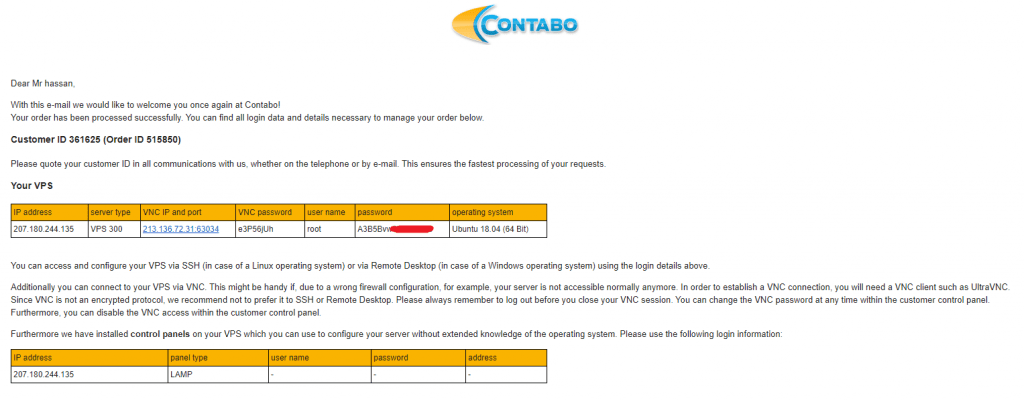
In about 24 hours, the Contabo team will set up the server and send you the details via email, like this:
For Digital Ocean.
If you want to choose Digital Ocean, simply Sign up through the coupon link below to get free 100$ to test everything free for one month.
And after you signup on Digital Ocean, just create a Droplet with the following specifications:
- Ubuntu 16/18/20 x64 as your operating system.
- You can start with 1 CPU/ 1 GB RAM (You can resize later).
Great! You Got Your Server.
3. Map Domain Name to your VPS Server.
Now, your VPS Server is accessible using the IP address Contabo’s team sent you via email. However, we don’t want to visit our WordPress site using just an IP address; we want to use our domain name.
To make this happen, we’ll link the domain name to our VPS IP. This way, you can access your VPS and WordPress site using both the domain and the IP.
To configure your DNS Records and make your wordpress website visible, follow these simple steps:
1. Open your Domain Provider’s DNS management zone (e.g., Namecheap in my case).
2. Edit the primary A record as shown below:

Done? Greate!
4. Start Installing WordPress on Contabo VPS.
To install WordPress on VPS, the Majority of scripts/websites will require a MySQL Database. So Let’s create one.
Connect to your VPS server using any SSH client like putty. and Let’s start!
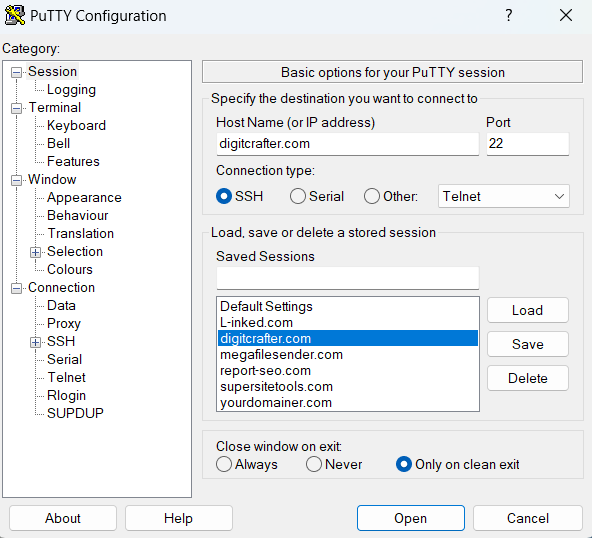
To get started, open Putty and type in the Server IP or Name. Then, click on “Open.”
You’ll be prompted to log in. Use “root” as the username and enter the password that was sent to you via email.
Quick tip: When you type the password, Putty won’t display it on the screen for security, but don’t worry, just type it as usual!
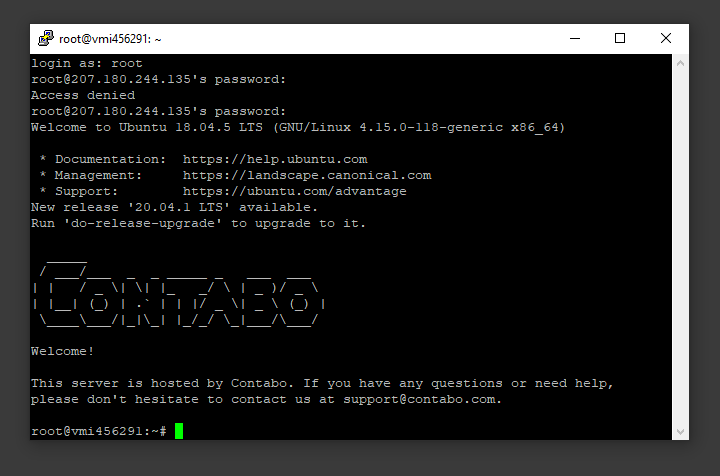
Creating a MySQL Database and User for WordPress
The good thing is, MySQL is already installed as a part of the LAMP Stack. However, we still need to make a database and set up a user for our application.
To begin, we’ll access the MySQL root (admin) account with this command:
mysql -u root -p
You’ll be asked for the root password; simply type or paste it and press Enter.
Now, let’s make a separate database for your PHP application. You can choose any name you like, but for simplicity in this guide, we’ll call it “TestDb”. Use this command to create the database:
CREATE DATABASE TestDb DEFAULT CHARACTER SET utf8 COLLATE utf8_unicode_ci;
Note: Every MySQL statement must end in a semi-colon (;)
Now, we’ll make a special MySQL user account that we’ll only use for our new database. It’s a smart move for better management and security. In this guide, we’ll call this user “DbUser”. But you’re welcome to pick a different name if you prefer.
We’re going to create this account, establish a password, and give it permission to access the database we just made. You can achieve this by using the following command. Be sure to select a robust password for your database user:
CREATE USER 'DbUser'@'localhost' IDENTIFIED BY 'enter_a_custom_password_here';
GRANT ALL ON TestDb.* TO 'DbUser'@'localhost';You’ve successfully created a database and a user account, both designed for your PHP application. To ensure that MySQL is aware of the recent changes we’ve made, we need to “flush the privileges.”
FLUSH PRIVILEGES;Exit out of MySQL by typing:
EXIT;Done!
Adding More PHP Extensions
WordPress and many of its plugins rely on extra PHP extensions. To use them with WordPress, you can download and install some of the most commonly used PHP extensions.
Start by running these commands:
sudo apt update
Then:
sudo apt install php-curl php-gd php-mbstring php-xml php-xmlrpc php-soap php-intl php-zip In the next section, we’ll restart the Apache web service to enable these new extensions. If you’re returning to install more plugins, you can restart Apache now with this command:
sudo systemctl restart apache2
Downloading WordPress
With our server software configured, it’s time to download and set up WordPress. For security reasons, it’s always a good idea to obtain the latest WordPress version from their website.
First, change your current directory to /html with this command:
cd /var/www/html
Now, let’s download the WordPress files:
curl -O https://wordpress.org/latest.tar.gz
To set up WordPress, extract the compressed file:
tar xzvf latest.tar.gz
Now that WordPress is downloaded, our server is configured. We’re ready to connect the pieces.
As there are a few small tasks to complete, I’ve prepared a brief video to guide you. Don’t worry; all the commands used in the video are also included in this guide, so you can easily follow along!
5. Configure Apache to Install WordPress
Well Done, Now WordPress is installed, we just need to configure apache so we can access our website using our domain name. To do so, open WinSCP (mentioned in the video) again and navigate to this directory: /etc/apache2/sites-available/
Now, create a new empty file and name it “domain.conf” (Change “domain” to your domain)
Open domain.conf Then copy and paste the content below into the file and save.
<VirtualHost *:80>
     ServerAdmin admin@domain
     DocumentRoot /var/www/html/
     ServerName domain
     ServerAlias domain
     <Directory /var/www/html/>
        Options +FollowSymlinks
        AllowOverride All
        Require all granted
     </Directory>
     ErrorLog ${APACHE_LOG_DIR}/error.log
     CustomLog ${APACHE_LOG_DIR}/access.log combined
</VirtualHost>
IMPORTANT: replace “domain” with your domain
Activate Apache Configuration and Restart the Service
To complete the setup, follow these straightforward commands:
- Enable the configuration in Apache:
sudo a2ensite domain.conf
- Enable the rewrite module:
sudo a2enmod rewrite
- Restart the Apache service:
sudo systemctl restart apache2.service
GREAT! You’re nearly there! 👏
6. Setting Up Your WordPress Directory
Before you can open WordPress in your web browser and complete the installation, there are a few things to adjust in your WordPress directory.
Configuring Ownership and Permissions
A crucial task is to establish appropriate file permissions and ownership. Here’s what we need to do:
First, we’ll grant ownership of all the files to the “www-data” user and group. This user represents the Apache web server, which needs the ability to read and write WordPress files to serve your website and carry out automatic updates.
Adjust Ownership with chown:
Update the ownership with chown:
sudo chown -R www-data:www-data /var/www/htmlNext we will run two find commands to set the correct permissions on the WordPress directories and files:
sudo find /var/www/html/ -type d -exec chmod 750 {} ;
sudo find /var/www/html/ -type f -exec chmod 640 {} ;
Configuring the WordPress Setup File
Next, let’s make adjustments to the primary WordPress configuration file (known as “wp-config,” as mentioned in the video).
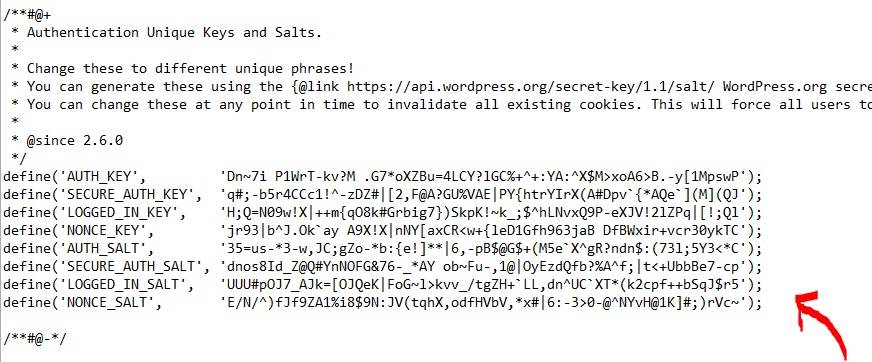
When we open this file, our first task is to modify certain secret keys to enhance the security of our installation. WordPress offers a secure key generator to generate these values, eliminating the need to create complex, secure values on your own. These keys are used internally, so having strong and secure values won’t impact usability.
To obtain these secure values from the WordPress secret key generator, follow these steps in Putty:
curl -s https://api.wordpress.org/secret-key/1.1/salt/You will get back unique values that look something like this:
Outputdefine('AUTH_KEY',         '1jl/vqfs<XhdXoAPz9 DO NOT COPY THESE VALUES c_j{iwqD^<+c9.k<J@4H');
define('SECURE_AUTH_KEY',  'E2N-h2]Dcvp+aS/p7X DO NOT COPY THESE VALUES {Ka(f;rv?Pxf})CgLi-3');
define('LOGGED_IN_KEY',    'W(50,{W^,OPB%PB<JF DO NOT COPY THESE VALUES 2;y&,2m%3]R6DUth[;88');
define('NONCE_KEY',        'll,4UC)7ua+8<!4VM+ DO NOT COPY THESE VALUES #`DXF+[$atzM7 o^-C7g');
define('AUTH_SALT',        'koMrurzOA+|L_lG}kf DO NOT COPY THESE VALUES  07VC*Lj*lD&?3w!BT#-');
define('SECURE_AUTH_SALT', 'p32*p,]z%LZ+pAu:VY DO NOT COPY THESE VALUES C-?y+K0DK_+F|0h{!_xY');
define('LOGGED_IN_SALT',   'i^/G2W7!-1H2OQ+t$3 DO NOT COPY THESE VALUES t6**bRVFSD[Hi])-qS`|');
define('NONCE_SALT',       'Q6]U:K?j4L%Z]}h^q7 DO NOT COPY THESE VALUES 1% ^qUswWgn+6&xqHN&%');
These lines contain configurations that we can simply paste into our configuration file to set secure keys. Please copy the output you’ve received.
Then, using WinSCP, open the WordPress configuration file and replace the lines as shown in the image below:
7. (Final Step) – Finishing the Installation via the Web Interface
Now that the server configuration is all set, we can finish the installation using the web interface.
Open your web browser and go to your server’s domain name or public IP address:
http://server_domain
Select your preferred language:
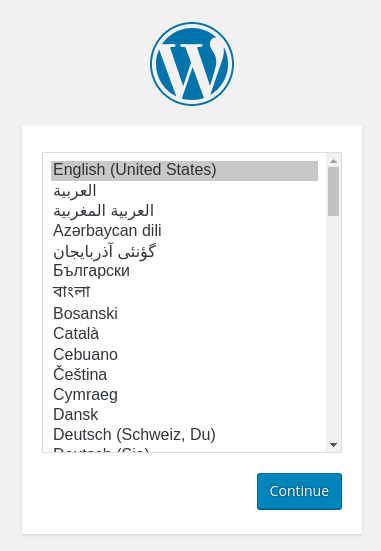
Awesome! WordPress is now installed and ready on your Contabo VPS!
If you have any questions, please don’t hesitate to ask in the comments section.
Affiliate Disclosure:
This blog may contain affiliate links. If you click on an affiliate link and make a purchase, I may earn a commission. This does not affect the price you pay. I only recommend products and services I tested and believe will benefit my readers.
