
How to Build a WordPress Website From Scratch in 10 Minutes
Want to build your first WordPress website but short on time to learn how?
In this article, I’ll guide you on creating your own website in just 10 minutes. You’ll have a website that impresses.
I’m sharing simple, easy-to-follow tips for making a website that does everything you want.
I’ll walk you through the whole process, from picking a web host to adjusting your contact form settings.
Can you believe it will take only about 10 minutes? Imagine that! In no time, you’ll have your own impressive WordPress website ready to wow your audience!
Table of Contents
- How to Make a Website – The Simple 8 Step Process
- Step 1 – Get the Right Hosting
- Step 2 – Install WordPress
- Step 3 – Installing an SSL Certificate
- Step 4 – Log Into Your WordPress Website
- Step 5 – Install a WordPress Theme
- Step 6 – Pick a Starter Site to Import
- Step 7 – Edit Your WordPress Web Pages With Elementor
- Step 8 – Set up the Contact Form
- Final Thoughts
I’m going to share the basics to make an easy website fast in the following steps:
- Step 1 – Get hosting services
- Step 2 – Install and set up WordPress
- Step 3 – Add an SSL certificate
- Step 4 – Log into Your WordPress website
- Step 5 – Install a WordPress theme
- Step 6 – Pick the starter site to import
- Step 7 – Use the customizer and Elementor
- Step 8 – Set up an email for the contact form
In this article, I want to help you create your website, allowing you to have complete control over every detail.
Now, let’s begin!
First, have a look at this website. It’s really well-made, right?
Pay attention to how the page looks and feels. Its design is ideal for any kind of business or professional website.

This is the optional portfolio page. Here, you have the opportunity to showcase images or any content related to your previous business or professional projects.

This is the About page. Notice the big “hero” image.
If you can put a photo of your team right there, that would be cool. Perhaps a shot with the office or company logo behind the people?

And still on the About page, here’s where we usually put the people on your team. It talks about the individual members of the company.

Then it’s the Contact page. It’s where your audience learns about your contact information.
You’re going to need to put your address, contact number and email here and perhaps your social media links too.
You might also want to add a map and driving directions on your Contact page. It’s entirely up to you.

Still, in the Contact page, there’s a form to fill out should your customers want to get in touch with you.

In the navigation area, shown on the top right part of the screen here, you may also want to display your phone number.
This allows people to easily see and hopefully, it when they’re visiting your website.

Now here’s the great news. All this can be easily done and edited in less time than you might think.
You just go to the editor, highlight the text you want to change, and it’s done!

Same goes with your images. Just click on the image to change it.

You can also rearrange items. Just drag and drop it to where you want it.

Now let’s get on with our tutorial.
If you want to build your first website, you’ll need a hosting account.
Step 1 – Get the Right Hosting
The first thing you’ll need for your website is a hosting account. A hosting is sort of like a space that you rent out on the internet.
Go to DigitCrafter and choose a web hosting company. We’ll go with the Beginner Hosting option in this list.

For this tutorial, we’ll use InMotion Hosting. Go to their page and select Web Hosting.

You’ll have 4 plans to choose from. We typically go for the best value because it includes unlimited websites.

You’ll be led to another page where you’ll need to enter your domain name.

InMotion Hosting will then check if your domain name is available.
If it’s available, the next page you’ll see will have “Congratulations” in it.
Now just proceed with filling out the required information.
Step 2 – Install WordPress

Step 3 – Installing an SSL Certificate
The security certificate is already included in your InMotion hosting account.
To install, follow these steps
- Login to your Account Management Panel (AMP).
- Click on the icon for Manage Free Basic SSL.
- If the switch under Enable Free SSL is in the OFF position, click it so that it moves to the ON position.
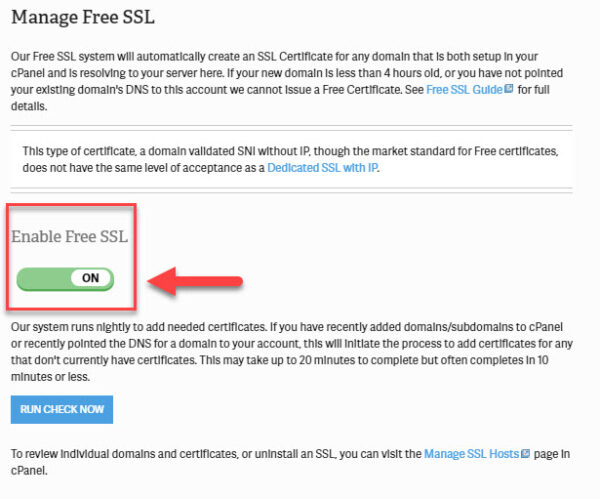
- Go ahead and click the blue Run Check Now to automatically add SSLs to any valid cPanel account.
Step 4 – Log Into Your WordPress Website
Now let’s go back to My Accounts and click on “Go to Admin Panel.”
This will open up your website login form. Use the login information you created to access your WordPress website.

Once you’ve logged in, your WordPress website is officially live.
To use that security certificate you installed, go to Settings > General.

Look at your URL at the WordPress Address and Site Address fields. This one’s just a slight modification.
Simply slip an S so it will say HTTPS. Do that in the 2 fields: WordPress Address (URL) and Site Address (URL).

Save the changes and you’re good.
WordPress will prompt you to log in again.
But notice a slight change here. Your URL has an HTTPS now. Google kinda requires it nowadays.
So what does that mean?
All traffic to your website will be encrypted. It’s also going to help with your website’s SEO.
Step 5 – Install a WordPress Theme
Next step is to install a WordPress theme. Let’s go to Appearance > Themes.

Click Add New.

Let’s go for the Popular Themes for this tutorial.

Next, hover your pointer over Astra and click Install and then Activate.

Once the theme is activated, you’ll see Astra Options under the Appearance menu.

Step 6 – Pick a Starter Site to Import
Let’s import a starter site. Go to the options for Astra theme by clicking on Appearance > Astra Options.
Go ahead and click on “Install Importer Plugin.” Once that’s done, click on “Download Library.”

Then you’ll go to a new page. Click on Elementor. It’s your page builder, which will let you choose from a variety of website designs.
For this tutorial, we picked Modern Design Solutions.

Click on the template that you want to import and then go through the setup.
This setup will allow you to define your logo, brand colors, and fonts, and then take you to the installation.

Once done, the final step is to select all the elements that you want to import within this setup and then move ahead.
Let’s import everything.

You can go to the Astra website to get a full info of articles and tutorials on changing the look of your WordPress website.
Step 7 – Edit Your WordPress Web Pages With Elementor
Elementor is the name of the page-building tool that helps you create these beautiful designs.

Step 8 – Set up the Contact Form
Let’s set your email address to where all the new WPForm entries will be sent to.
Go to WPForms > All Forms. Now, click Edit for the form where the entries should be sent.

Then, click Settings > Notifications.

The Send To Email Address is where to put your email address. This page also lets you customize the format of the email, the subject lines and more.
So that’s pretty much it. A full WordPress website in just about 10 minutes.
Congratulations on making your new website!
Final Words
Now that you know the basics of creating a website, it’s time to start your own project.
Remember that you don’t need to be a coding expert to create a beautiful and functional website. Just follow the steps outlined here and you’ll be good to go in no time!
If you need help along the way, these pages can also help you to create a free blog, a business website or an Online Store
Finally, once your site is complete, make sure you promote it so people can find it. With little effort, you will have a website you can be proud of in no time!
How long does it take to create your first website? What tricks have you learned along the way to create a beautiful and functional website?
I would love to hear your thoughts in the comments section!


Thanks for sharing. I read many of your blog posts, cool, your blog is very good.
This is an invaluable resource for anyone interested in this subject.