5 Tips To Increase WordPress Website Speed, Security & SEO
I remember the first time I set up a WordPress website. I was excited, but I quickly ran into problems—slow load times, security vulnerabilities, and SEO struggles. No matter what I did, my site wasn’t performing as well as I wanted. It felt frustrating, and I wished someone had just told me the key settings to fix from day one.
Fast forward to today, and after years of testing, tweaking, and learning, I’ve discovered five essential WordPress settings that can drastically improve your website’s speed, security, and SEO—without installing extra plugins.
And trust me, once you make these changes, you’ll wonder why you didn’t do it sooner!
Why These WordPress Settings Matter
Before we dive in, let’s get one thing straight—WordPress is an incredibly powerful platform, but if you leave its default settings untouched, you might be setting yourself up for trouble.
By tweaking just a few settings, you can:
✅ Speed up your site—reducing load times and improving user experience.
✅ Enhance security—protecting your website from hackers and malware.
✅ Improve SEO rankings—helping your site appear higher in search results.
And the best part? You don’t need any fancy plugins or technical skills—just a few quick changes, and you’ll see instant improvements.
So, let’s get started!
1. Set the Correct Time Zone & Date Format in WordPress
One of the most overlooked WordPress settings is the time zone and date format—but trust me, it’s more important than you think!
Imagine setting an alarm on your phone, but you’ve accidentally selected the wrong city or time zone. Your alarm goes off at the wrong time, and your whole schedule gets messed up. Well, the same thing happens in WordPress when your time zone isn’t configured correctly!
If your WordPress time zone is incorrect, your scheduled posts may publish at the wrong time, which can hurt engagement, SEO, and even your email marketing campaigns.
How to Fix Your WordPress Time Zone & Date Format
Luckily, fixing this is super easy. Just follow these steps:
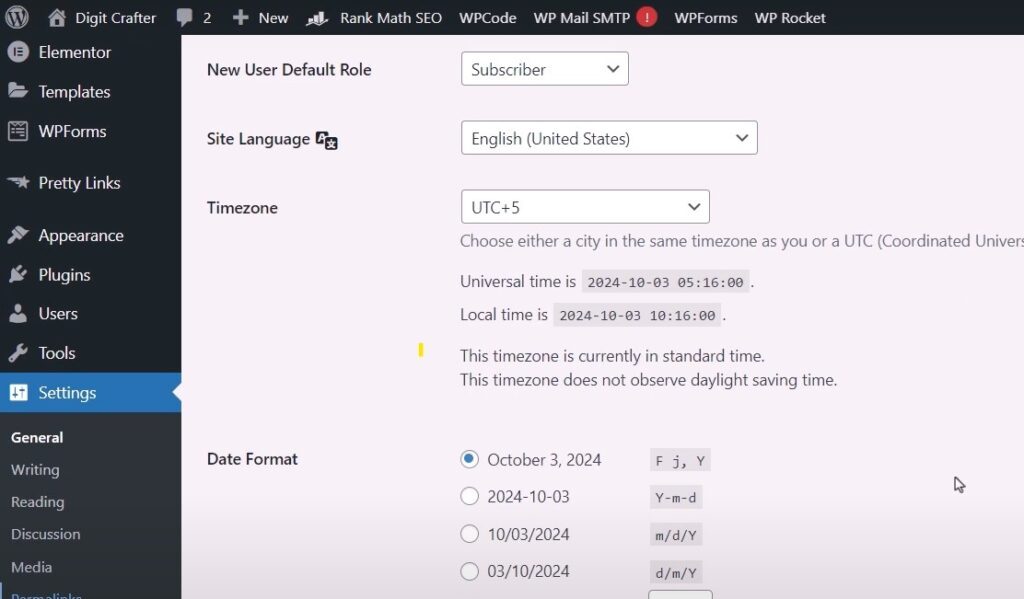
1️⃣ Go to your WordPress Dashboard
2️⃣ Navigate to “Settings” > “General”
3️⃣ Scroll down to the “Time Zone” section
4️⃣ Select your city or the correct UTC time zone from the dropdown list
5️⃣ Choose your preferred Date Format (optional, but useful for consistency)
6️⃣ Click “Save Changes”
✅ Why This Matters: Once your time zone is set correctly, your blog posts will go live exactly when you want them to. This ensures better audience engagement, improved SEO, and seamless post scheduling.
2. Configure a Clean & SEO-Friendly Permalink Structure
Your website’s permalink structure plays a huge role in how search engines and visitors interact with your content. If your URLs are messy and confusing, it can hurt your SEO and make your website harder to navigate.
So, what exactly are permalinks?
A permalink is the full URL of a webpage on your site. For example, if you open any blog post, the link in the address bar is its permalink.
By default, WordPress uses an ugly and unreadable permalink structure like this:
👉 https://yourwebsite.com/?p=123
Not only is this difficult for users to understand, but search engines struggle to index it properly, which can hurt your rankings.
How to Set Up Clean & SEO-Friendly Permalinks
To make your URLs short, clean, and easy to understand, follow these steps:
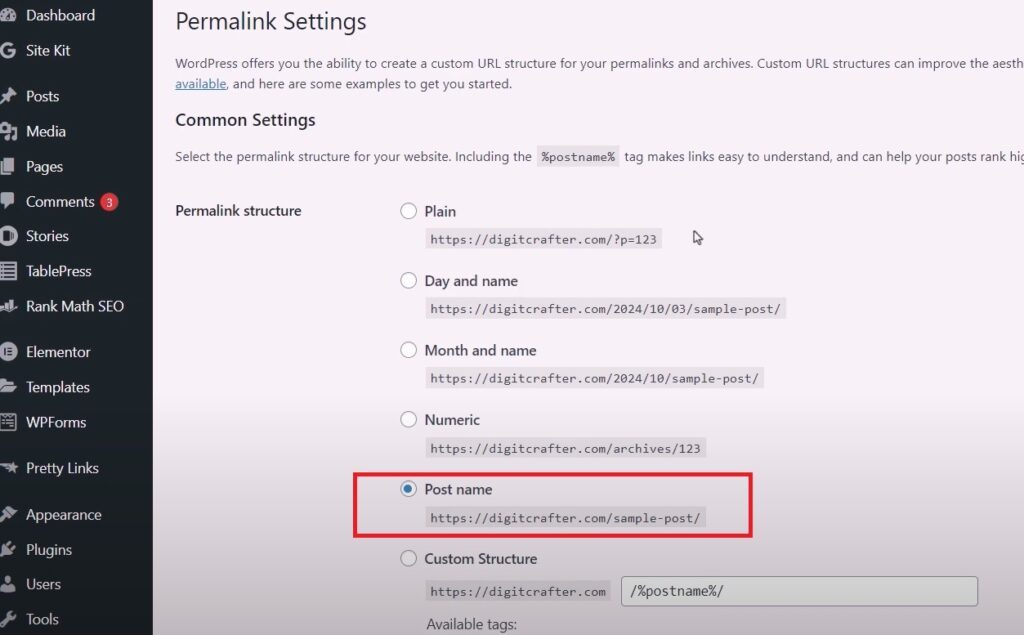
1️⃣ Go to WordPress Dashboard
2️⃣ Navigate to “Settings” > “Permalinks”
3️⃣ Under “Common Settings,” select “Post name”
4️⃣ Click “Save Changes”
✅ Why This Matters:
- Better SEO: Search engines like Google prioritize clear, keyword-rich URLs.
- Improved User Experience: Visitors can easily understand what your page is about.
- Higher Click-Through Rate (CTR): A readable URL increases the chances of people clicking on your link.
Customizing Your Post URL (Permalink Slug)
Even after setting your permalink structure, you should still customize individual post URLs to make them shorter and more targeted.
Here’s how to do it:
1️⃣ Go to “Posts” > “All Posts”
2️⃣ Find the post you want to edit and click “Quick Edit”
3️⃣ Look for the “Slug” section
4️⃣ Edit the slug to be short, relevant, and keyword-rich
5️⃣ Click “Update”
Example:
❌ Bad URL: https://yourwebsite.com/2024/03/07/how-to-make-money-online-with-wordpress-ai-and-digital-marketing-strategies
✅ Good URL: https://yourwebsite.com/make-money-wordpress-ai
Pro Tip: Avoid using stop words like “the,” “and,” “of,” in your URL. Keep it short, clean, and focused on your primary keyword.
By optimizing your permalink structure, you’re not only making your site look more professional, but you’re also boosting your chances of ranking higher in Google!
3. Optimize Media Settings to Improve Speed & Save Storage
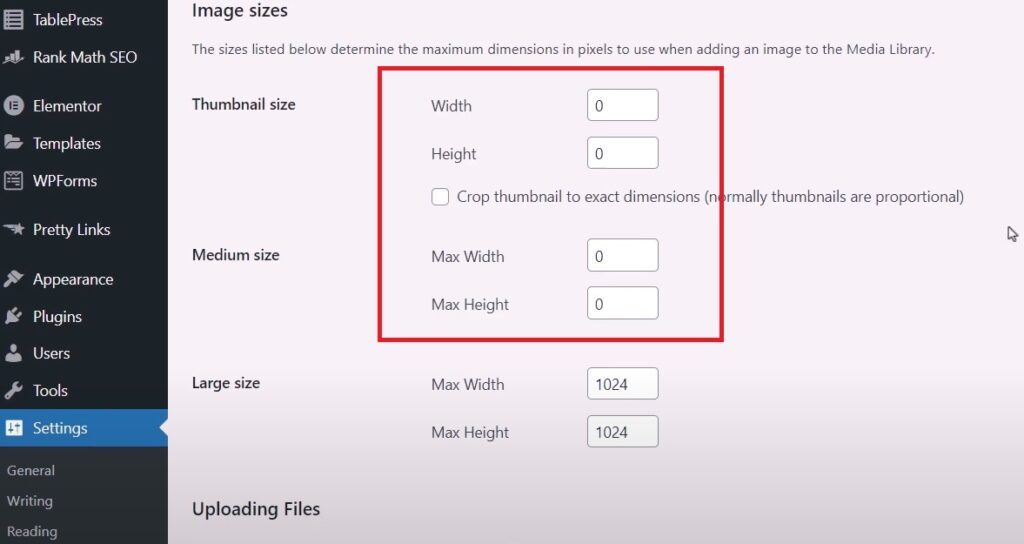
Images are an essential part of any website, but did you know that WordPress automatically creates multiple copies of every image you upload? While this might sound useful, it actually slows down your website and takes up unnecessary storage space on your hosting server.
By default, WordPress generates three additional image sizes:
- Thumbnail (150×150 pixels)
- Medium (max 600px width)
- Large (max 1024px width)
On top of that, themes and plugins may create even more image variations, leading to excessive storage usage and longer page load times.
To prevent WordPress from creating unnecessary image versions, follow these simple steps:
1️⃣ Go to WordPress Dashboard
2️⃣ Navigate to “Settings” > “Media”
3️⃣ Find the “Image sizes” section
4️⃣ Set “Thumbnail size,” “Medium size,” and “Large size” to 0 (or remove them if your theme allows)
5️⃣ Click “Save Changes”
✅ Why This Matters:
- Faster website loading times—fewer image versions mean less storage clutter.
- Saves disk space—reducing unnecessary storage usage on your hosting plan.
- Prevents database bloat—keeping your WordPress media library cleaner and more efficient.
Best Image Settings for Different Website Types
The ideal image size settings depend on the type of website you have:
✔ For Blogs:
- Keep only large images (1024px or higher) since blogs mainly use full-width images.
- Remove unnecessary smaller image sizes.
✔ For E-commerce Websites:
- Keep medium images (600-800px) for product thumbnails.
- Set a larger size for high-quality product images.
If you follow the exact steps, it will prevent WordPress from storing duplicate images, helping your website run faster and smoother
4. Secure Your Website from Spam by Configuring Discussion & Comment Settings
Comments can be a great way to engage with your audience, but if left unchecked, they can also become a spam magnet filled with suspicious links and harmful content. By default, WordPress allows anyone to leave comments, which opens the door to bots, spam, and even security risks.
Why Comment Spam is Dangerous
Spam comments aren’t just annoying—they can be harmful in multiple ways:
🚨 SEO Penalty – Google may penalize your website if it detects too many spammy outbound links.
🚨 Security Risk – Spam links often lead to phishing sites or malware downloads.
🚨 Poor User Experience – Too much spam makes your site look unprofessional and untrustworthy.
How to Stop Spam & Secure Your Comment Section
To keep your website clean and safe, follow these steps to adjust your comment settings:
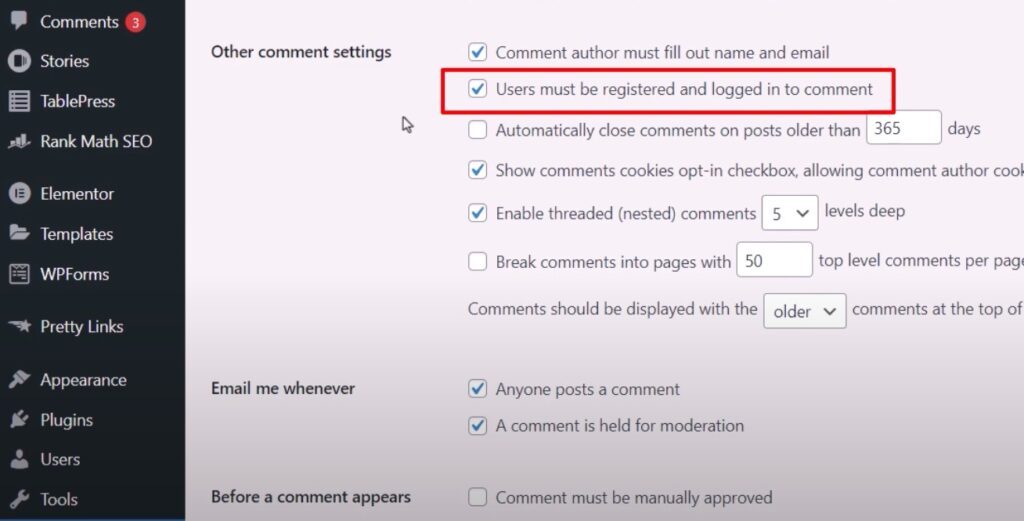
1️⃣ Go to “Settings” > “Discussion”
2️⃣ Find the “Other Comment Settings” section
3️⃣ Enable the option: “Users must be registered and logged in to comment.”
4️⃣ Scroll down to “Comment Moderation”
5️⃣ Add suspicious words (like ‘http’, ‘casino’, ‘free money’) to automatically hold comments for moderation.
6️⃣ Click “Save Changes”
✅ Why This Works:
- Prevents spam bots from flooding your comments
- Eliminates spam links that could harm your website’s SEO
- Ensures only real users engage in discussions
Bonus Tip: Use an Anti-Spam Plugin
Even with WordPress’ built-in settings, some spam can still slip through. To take extra precautions, install a free anti-spam plugin like:
- Akismet Anti-Spam (Automatically filters spammy comments)
- Antispam Bee (Blocks bot-generated comments)
Configure these settings and use an anti-spam plugin, in this way your website’s comment section will remain clean, professional, and safe for genuine users.
5. Optimize Your WordPress Reading Settings for Better User Experience & SEO
Your website’s homepage is the first thing visitors see—it sets the tone for your brand, content, and user experience. Configuring your Reading Settings properly ensures that your site displays content exactly how you want it.
How to Access Reading Settings
To adjust these settings:
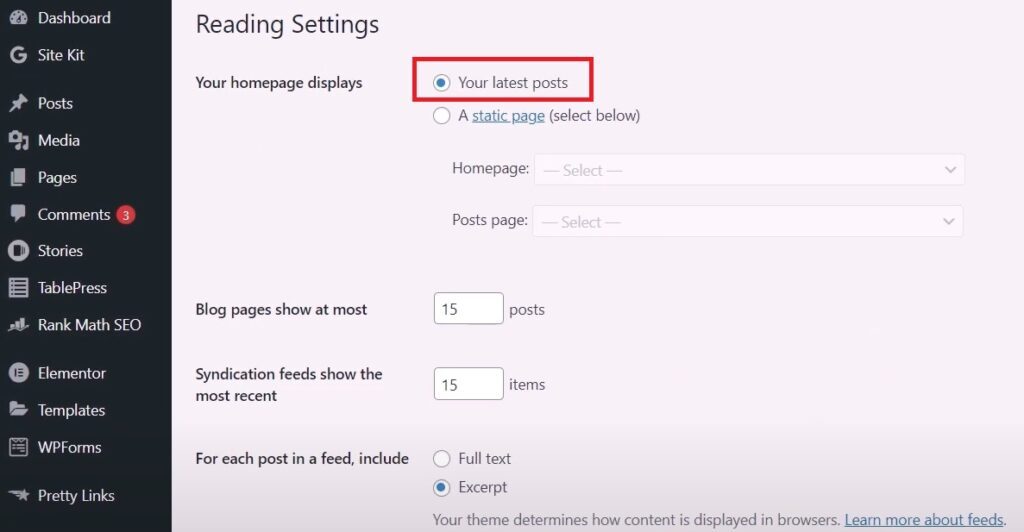
1️⃣ Go to “Settings” > “Reading” in your WordPress dashboard.
2️⃣ Decide whether you want your homepage to display your latest posts or a static page.
Option 1: Display Latest Blog Posts (Best for Blogs & News Websites)
If your website is primarily a blog, displaying your latest posts on the homepage keeps things fresh and dynamic.
📌 How to enable:
- In the “Reading” settings, select “Your Latest Posts.”
- WordPress will automatically update your homepage with newly published articles.
✅ Best for: Bloggers, news websites, and content-heavy platforms.
Option 2: Use a Static Homepage (Best for Business & Professional Websites)
If you’re running a business, portfolio, or service website, a static homepage provides a more professional look and gives visitors a clear introduction to your site.
📌 How to enable:
1️⃣ Select “A Static Page”
2️⃣ Choose a custom homepage from your list of published pages.
3️⃣ (Optional) Select a different Posts Page where your blog posts will appear.
✅ Best for: Business websites, landing pages, portfolios, and eCommerce stores.
SEO Warning: Uncheck “Discourage Search Engines from Indexing This Site”
MOST IMPORTANT: Scroll down and make sure the option “Discourage search engines from indexing this site” is unchecked!
Why?
- If this box is checked, Google and other search engines won’t index your site, and your website won’t appear in search results.
- This setting is sometimes enabled by default on new WordPress installations, so double-check it!
Final Thoughts: Choose the Best Reading Settings for Your Site
- If you’re a blogger: Show your latest posts on the homepage.
- If you run a business website: Use a static homepage for a more professional look.
- For SEO: NEVER check “Discourage search engines from indexing this site.”
✅ Now your WordPress homepage is optimized for better user experience and search rankings!
If you like this article, don’t forget to subscribe to my newsletter and add Digitcrafter to your daily reads.😊