Hey there! If you’re feeling good about your WordPress website but not so much about your hosting provider or domain, you might be thinking about migrating your site somewhere else without causing any hiccups. Don’t worry, you’re not alone in this!
Let’s talk about why people decide to switch their WordPress site to a different host or domain and how you can migrate WordPress site to new host or domain.
Table of Contents
Why Transfer WordPress Site To A New Host Or Domain?
When you decide to move your WordPress site to a new host or domain, there are usually two main reasons behind it. First, you might have bought a better domain name that carries more authority. Second, you might want to rebrand your site with a new name or web address. Alternatively, you might not be happy with your current hosting provider’s service, or you could have the budget to upgrade to a better one.
No matter your reason for wanting to learn how to move a WordPress site, it’s all about establishing a stronger online presence for your business in the long term. If you’re the one managing the site, all of this might seem overwhelming. But don’t worry—I’m here to guide you through the process of moving your WordPress site to a new host or domain, even if you’re not a developer. Let’s get started!
How to Migrate WordPress Site
Are you eager to learn how to move your WordPress site? Well, first things first – it’s essential to understand whether you’re changing your domain name or switching to a different web host altogether. No matter which one you’re doing, you can make your life easier by using a WordPress migration plugin.
Let’s talk about Duplicator, a fantastic free plugin that’s a must-have for WordPress migration. It’s free to use, does most of the heavy lifting for you, saves you time, and lowers the chance of making mistakes. With Duplicator, I’ll show you how to smoothly switch your domain without breaking a sweat.
This duplicator plugin is compatible with all shared hosting providers such as Namecheap, Hostinger, and Godaddy but if you are planning to migrate to your site to one of the top cloud hosting proivders or managed hosting providers such as Cloudways they provide their own migration plugin which is a lot more easier.
How to Migrate WordPress Site To New Domain
When you’re figuring out how to move your WordPress site to a new domain, your main aim is to make sure it doesn’t hurt your search engine ranking and traffic too much. Just a heads up: there might be a slight dip in both for a while. That’s because search engines and users need some time to get used to the new site address. But if you migrate the domain carefully and correctly, your website will eventually attract even more visitors than before. Here’s what you need to do.
1- Back Up Your Website Files
Before you do anything else to move your WordPress site to a new domain, make sure you do this first: back up your WordPress site. It’s super important because you’ll need to upload it to your new domain. Plus, if something goes wrong during the transfer, having a backup will prevent you from losing a lot of your data.
To sum it up, making a full backup means saving all your website files onto your computer. This includes a database (which holds all your website content and data) and static files (like your WordPress core and theme files). These files rely on each other to make your website work properly.
Luckily, there’s a plugin called Duplicator that can help you with this. Here’s how to use it.
To back up your files with your Duplicator plugin
Here are the simple steps to use the Duplicator plugin to back up your WordPress site:

Install and activate the Duplicator plugin: Go to your WordPress dashboard, then click on “Plugins” and choose “Add New.” Search for “Duplicator,” install it, and activate it.
Access Duplicator in your dashboard: Once activated, you’ll find a new option called “Duplicator” in your WordPress dashboard panel. Click on “Duplicator” and then select “Packages.”
Create a new backup: In the “Packages » All” screen, click on “Create New.”
Name your backup: Give your new backup a name, and then click “Next.”
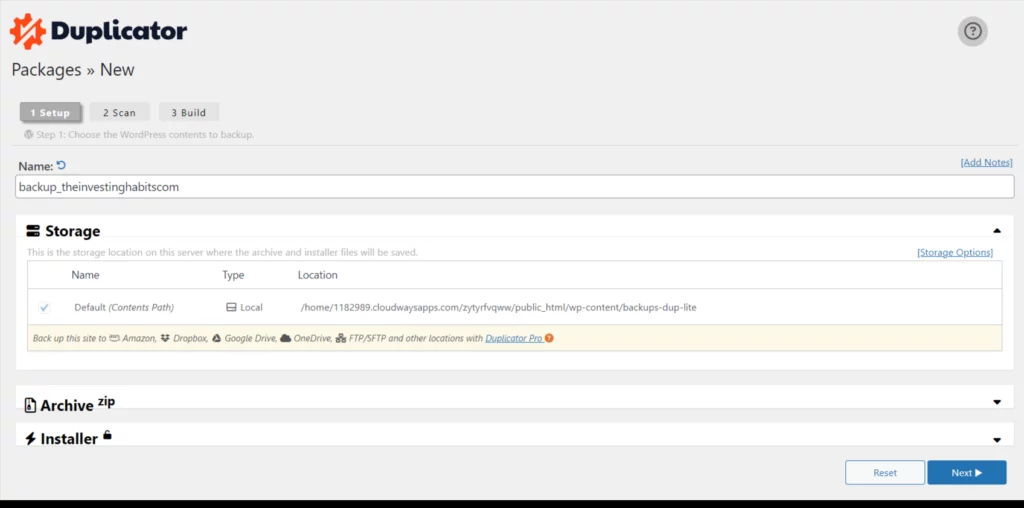
Build your backup: After Duplicator finishes scanning your site, click on “Build.” This might take a while depending on how big your site is.
Download your backup files: Once the backup file is ready, choose the “One-Click Download” option. This will download both your backup file and the “installer.php” file to your device. The “installer.php” file is what you’ll use to restore your backup to your new domain.
After downloading, make sure to keep your backup file safe. If anything goes wrong and you need to restore your site, you’ll have everything you need.
2- Create a Database for Your New Domain
We need to connect a database to your new website domain. This is where you’ll upload all the files for your WordPress site. If you’ve already set up a database for your new domain, you can skip this part.
The easiest way to create a database is by using cPanel, which is usually included with most hosting providers.
Here’s how to create a new database using cPanel:
1- Log in to your hosting account and find the cPanel main menu.
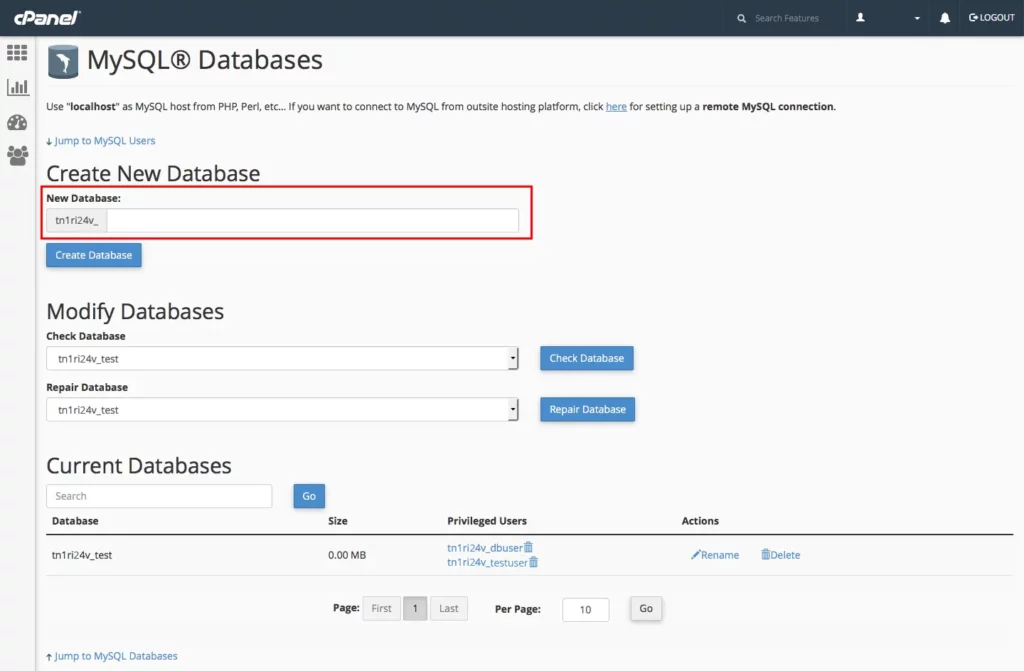
2- Look for “MySQL Databases” under the Databases section and click on it.
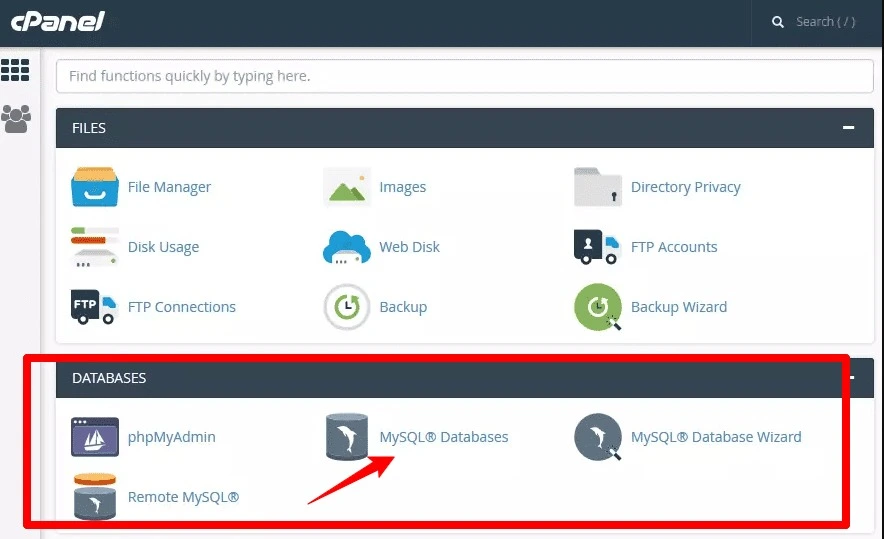
3- Next, you’ll see an option to “Create a New Database.” Give your database a name and hit the “Create Database” button. Remember this name for later.
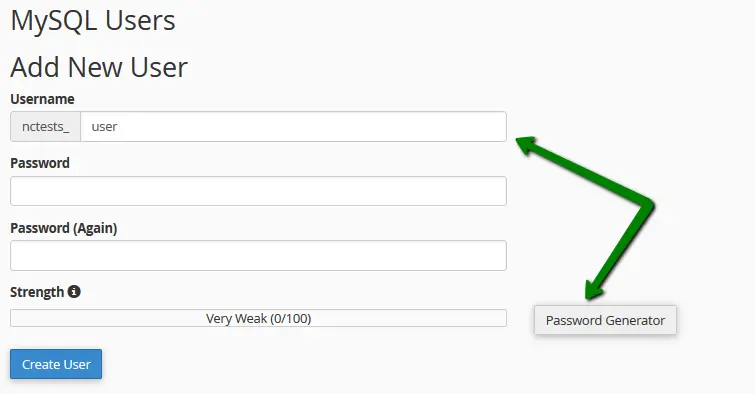
4- Now, you need to add yourself as a user to manage the database. Under “Add a New User,” enter a username and password, then click “Create a User.” Save these details somewhere safe.
5- Scroll down to “Add a User to a Database.” Select the user and the database you just created from the dropdown menus, then click “Add.”
6- You’ll be taken to a screen where you can manage user privileges. Check the box that says “ALL PRIVILEGES” to give yourself full access to the database, then click “Make Changes.”
That’s it! You’ve successfully set up a database for your website.
3- Upload Backup Files to the New Database
Time to move your WordPress website files to the new database. We’ll use cPanel and Duplicator for this step.
Here’s how to upload your files to the new database:
1- Go to File Manager under Files.
2- In the File Manager Directory Selection window, choose “Document root for” and pick your new domain from the dropdown menu. Click Go.
3- Click on Upload in the top toolbar to upload your website backup file and installer file.
4- Visit domain.com/installer.php (replace “domain.com” with your new domain). This will launch the Duplicator installation wizard. Click Next to proceed.
5- Enter the name of the database you made for the file upload, along with your username and password to access the database. Click Next.

6- Next, Duplicator will fill in the URL field with your new domain. Just click Next.
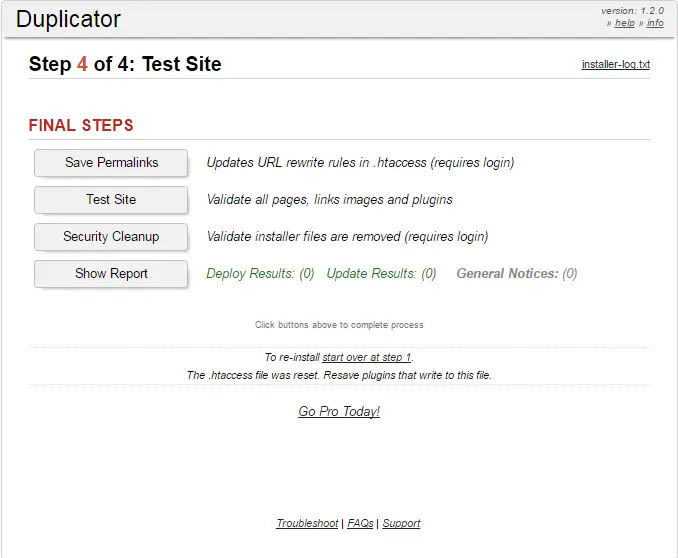
7- Lastly, click Save Permalinks on the final screen, then Test Site to check out your website in its new spot.
That’s it! Your files are now in the new database.
4- Redirect Your Old Site to Your New Site
Time to make sure your old website leads to your new one. If you don’t redirect your old domain, both visitors and search engines might get lost, harming your SEO.
Here’s the fix: Set up permanent 301 redirects from your old domain to your new one. This way, when someone types your old domain, they’ll end up on your new site.
To redirect your old WordPress site to your new one, you’ve got a couple of options. You can use a redirect plugin, which handles the technical stuff for you. Or, if you’re up for a bit of coding, you can do it manually.
Simply log into your old WordPress site, find the .htaccess file in your root directory, and add this code at the top:
#Options +FollowSymLinks

RewriteEngine on

RewriteRule ^(.*)$ http://www.newdomain.com/$1 [R=301,L]
Replace “newdomain.com” with your actual new domain. Then, save the file.
To check if your redirects work, type your old website URL into your browser. Everything from your old domain, including subdirectories and specific pages, should lead to your new domain. If not, reach out to your hosting support for assistance.
5. Declutter Your New WordPress Site
So, even though your new website might seem fine, there could be some small issues lingering after the domain switch. Let’s tackle them step by step.
First off, let’s hunt down and fix any broken links on your new site caused by the domain change.
Then, we need to update all internal links to point to your new domain. Otherwise, they’ll just lead back to your old site. I suggest using a plugin like Better Search Replace to quickly find and update these links.
Lastly, it’s time for a thorough check-up. Go through your entire site, page by page, plugin by plugin, and setting by setting. Make sure everything looks and works as it should. If you spot any missing images or media, you can either replace them manually or use your find-and-replace plugin to update all image links to your new domain.
6- Inform Your Visitors and Google About Your New Domain
Your website is now up and running on the new domain. Great job!
But before spreading the word to everyone, it’s essential to inform Google about this change. This helps your new site appear in Google search results.
You can do this through Google Search Console, a free tool that helps improve your website’s visibility in search results. Check out Google’s guide on using the Change of Address tool to make sure your new domain is properly set up.
And don’t forget about your visitors! While 301 redirects will guide them to the right place, it’s a good idea to personally let them know about the domain change. You can do this through an email to subscribers, a message on your website’s front page, a blog post, or a social media update. Now, you’re all set to celebrate your new domain name!
How to Migrate a WordPress Site to a New Host
Moving from one host to another is a bit like changing your domain, but there are key differences. Here’s how to switch hosting providers for your WordPress site:
1- Find a New Hosting Provider
Look for a new hosting provider that fits your needs better. You can check out our list of top WordPress hosting providers for guidance.
Some hosts offer free migration help, which can save you a lot of hassle. Keep an eye out for this when comparing options.
2- Backup WordPress Files
To move your WordPress site to a new host, first, download your site files. This way, you can upload them to your new host. If something goes wrong, you can reinstall your backup using the Duplicator plugin.
Install Duplicator Plugin: Go to your WordPress dashboard, choose Plugins > Add New, and search for “Duplicator.” Install and activate it.
Create a Backup: Once activated, go to Duplicator > Packages. Click on “Create New” and give your backup a name. Follow the prompts to start the backup process. This may take some time depending on your site’s size.
Download Backup Files: Once the backup is complete, click “Build.” When done, select the “One-Click Download” option. This will save your backup files, including installer.php, to your device.
Store Backup Safely: Keep a copy of your backup files in a safe place for the rest of the migration process. This ensures you have a fallback in case anything goes wrong.
3- Move Your Website Files to the New Host
In this step, you have two choices. If your hosting provider offers migration assistance, follow their guidance and proceed to the next step.
If your host doesn’t provide this service, you’ll need to create a database on your new hosting server to accommodate your WordPress files. This can be done conveniently using cPanel, which is commonly available with major hosting providers. Afterward, let Duplicator take care of the rest of the transfer for you.
To Transfer Your Website Files To Your New Host Server, Follow These Steps:
1- Log in to your hosting account and find the cPanel main menu.
2- Navigate to “MySQL Databases” under the “Databases” section.
3- Create a new database by entering a name and clicking “Create Database.” Remember this name.
4- Add yourself as a user by providing a username and password. Click “Create a User” and save these credentials.
5- Associate the user with the database by selecting them both and clicking “Add.”
6- Grant full access to the database by checking the “ALL PRIVILEGES” box and clicking “Make Changes.”
7- Upload your WordPress backup files to your root directory in cPanel.
8- Visit “domain.com/installer.php” in your web browser, replacing “domain.com” with your domain name. This launches the Duplicator installation wizard.
9- Enter your database name, username, password, and leave the host as “localhost.”
10- Click “Test Connection” to confirm everything works smoothly. If successful, you’ll receive a confirmation message.

11- Click “Run Deployment”
12- The next page will display your old and new URLs, which should match if you’re retaining your old domain. Click on “Run Update.”
13- On the last page, you can follow the testing suggestions if you wish.
4- Point Your Domain to Your New Host
Alright, so you’ve got your website set up on a new host, which is great! Now, we need to make sure your domain name points to the right place, so people can find your new site. If you don’t do this, your old website might still be the one people see when they visit your URL.
Your host will give you some nameservers. These are like signposts that tell your domain where to find your website. Most hosts will make these nameservers easy to find in your account.
Once you have your nameservers, you’ll need to log in to your domain registrar. That’s the place where you bought your domain name. There, you’ll replace the old nameservers with the new ones your host gave you.
Now, here’s the tricky part: it might take a little while for everything to update. It could be anywhere from a few hours to a couple of days before your domain points to your new site for everyone. Just be patient, and soon your new website will be ready for visitors!
5- Thoroughly Check Your New Site
Let’s make sure everything looks good on your new website! Don’t worry, visitors won’t see any changes because we’re just moving where the website lives, not the content itself. Plus, if everything goes smoothly, your site won’t be down at all during the switch.
Still, it’s a good idea to double-check all your pages to make sure everything made it over okay. If anything’s missing, you can replace it using the backup you made. This way, your website will be in tip-top shape for your visitors!
Final Words
Now that you’ve finished moving my website, you can focus on growing it in its new home. It only took me an hour or two and a helpful plugin to get everything set up.
You might even think about creating a WordPress staging site now that you’ve become a pro at migrating sites. A staging site is like a secret version of my website that you can use to try out new things without anyone seeing. And when you’re ready, moving those changes to your main website will be super easy.
Disclosure: This blog article contains affiliate links, and if you make a purchase through these links, I may earn a commission at no additional cost to you. Your support through these links helps sustain and improve the content on this platform.