
Install WordPress on VPS Server: Load Site Under 1 Second
Are you ready to delve into the technical aspects of this tutorial? Don’t worry, I’ve broken down complex concepts into simple steps for you to understand that How to Install WordPress on VPS using fastest servers offered by Cloudways.

Here’s a quick overview of what you’ll be learning:
1. Choosing the Right Cloudways Plan
2. Setting Up Your WordPress Site
3. Making the Most of the Kadence Theme
4. Getting Your Domain Name & Email Hosting
5. Optimizing Your Cloudways Server for Best Performance
6. Setting Up a Content Delivery Network
But that’s not all! I’ll also show you how to get budget-friendly email hosting, secure your site with an SSL certificate, and much more.
After we’re done, we’ll even put your website to the test using GTmetrics to see how much faster and smoother it’s running.
Table of Contents
- Why Choose Cloudways?
- The Cloudways Free Three-Day Trial Challenge
- Cloudways Full Setup: Step-by-Step Guide
- Choosing the Perfect Cloudways Plan
- Setting Up Your WordPress Site
- Utilizing the Kadence Theme
- Connecting Your Domain and Email to Your Website
- Optimizing Your Cloudways Server for Best Performance
- Setting up a Content Delivery Network
- Checking Your Website Speed with GTmetrix
Why Choose Cloudways?
I’ve been using Cloudways for my various sites for more than four years now, and I must say, it’s an exceptional hosting service for websites. It’s akin to gaining access to a potent engine for your website.
Differing from shared hosting, where site speed can suffer due to resource sharing, Cloudways enables you to harness the complete potential of hosting services such as Vultr High Frequency, DigitalOcean, and Linode.
And the most appealing aspect? You don’t require extensive technical expertise or substantial expenses on IT support. Cloudways’ user-friendly control panel streamlines the process, making it straightforward and efficient. Alongside features like site cloning, one-click site staging, and WordPress-centric backups, it stands as an excellent choice for newcomers and seasoned users alike.
For those seeking optimal performance without straining their budget, Cloudways is the path to follow. It presents a superb alternative to pricier hosting choices like WPEngine and Kinsta.
If you want to “Install WordPress on VPS,” Cloudways is a fantastic solution for your hosting needs.
The Cloudways Free Three-Day Trial Challenge
Some time ago, I presented a challenge to my YouTube channel, DigitCrafter’s, followers. I invited them to explore Cloudways by joining the free three-day trial and transferring their slowest website.
The outcomes were remarkable. One user exclaimed, Update: Holy freaking cow. I loaded my slowest site just like you guided me. GTmetrics loaded it at 10.5 seconds, the fully loaded time. But after uploading it to Digital Ocean through Cloudways, it’s loading in less than one second. OMG!
While your encounter may differ, a noticeable enhancement in performance is certain. Within this guide, I will lead you through the process of participating in this challenge and optimizing Cloudways to its maximum potential, including the steps to “Install WordPress on VPS.”
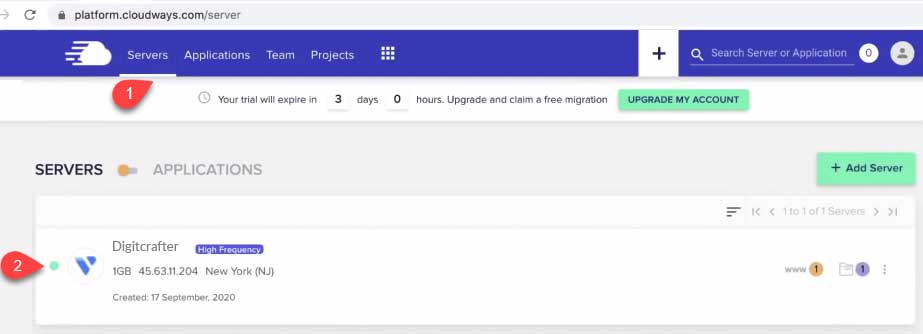
Remember, if you decide to make Cloudways your go-to service, just hit “Upgrade My Account.” Otherwise, everything will be wiped after three days.
This free trial is a risk-free opportunity to witness the prowess of Cloudways hosting. It won’t cost you much time, and in the end, you’ll be amazed at the difference it makes.https://www.youtube.com/watch?v=ecn_WYMjCyw
Cloudways Full Setup: Step-by-Step Guide
Step 1: Choosing the Perfect Cloudways Plan
The very first thing to do when you’re getting started with Cloudways is to select the right plan. If your website doesn’t have a lot of visitors, you can begin with an affordable plan.
For the best results, opt for the Vultr High Frequency plan. It’s their latest technology, and I’ll guide you through setting it up correctly.
To begin, go to their website using this link: https://digitcrafter.com/cloudways.
This is my referral link, and it ensures you get the most significant available discount. You won’t find a better deal anywhere else on the internet.
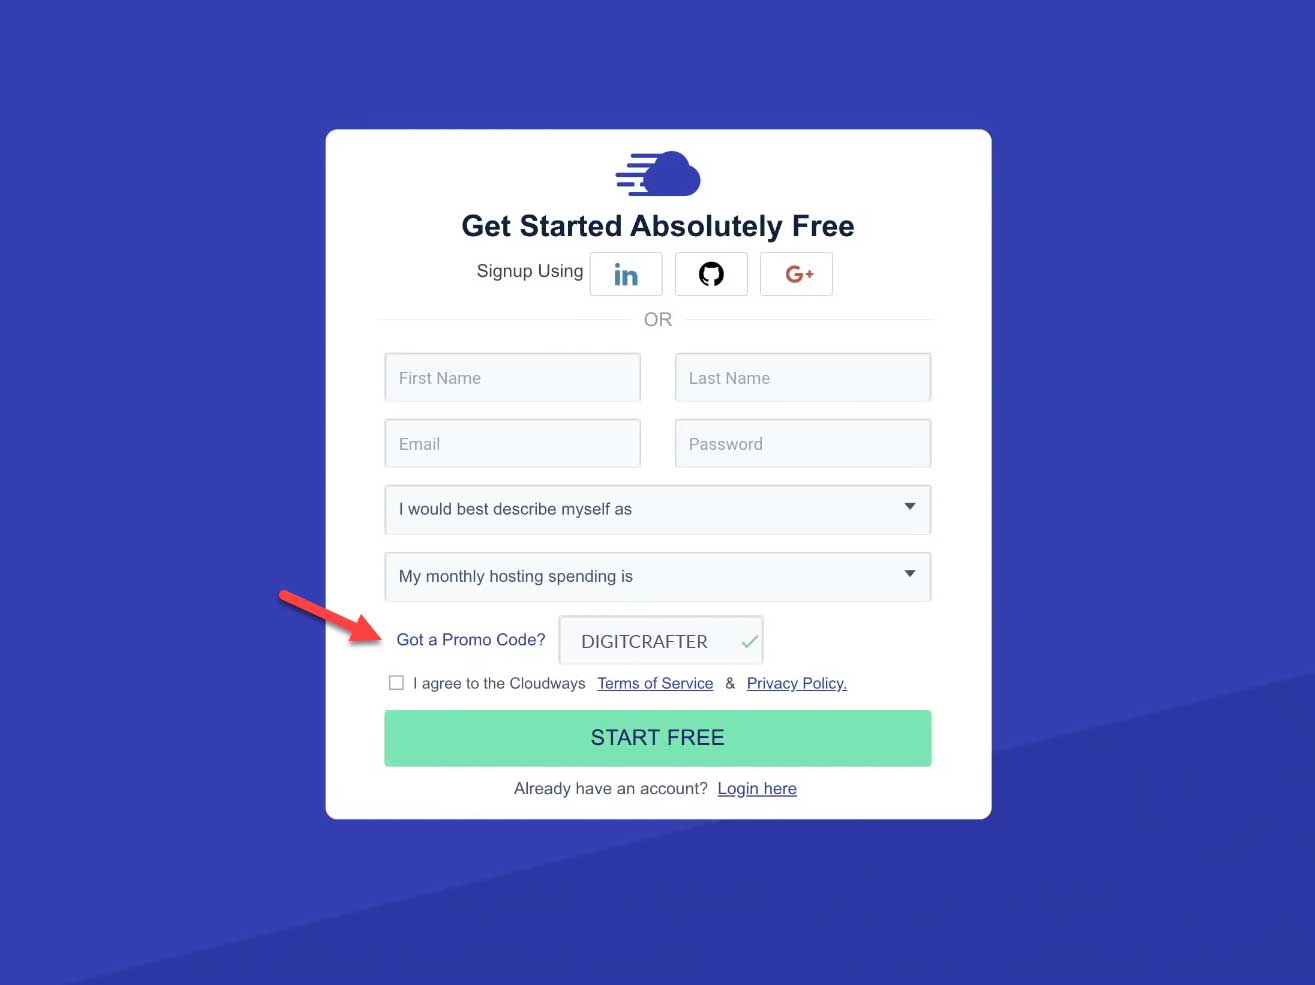
Click on “Start Free” at the top right corner of the page.
Next, you’ll need to complete a form.
Towards the end of the form, you’ll see a section labeled “Got a Promo Code?”
Enter the code DIGITCRAFTER to save 20% on your monthly service charge for the first three months.
Consider this my way of saying “thank you” for your support!
It’s important to highlight that there are scammers who could potentially exploit Cloudways’ complimentary service for malicious intent.
To ensure platform security, Cloudways has established a mechanism to identify potential scams.
Yet, there might be instances where this mechanism erroneously flags your email as suspicious.
Should this occur, no need for concern.
Simply reach out to their support team, apprise them of the situation, and they will swiftly address any misconceptions.
In case you’re interested in “Installing WordPress on VPS,” Cloudways offers support and solutions tailored to your needs.
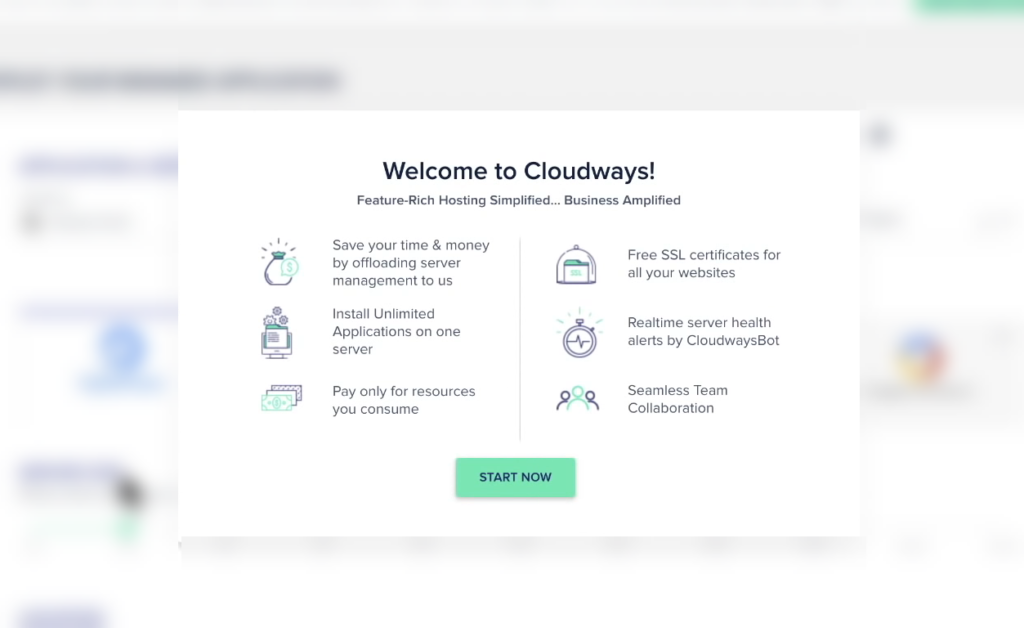
Once you’ve completed the form, click on “Start Free” and then proceed to “Start Now.”
Now, let’s focus on a few important details here.
We’ll go through these step by step to ensure you understand.
But before anything else, don’t forget to verify your account.
This step is crucial, as skipping it means you’ll need to redo the setup.
Look for a small banner right below the menu – it’s easy to overlook.
All you need to do is check your email, complete the verification, and refresh if needed.

Once your cloudways account is verified, you can now setup the initial server setup.
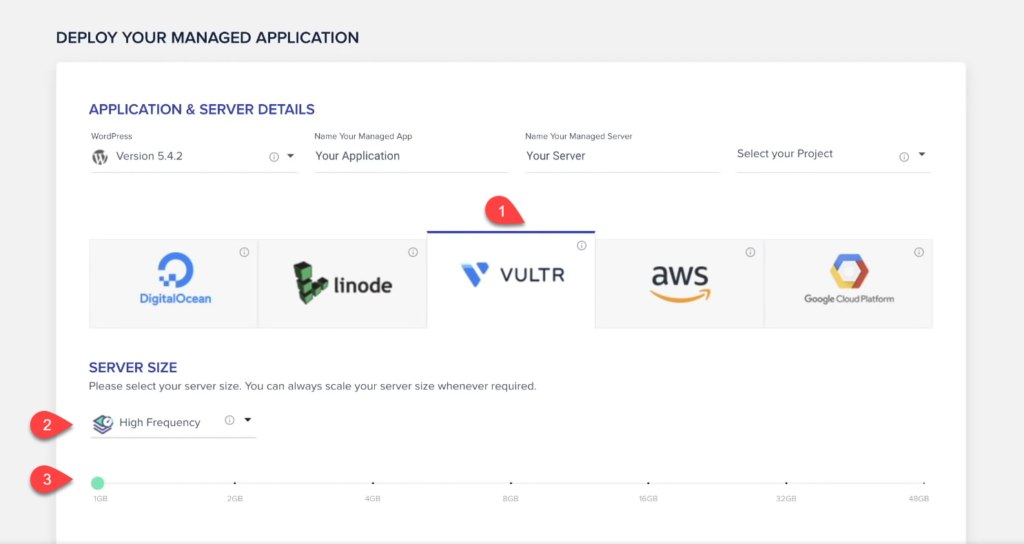
Let’s get started by picking Vultr as your hosting provider. Then, under “Server Size,” switch from “Standard” to “High Frequency.”
This new technology is super fast and will unleash Cloudways’ true potential.
When it comes to the server size, it depends on what you require.
The smallest option is a server with one gigabyte of memory, priced at $12 per month.
You can start with this, and if needed, you can upgrade later.
Now, let’s scroll up a bit to explore the settings further.
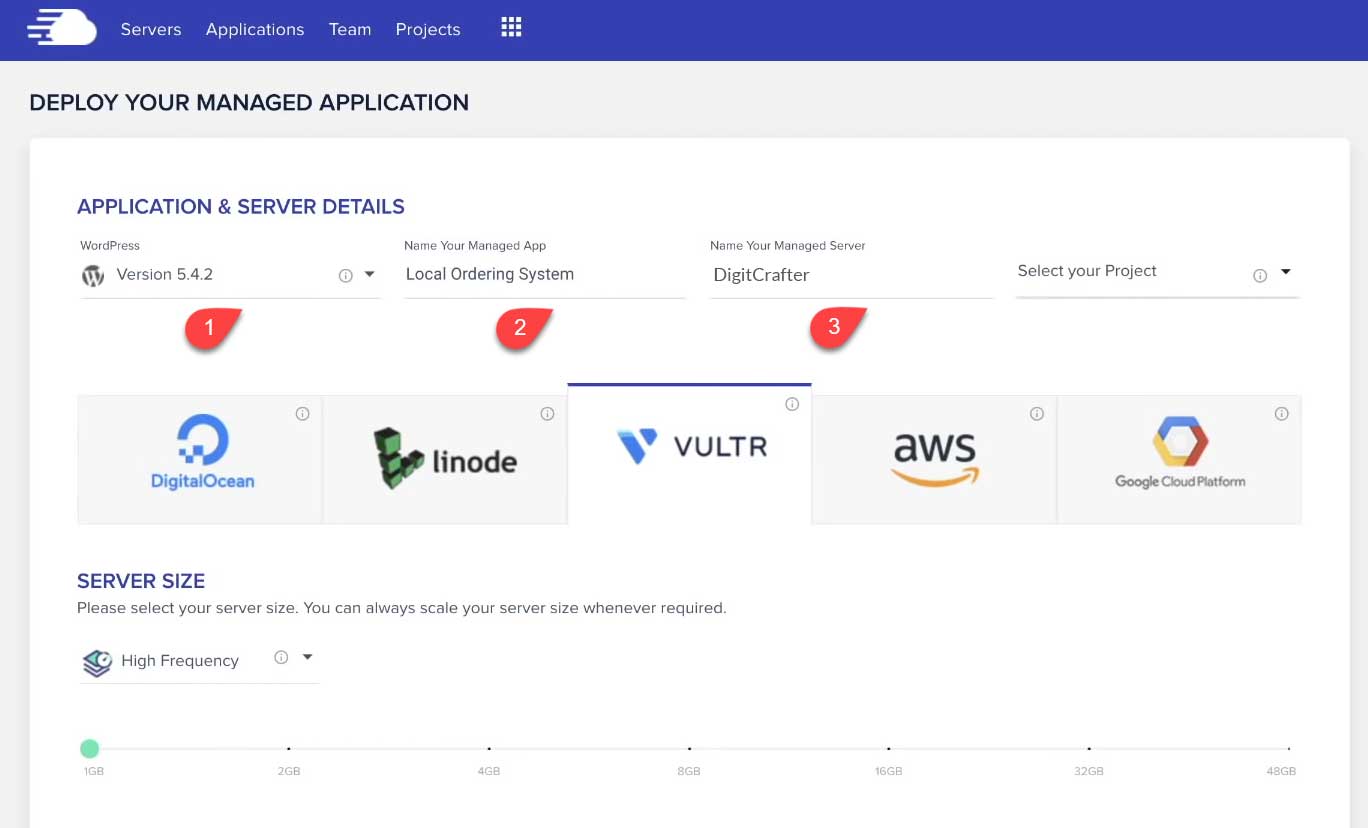
Now, it’s time to set up an application, which is just an example of How to Install WordPress on VPS Server. Later on, you can even add different kinds of apps if you want.
Your choice here is flexible, and you can change it later if needed.
For this example, I’ll choose the default WordPress installation.
There are also options for WooCommerce, WordPress Multisite, and a “Clean” installation that won’t automatically add a cache plugin.
After making your choice, give a name to your app and server. You can always change this later if you want.
On the upper-right corner, you’ll see the option “Select Your Project.” This is useful for managing multiple WordPress installations in projects and allowing others to access them. But you can skip using this feature for now.
Finally, scroll to the bottom of the page to choose a location for your server.
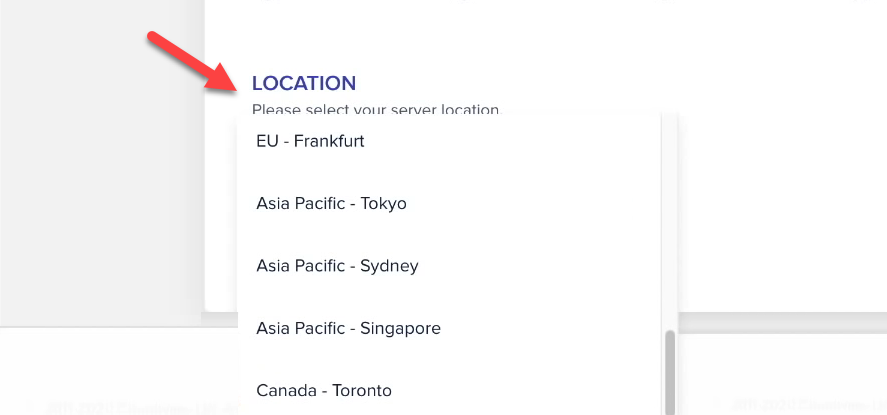
There are various server locations to choose from. Pick the one that’s closest to where most of your website visitors are located.
Once you’ve made your selection, click on the “Launch” button.
The setup process will take a few minutes.
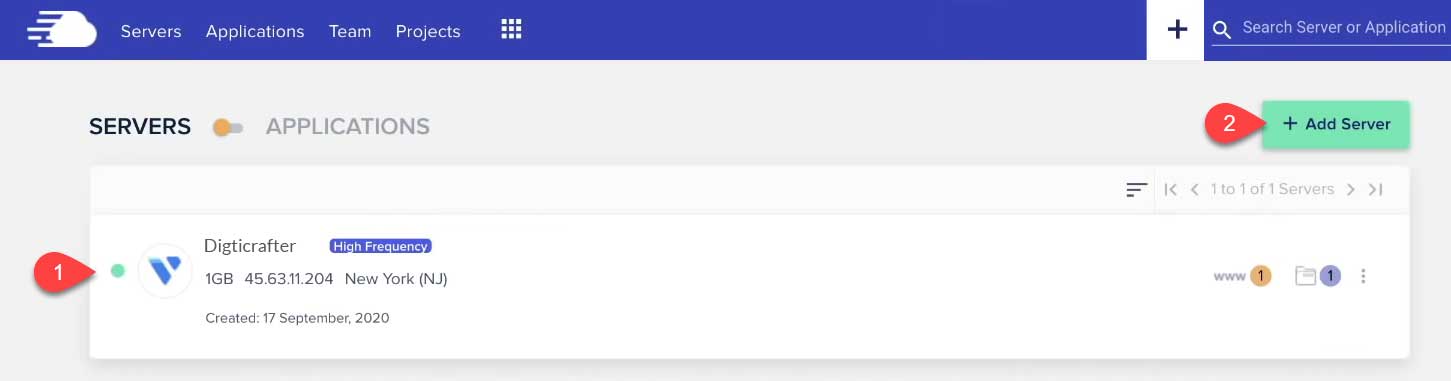
Once the server setup is completed, you’ll see a list of your servers in the interface.
Remember, you can have multiple servers if you need to separate your site or host different websites on different servers.
Step 2: Setting Up Your WordPress Site
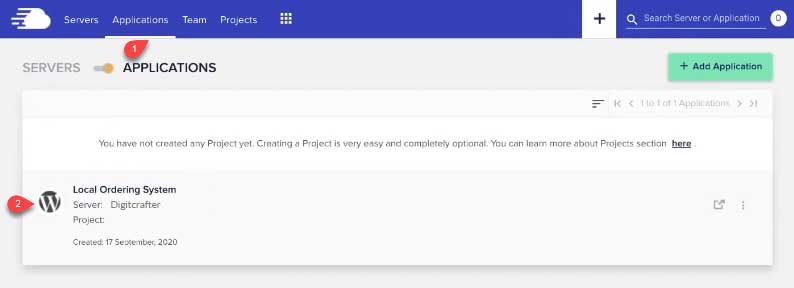
Navigate to the “Applications” section in the menu.
You’ll find the application you installed when setting up the server.
If you want to add more WordPress installations, you can do so by clicking “Add Application.”
For now, let’s click on the new WordPress installation you just created.

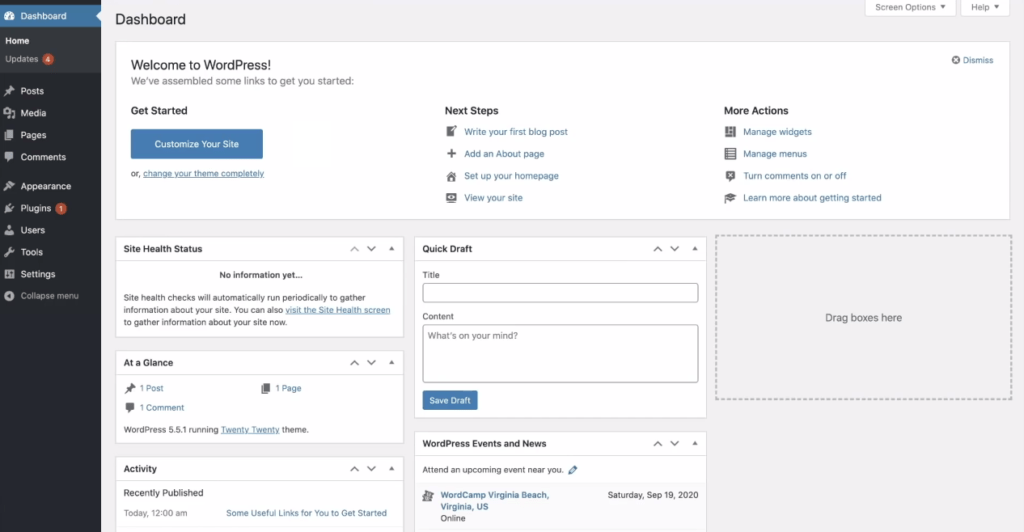
Clicking on the WordPress installation will take you to the admin panel of your website.
You might notice a strange URL with unusual information. Don’t worry, this is the temporary URL provided by Cloudways when you initially set up the website. You can use this URL while you’re working on your site before connecting your actual domain name.
This temporary URL is quite useful, especially when you’re testing new things or setting up new sites without a domain.
To log in, click the arrow icon in the upper right corner of the temporary URL. This will open a new tab where you can easily copy the username and password for logging in.
Migrating Your website to Cloudways
Moving your website to Cloudways can be done in a couple of ways.
Cloudways offers its own migration plugin, designed to help you transfer your website from your current hosting provider to Cloudways.
Another option is using the Cloudways WordPress Migrator plugin, which is quite popular among users. I’ll guide you through this method.
Here’s how to do it:
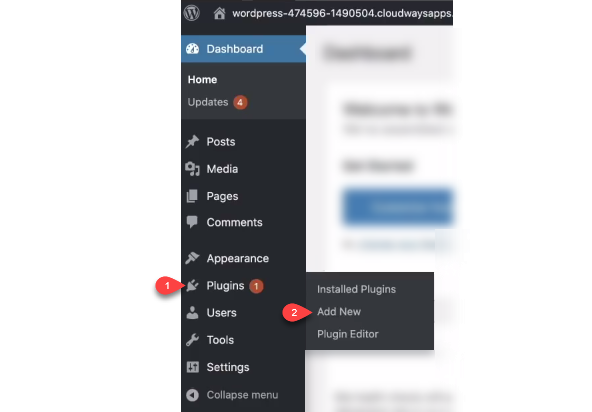
Go to your WordPress dashboard and click on “Plugins.”
Select “Add New” to install a new plugin.
To migrate your website using the Cloudways WordPress Migrator plugin, follow these steps:
On the website you want to migrate, search for and install the “Cloudways WordPress Migrator” plugin.
This plugin will handle the migration process for you, making it easier.
Cloudways provides a detailed guide on how to use this plugin. You can find the step-by-step tutorial at support.cloudways.com/how-to-migrate-wordpress-to-cloudways.
Step 3: Utilizing the Kadence Theme
For the fastest performance on your WordPress site, the Kadence theme is highly recommended. It’s one of the best themes available, and I personally find it fantastic to work with. The best part is that even its free version offers all its features without holding anything back.
If you’re aiming to enhance your website’s speed, the Kadence theme is a must-have. You can easily download it from its official website, Kadence-theme.com. Once you’ve downloaded the theme, follow these steps:
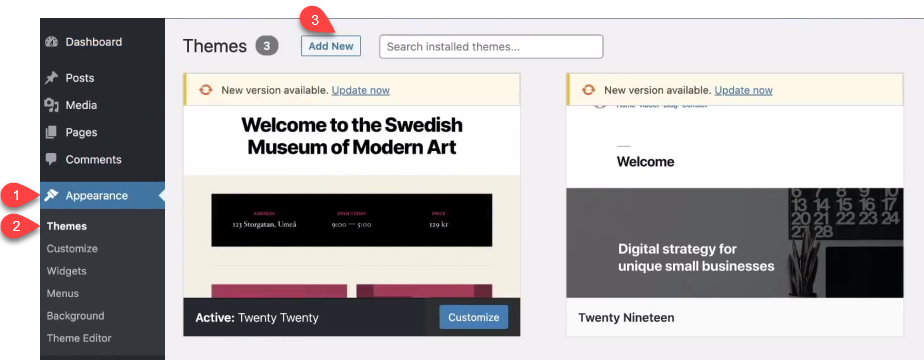
- Go to the “Appearance” section in your WordPress dashboard.
- Choose “Themes.”
- Click on “Add New.”
By using the Kadence theme, you’re taking a great step toward improving your website’s performance and user experience.
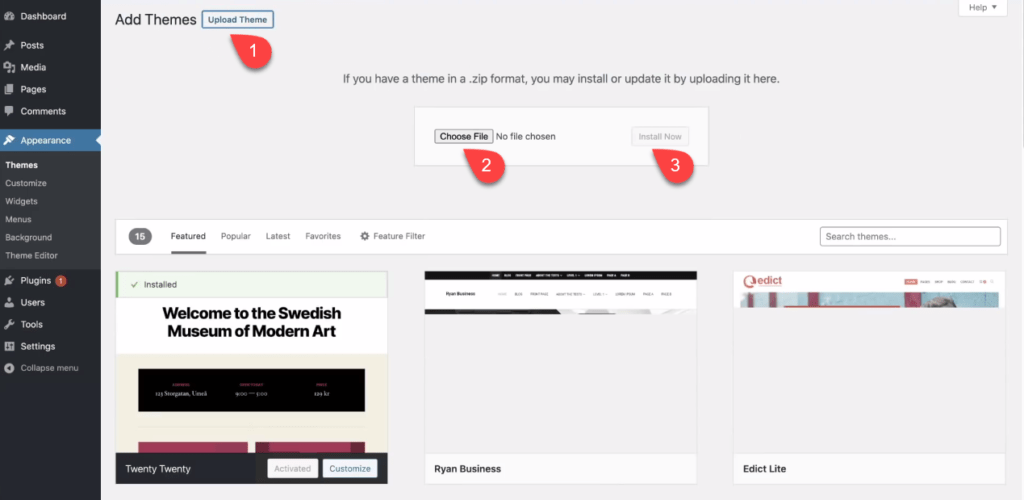
Click on Upload Theme, and then Choose File.
Next, select Install Now, and finally choose Activate.
When you select the Kadence theme, it will suggest installing the Kadence Starter Templates. You should definitely go ahead and pick that option.
These templates are complete websites that are pre-designed and ready for you to install. They include various options, and one of the recent additions is the LearnDash Course template. This can be particularly useful if you’re planning to create an online course website.
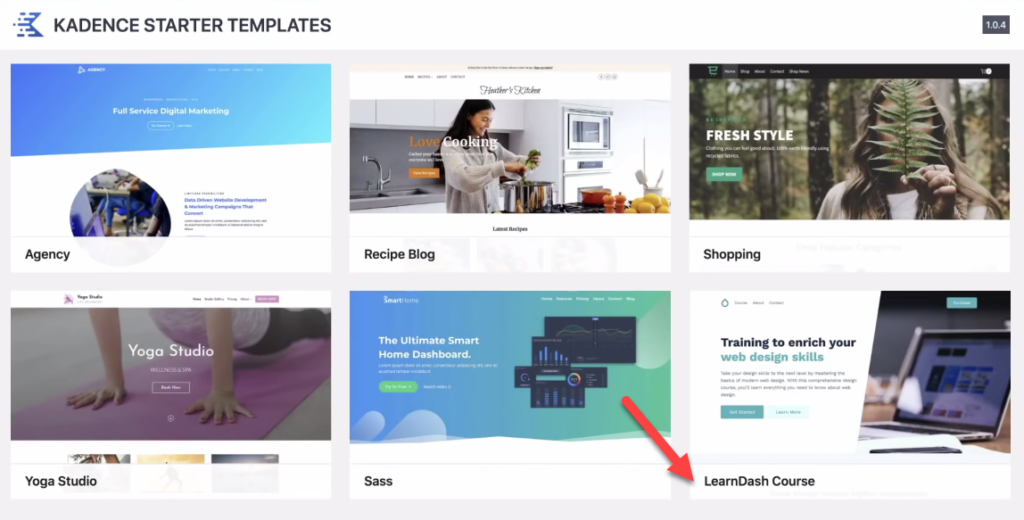
The template I mentioned earlier is specifically made for creating a website focused on a single online course. I will now proceed to import this template, and the process should only take a minute or two. This will set up the foundation for your online course website quickly and easily.

One of the things I really like about the Kadence theme is its globally-linked color palette.
This means that you can easily change the overall look and style of your website with just a few simple clicks.
And the best part is, if you ever want to switch to different colors, you can easily update them at any time without much hassle. This feature makes it incredibly convenient to give your website a fresh and appealing appearance.
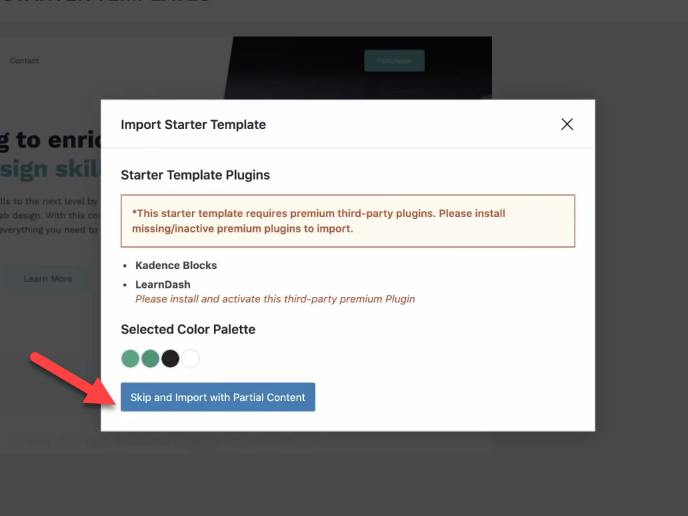
For this tutorial, green works for me so I’ll choose that.
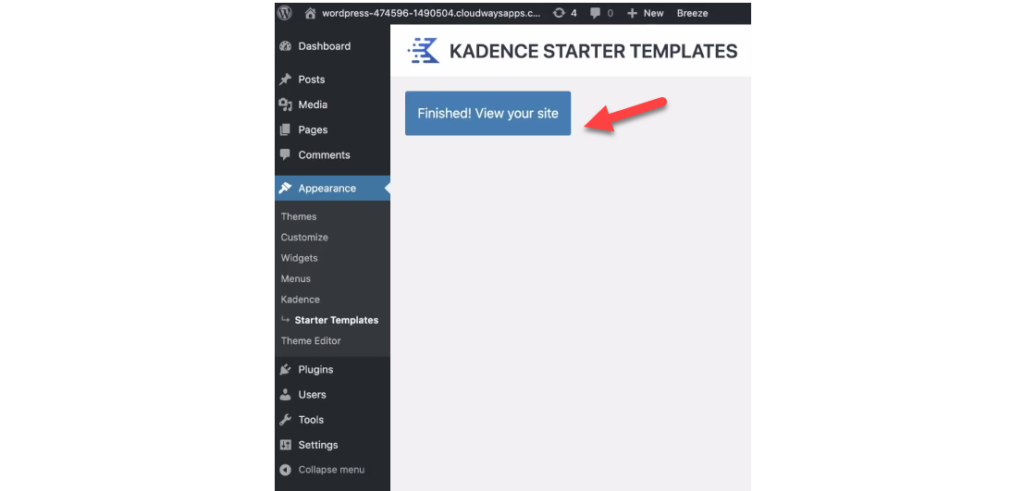
Once you click on “Finished! View your site,” you’ll be able to admire your stunning new website
This website template is ideal for various types of online training or membership websites, and the best part is that it comes with the Kadence theme starter template completely free of charge.
Step 4: Connecting Your Domain and Email to Your Website
Now that your website is all set up, the next step is linking your domain name and email hosting to it.
Unlike traditional hosting services such as Hostinger and InMotion Hosting, high-speed premium WordPress hosting services like Cloudways don’t include domain registration and email hosting in their packages.
You’ll need to get your domain name and email hosting from other places that offer these services. Don’t worry, I’ll provide some recommendations later on.
The important thing here is to understand how to connect these services to Cloudways.
Understanding DNS Servers
When you want to link your domain name and email to Cloudways, it’s helpful to understand DNS (Domain Name System) servers. Imagine DNS servers as databases that change easy-to-remember web addresses (like URLs) into real IP addresses.
Let’s make this simpler with an everyday example. Picture a restaurant you adore, Crust Pie, famous for its tasty mushroom crust pizza. Crust Pie is easy to remember, but if you want to share it with someone else, they won’t know where to find it. They’d have to use Google Maps or Yelp to discover its actual location.
DNS servers work similarly. They take user-friendly site names, like DigitCrafter, and translate them into the right server address, which is called an IP address.
This understanding becomes valuable when you’re looking to “Install WordPress on VPS” using Cloudways. It ensures that your website is reachable and functions smoothly.
Here is the image illustration of DNS servers:
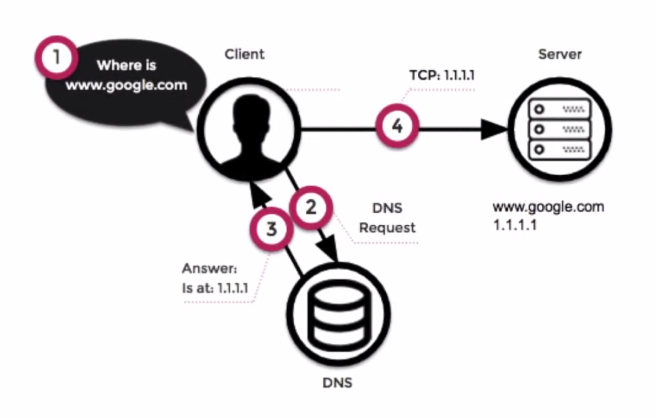
When you wish to access a website, you type its name in your browser. This action prompts the DNS server to locate the website’s actual position, which is its IP address. This is crucial because your web browser doesn’t comprehend website names the way humans do.
As your request flows through the DNS server, it directs your browser on the correct path to reach the website. This ensures the website’s content displays on your screen.
Keep in mind, this entire process happens in a split second each time you visit a site.
Now that you understand the role of a DNS server, let’s delve into adding DNS records.
These records serve as guides for web browsers and email services, helping them locate the appropriate destinations linked to your user-friendly website name. This knowledge comes in handy when aiming to “Install WordPress on VPS,” ensuring your website is easily accessible and functions efficiently.
In the next steps, you’ll learn two important things:
1. Where to Find Your DNS Server: You can locate it where you registered your website’s name.
2. Types of DNS Records You Need: I’ll explain four types you’ll need:
– A Records and CNAME Records: These help with your website and subdomains.
– MX Records: They show where your email service is.
– TXT Records: These serve various purposes, like Google verification and email security.
Don’t worry if it sounds a bit overwhelming. I promise you’ll see how simple it actually is, and I’ll guide you through each step.
Domain Registration with Cloudflare
When you want to create a website, you need a domain name. You can get this name from various places, and they’ll give you the ability to manage DNS.
If you already have a domain somewhere else, you can transfer it to a service like Cloudflare, which will help manage your DNS.
What you’ll mainly do is add DNS records. These records help connect different parts of your website and services to the right locations.
Common places to get a domain and manage DNS are NameCheap and GoDaddy. If you are looking for great service to instantly generate domain names, I recommend Aiwebranker.
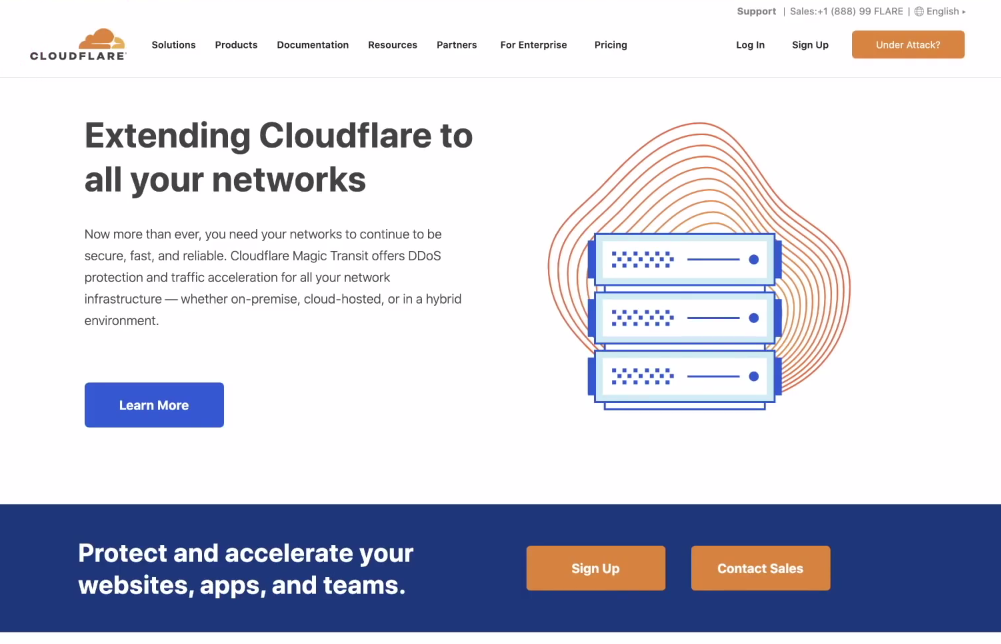
I personally use Cloudflare because it’s super cheap and free.

Getting a new domain name is affordable, starting at $5.78. Plus, there’s added protection for your site.
Using Cloudflare for domain registration is a recent option. To get started, sign up, verify your account, and log in.
If you already have a domain name and want to continue using it, here’s what you need to do next.
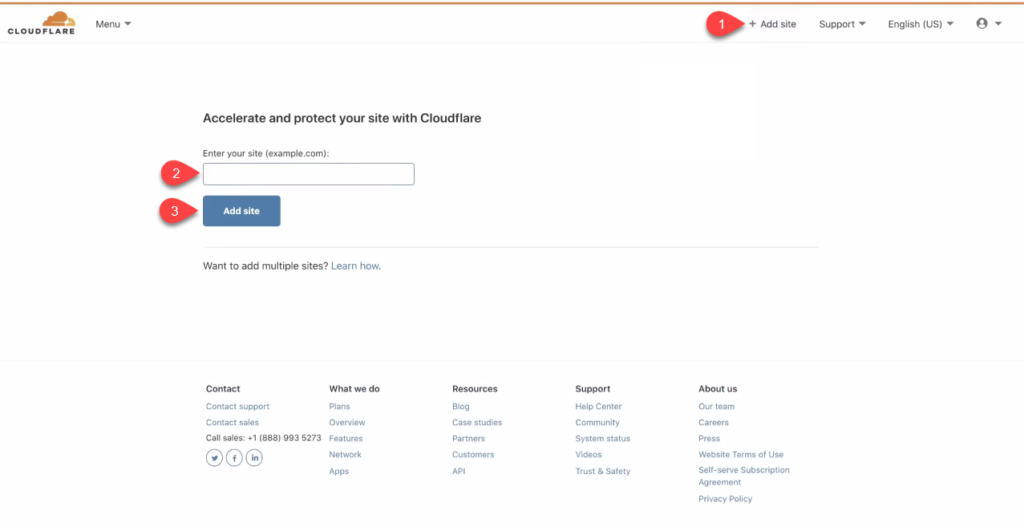
To get started, click on “Add Site” in Cloudflare’s navigation bar.
Enter your website’s address so that Cloudflare can handle your DNS server tasks. You can link multiple domain names to Cloudflare for this purpose.
For example, I recently registered a website with Cloudflare. Here’s what the control panel looks like for managing your site’s settings.
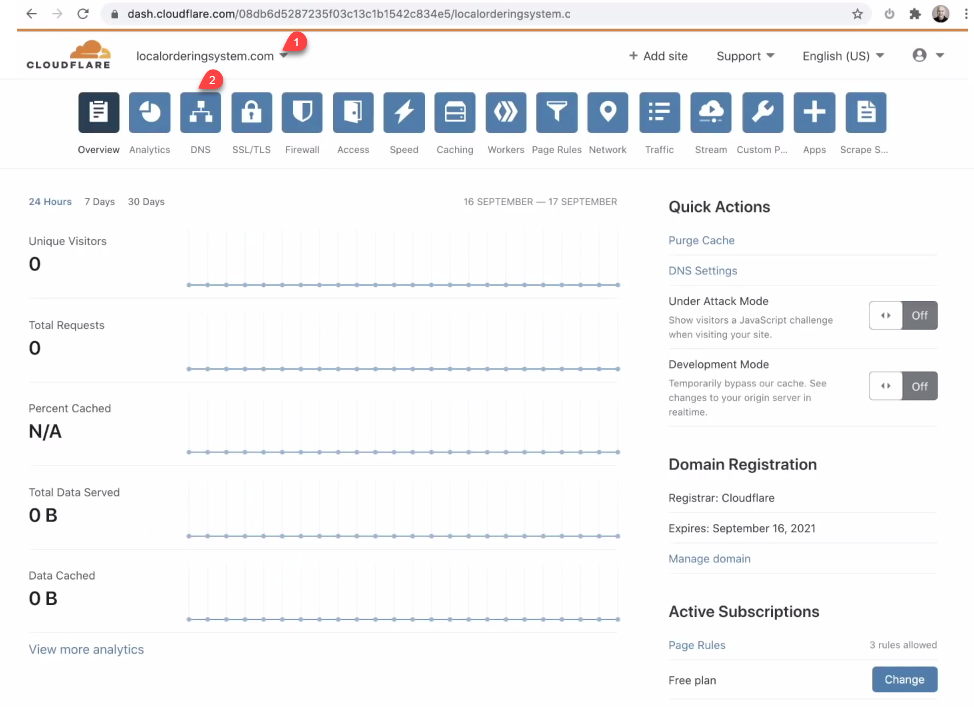
Select on the third option named DNS.
Currently, there are no records listed here. If you need to add records, click on “Add Record.”
While there are various types of records available, we’ll focus on the four types we previously talked about.
To connect your registered domain to Cloudways, follow these steps:
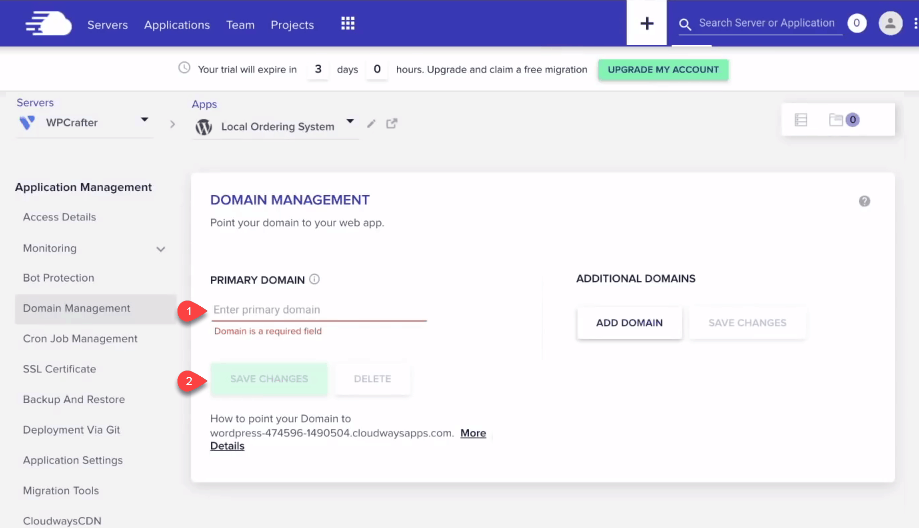
Go back to Cloudways and click on “Application” in the menu.
Choose “Domain Management” from the options.
Enter your domain name and save the changes by clicking “Save Changes.”
Follow these simple steps to connect your domain name:
Below it, find “More Detail” for the section titled “How to point your Domain name…”
Clicking on this option will open a detailed tutorial that guides you through the process of connecting your domain.
If you’d like to read the detailed instructions on how to connect your domain name to Cloudways, you have a couple of options:
You can visit the link support.cloudways.com/how-do-i-take-my-website-live-from-cloudways to access the tutorial.
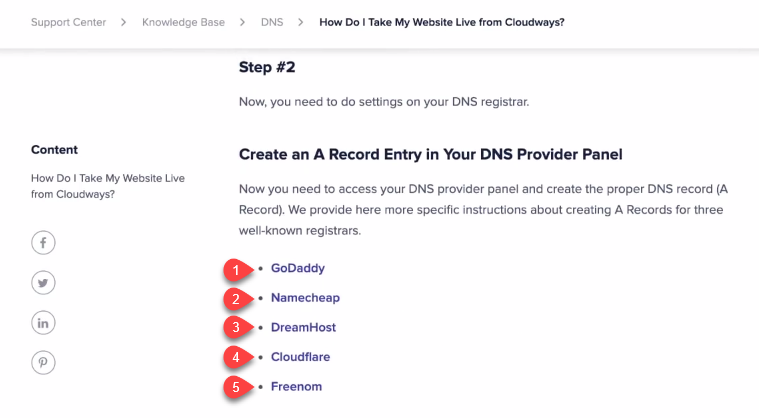
As you scroll down the article, you’ll also find instructions for various domain name providers.
Additionally, if you’re using Cloudflare, you can click on the Cloudflare bookmark for specific guidance.
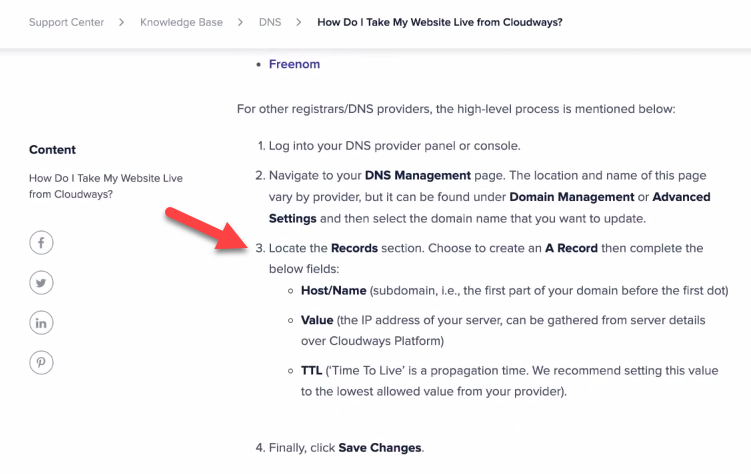
Here it tells that you need to create an A Record on Cloudflare and connect it to the IP address of your server.
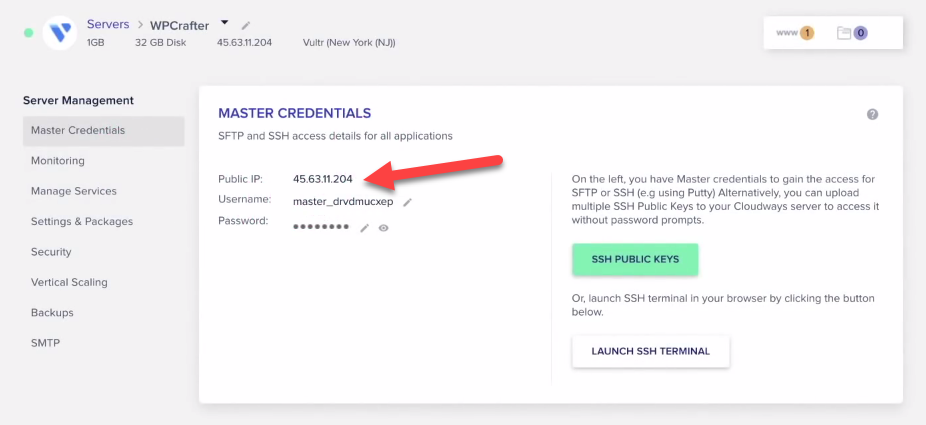
Let’s head back to Cloudways and click on Servers.
My IP address is displayed under Public IP.
Clicking on the numbers automatically copies it.
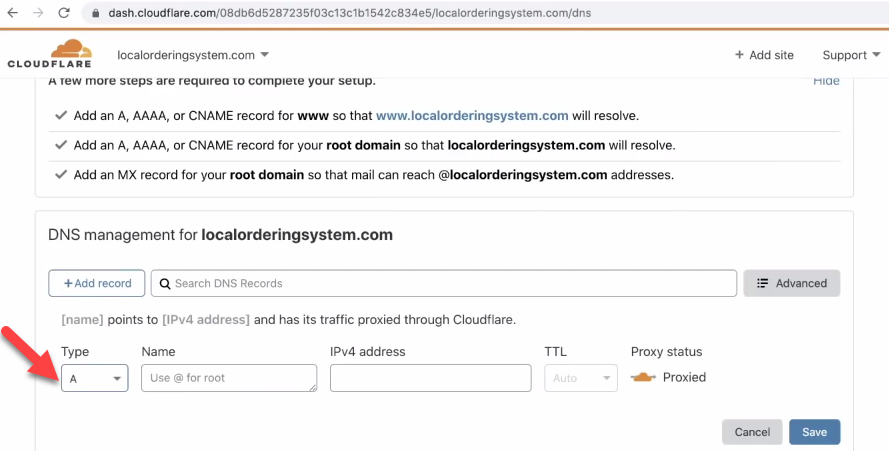
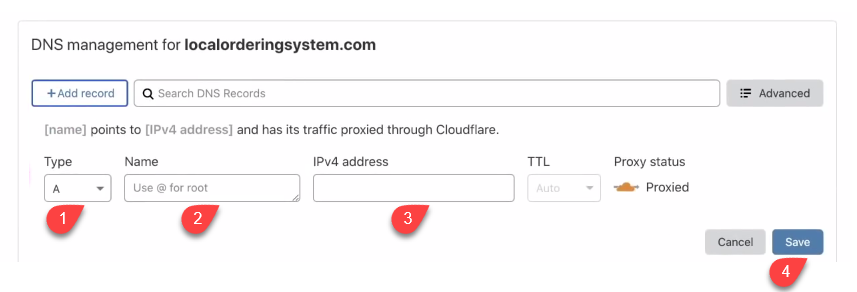
So next process is going back to Cloudflare’s DNS server and select A for the Type.
To start, enter “@” in the “Name” field. Then, paste your IPv4 address into the “IPv4 Address” field. Click “Save” to save this DNS record.
This is the initial DNS record you should configure for your domain.
Remember, if you encounter any issues or realize a mistake, there’s no need to worry. You won’t cause any damage. You can easily select the “Edit” option to make changes.
Once you’ve set up the DNS record, you’ll also need to connect your domain name on the Cloudways platform.
Simply copy your website’s address to your clipboard.
In Cloudways Dasboard, click on Applications and select your WordPress installation.
Choose Domain Management on the left menu tab.
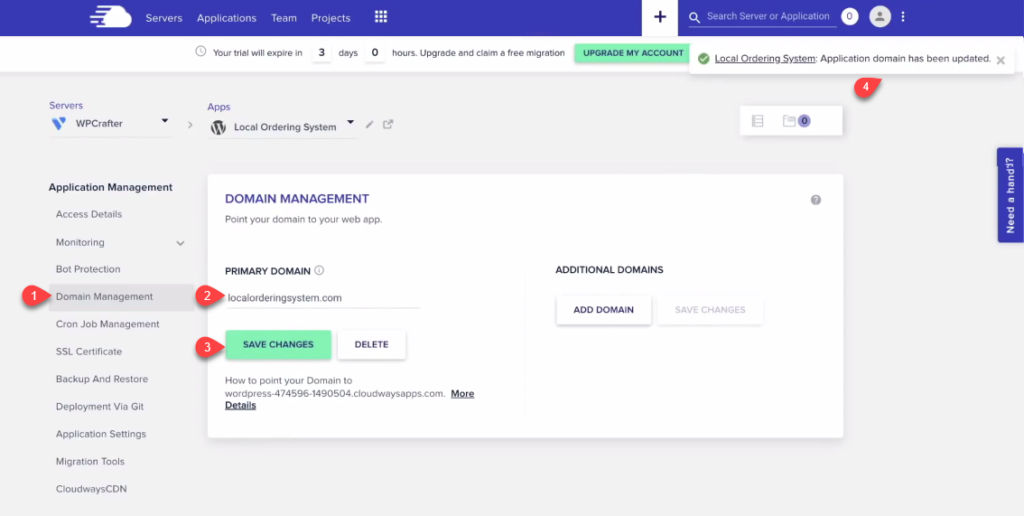
Paste the domain name and click on Save Changes.
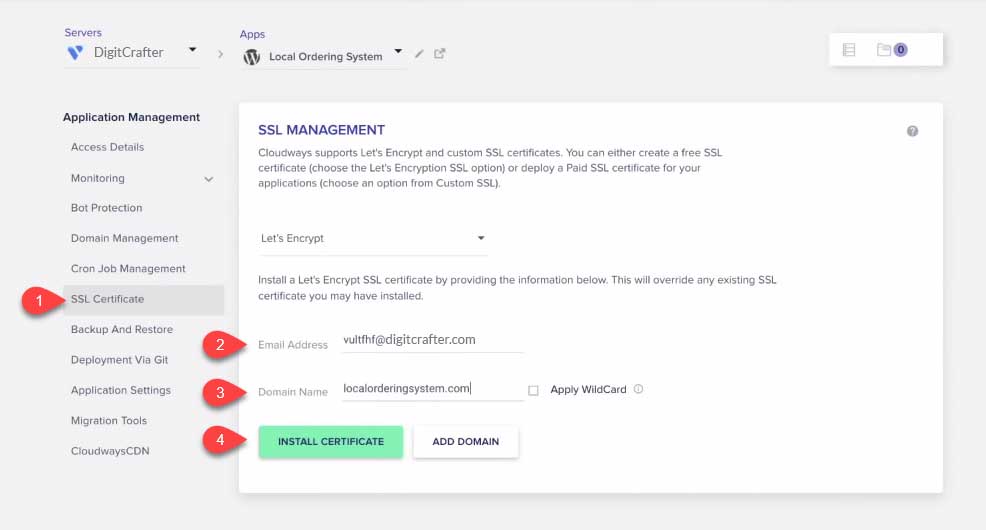
Obtaining an SSL Certificate
Once you’ve linked your domain name, the next step is to acquire an SSL certificate to enhance security.
To achieve this, navigate to the “SSL Certificate” option located in Cloudways’ left-side menu.
Provide your email address and domain name in the designated fields. Then, click on “Install Certificate” to proceed.
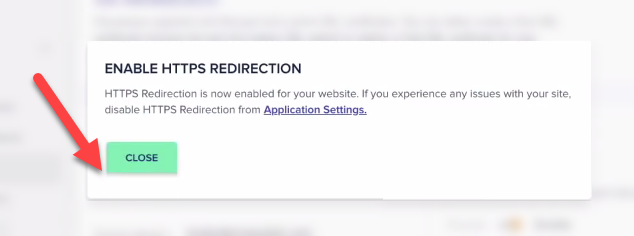
When you proceed with obtaining the SSL certificate, you’ll encounter a notification titled “Enable HTTPS Redirection.”
It’s highly recommended to enable this option. Doing so ensures that visitors are automatically directed to the secure HTTPS version of your website, enhancing overall security and user experience.
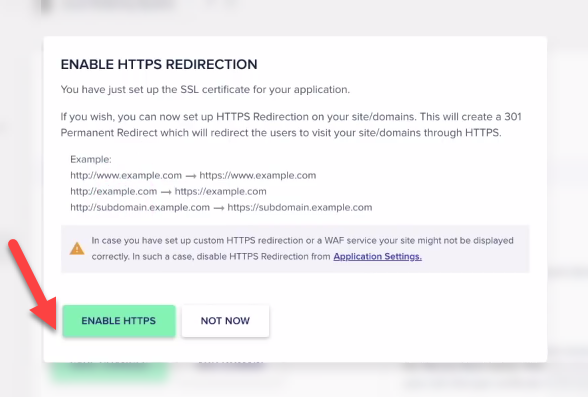
Select Enable HTTPS and then click Close.
SSL certificates typically have a validity period of around three months.
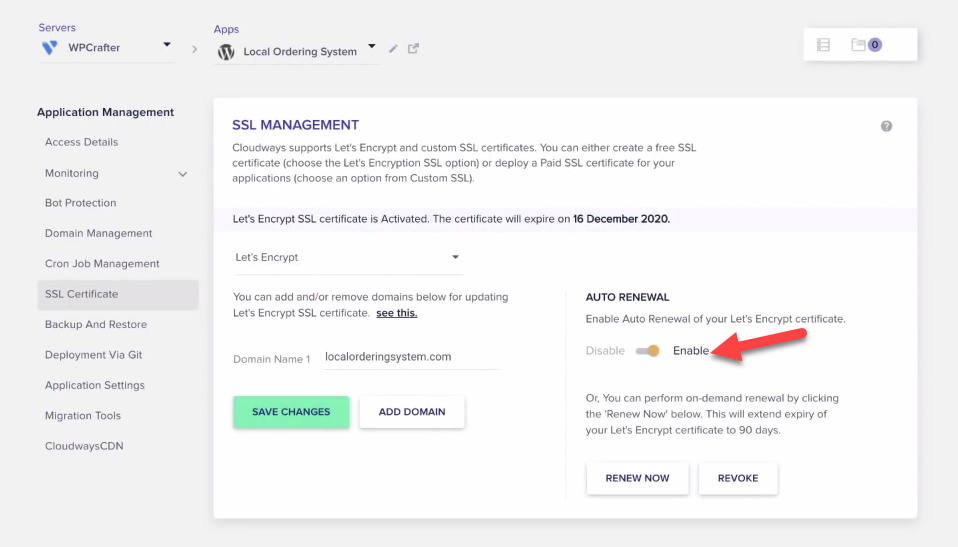
Once you’ve enabled HTTPS redirection and obtained your SSL certificate, it’s important to ensure that the auto-renewal option for the certificate is activated.
This ensures that your website’s SSL certificate will be automatically renewed before it expires, helping to maintain the security and accessibility of your site.
Once you’ve configured your DNS settings, remember that the changes might not become noticeable right away.
It could take anywhere from six to 48 hours for the adjustments to fully take effect. This waiting period is known as propagation, during which the updated information about your website spreads gradually across the internet.
This propagation process ensures that the new settings are distributed and updated across different servers worldwide. So, be patient if you don’t immediately observe the changes you made.
If you encounter any uncertainties or queries during this time, don’t hesitate to get in touch with Cloudways’ support team for assistance.
Email Hosting Options
Notably, premium WordPress hosting providers like Cloudways, WPEngine, and Kinsta do not include email hosting services. To address this, we will discuss alternative services where you can acquire email accounts.
When using any email service, it’s essential to set up a few specific DNS entries to ensure proper functionality.
1. Rackspace
Rackspace is a leader in the field of email hosting.
Cloudways has integration with Rackspace.
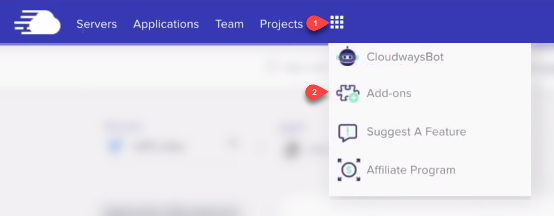
You can have access to it by clicking on the dial pad icon on the top menu.
After this, choose Add-ons and then Click on Rackspace Email.
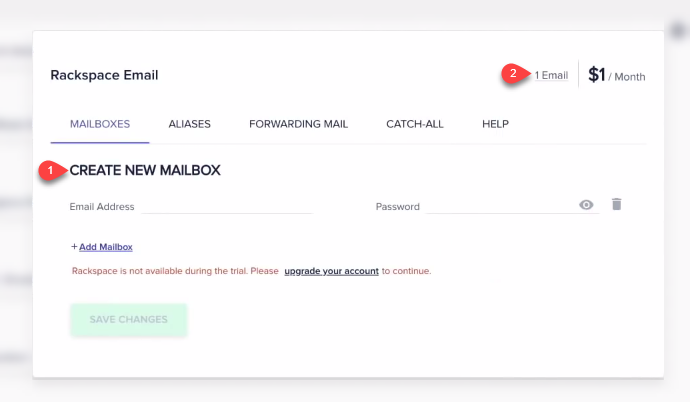
From here you can create a new mailbox that costs $1 per month.
There is also a knowledge article on Cloudways’ website you can visit at support.cloudways.com/how-to-use-rackspace-addon on how you can use this.
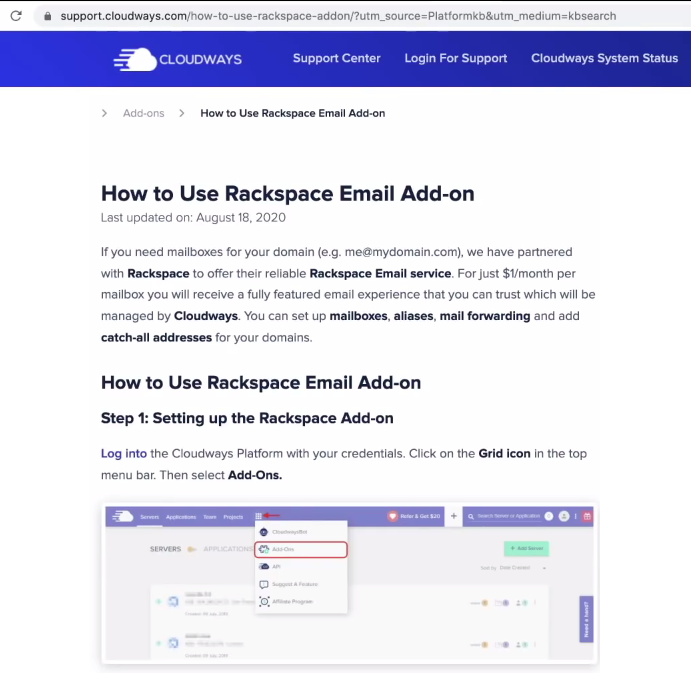
Scrolling down on this article, there are instructions on how to setup your DNS records.
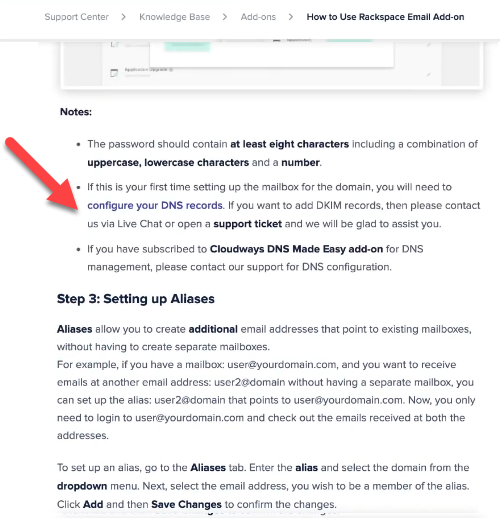
To start, click on the “configure your DNS records” link.
This link will take you to another page at docs.rackspace.com/support/how-to/set-up-dns-records-for-cloud-office-email. Here, you’ll find detailed instructions on the specific DNS records you should add for your email setup. These records include essential information like hostnames, priority, and TTL.
2. Google Workspace
Another option is the professional version of Google Workspace. While it comes at a higher cost, it provides access to a range of extra applications and features.
3. Microsoft 365
Many businesses also opt for Microsoft 365, which offers various plans. The Business Basic plan starts at $5 per user per month. The Business Standard plan is priced at $12.50 per user per month, and the Microsoft 365 Business Premium plan is available at $20 per user per month.
4. ProtonMail
For those concerned about email privacy, ProtonMail is an excellent choice. It offers truly private email hosting that ensures your messages remain secure.
5. Zoho Mail
Zoho Mail is an email hosting service that allows you to create up to five email accounts for free. If you require more email accounts, there are affordable options available. Cloudways also provides an article guiding you through the process of adding DNS records with Zoho Mail.
By exploring these email hosting options, you can find the best fit for your needs and ensure efficient communication for your website or business.
My Email Hosting Provider
As someone who values financial prudence, I always look for smart ways to save money. One of my strategies is to opt for affordable web hosting that includes email services.
Let me share a great example: Hostinger.
I’ve personally tested their hosting services.
While it may not be the absolute best, their plans are incredibly budget-friendly. Starting at just $0.99 per month, you can access hosting along with various other services.
But here’s the key: I recommend their Premium Shared Hosting plan, priced at $2.59 per month.
This plan allows you to create up to 100 email accounts, along with a bundle of other useful features. Plus, they offer the option to pay for multiple years upfront to lock in this low price.
So, by making a smart choice like this, you can enjoy quality web hosting and email services without breaking the bank.
Step 5: Optimizing Your Cloudways Server for Best Performance
Now, let’s move on to improving the performance of your server on Cloudways. There are some adjustments we can make to your WordPress site to make the most of Cloudways’ powerful capabilities.
Here are the changes we’ll make:
Enable Redis: Redis is a technology that boosts your website’s speed and efficiency.
Enable Varnish: Varnish is another tool that enhances website speed and caching.
Increase Memory: We’ll allocate more memory to each WordPress installation.
Let’s start with enabling Redis:
Log in to your Cloudways account and click on “Servers” in the top menu.
Select the server you recently created.
In the next steps, we’ll guide you through the process of implementing these optimizations to ensure your website runs smoothly and efficiently.
This will help make the most of Cloudways’ capabilities for a faster and better performing website.
Now, let’s make some improvements to your Cloudways server settings for better performance.
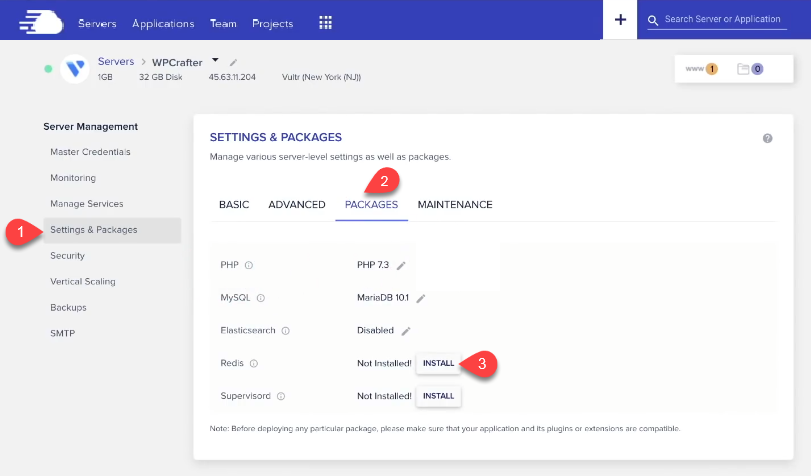
Enable Redis: First, go to “Settings & Packages” in the left menu.
Then select “Packages” and click on “Install” for Redis. Redis helps speed up your website.
You can also consider upgrading your PHP and MYSQL versions for better compatibility and performance.
Managed Services: In the “Managed Service” section, you’ll notice the status of Redis and Varnish.
- Redis should show as running.
- Varnish is now improved. Varnish is a tool for server-side caching, speeding up your website without relying on plugins.
In case you need to refresh your caches, you can clear them in the “Manage Services” section.
Now, let’s move on to making changes at the application level for further optimization. This will help ensure your website runs smoothly and efficiently, providing a better experience for your visitors.

To enhance the security of your WordPress site, follow these steps:
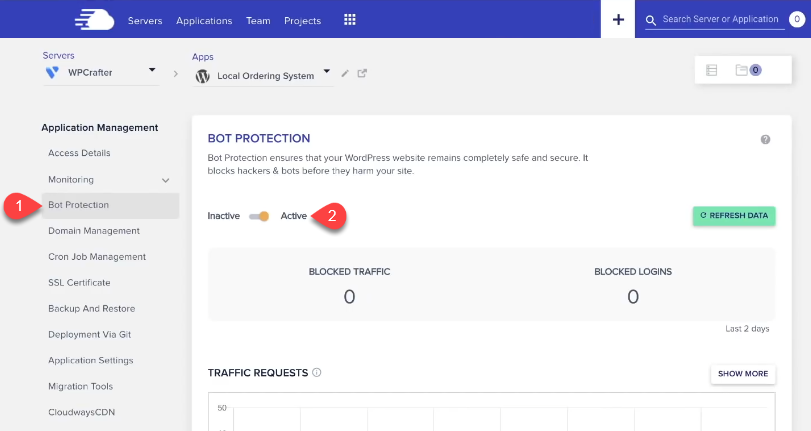
Access Your WordPress Installation: Click on “Applications” in the navigation bar and select your WordPress installation.
Activate Bot Protection: In the left menu, find and click on “Bot Protection.” Make sure it’s active.
Enabling bot protection is crucial for safeguarding your website from potential security threats and unauthorized access.
This step helps ensure a safer online environment for your site and its visitors.
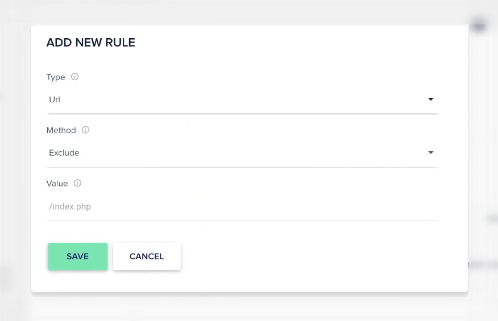
Next, choose Application Settings and then click on Varnish Settings.

Click on Add New Rule is you need to add an exclusion with Varnish.
Connecting to Redis Server Side Caching
Understanding and correctly configuring Redis can be a bit challenging in many tutorials.
Often, they don’t explain the full process, which can prevent users from reaping the true benefits of Redis.
Enabling Redis on the server is just the beginning. To truly experience its advantages, there are additional steps you need to follow.
It’s important to ensure that you complete the entire configuration process to fully harness the power of Redis for your website’s performance and speed.
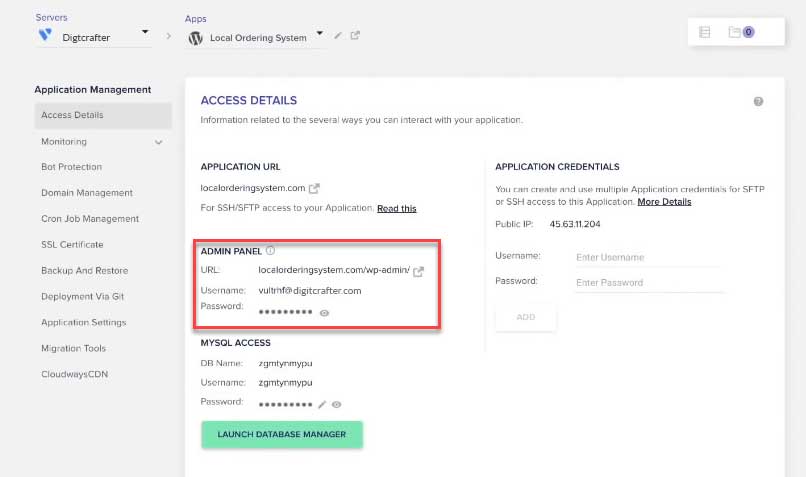
Go to Access Details under Application and then log in to your WordPress site using the information on the Admin Panel.
Cloudways provides a helpful article that guides you through enhancing your website’s performance with Redis, a powerful caching tool.
To access the article, simply go to cloudways.com/blog/install-redis-cache-wordpress.
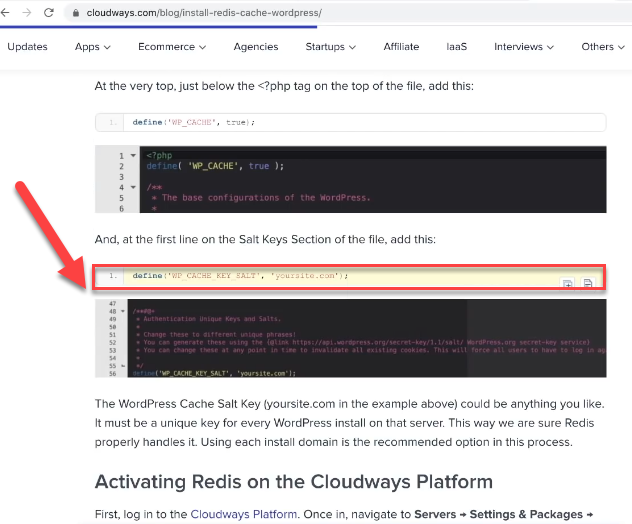
When you scroll down the page, you’ll discover step-by-step instructions for adding a single line of code that’s crucial for making the most of Redis cache in WordPress. This code tweak can greatly improve your website’s speed and responsiveness.
Tweaking WP-Config file
Now that we’ve made the Redis adjustments, let’s optimize another crucial aspect: your wp-config file.
This file essentially manages how your WordPress site communicates with the database on your hosting server. While you could use FTP to access it, this method might be tricky if you’re not experienced.
Instead, we’ll use a simpler approach by installing a free plugin temporarily, which you can later remove.
To do this, follow these steps:
- Log in to your WordPress dashboard.
- Click on “Plugins” and then select “Add New.”
- Search for “WP Config File Editor.”
- Click “Install Now” and then “Activate.”
This plugin lets you easily tweak your wp-config file without dealing with complex FTP processes. This step will further enhance your website’s performance and overall efficiency.
This will add a new option on your WordPress menu,
Adjusting Memory Limit
Let’s continue optimizing your website’s performance by adjusting the memory limit in your wp-config file.
Here’s how you can do it:
First, access the newly installed plugin by clicking on its name in the Plugins section.
From there, choose the “Maintenance” option.
You’ll see a setting called “Max Memory Limit.” Change the value from 256 to 1024. This enhances your site’s ability to handle tasks.
After adjusting the memory limit, don’t forget to click “Save.”
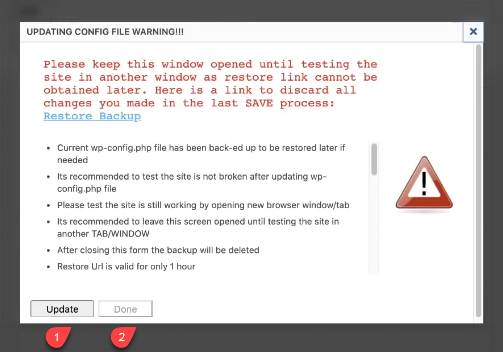
A pop-up might appear warning you about updating the config file. Click “Update” and then “Done.”
Code Adjustments
Now, let’s make some code adjustments for better performance using the WPCF Editor plugin:
Click on “Raw Editing” in the WPCF Editor menu.
Follow the instructions from the article you referred to. Begin by pressing the “Enter” key to create a new line.
Then, paste the specific line of code provided in the article.
Pay attention to the part that says “yoursite.com” in the code. Change this to your actual website’s name.
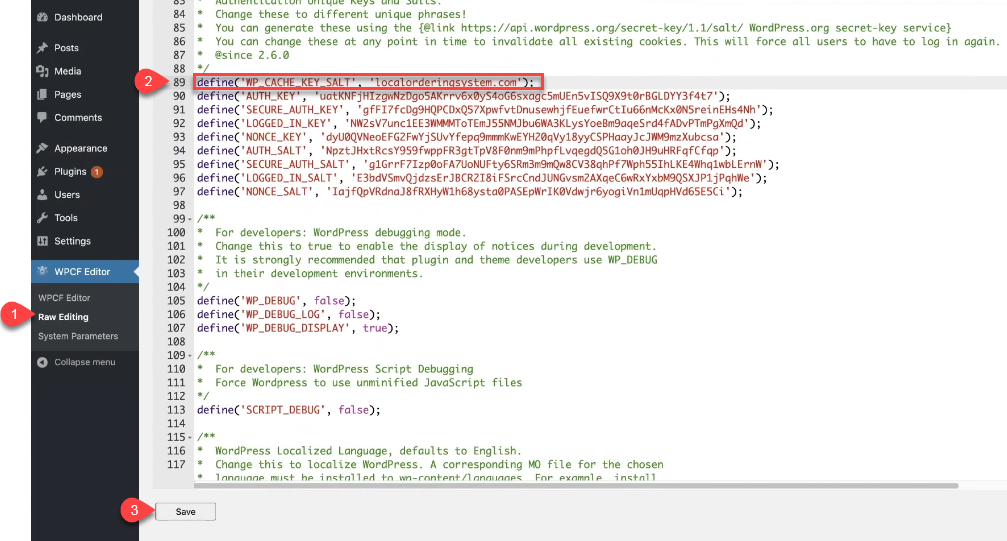
Now that you’ve made the necessary code adjustments, let’s save your changes:
Scroll down and click on the “Save” button.
After saving, proceed to click on “Update.”
Lastly, click on “Done” to ensure your changes are applied.
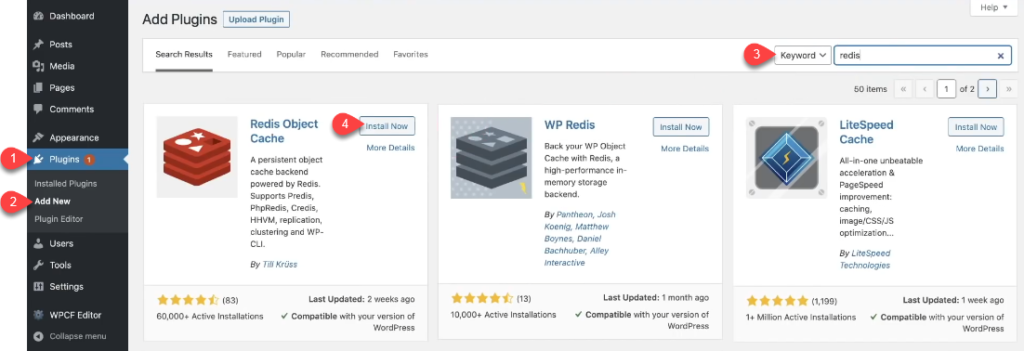
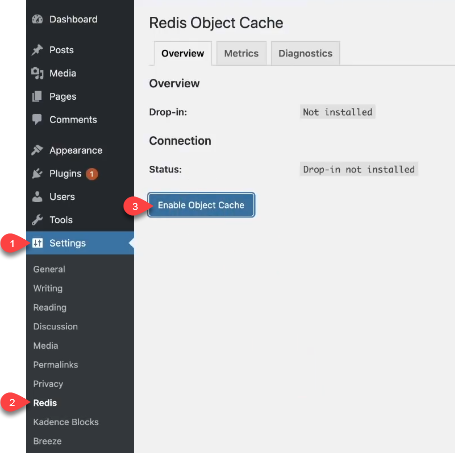
The next task on our list is installing the “Redis Object Cache” plugin, which is essential for optimizing your website’s performance. This plugin will help boost the efficiency of data storage and retrieval, leading to a faster and smoother website experience for your visitors.
This connects your website to the server-side caching.
Under the Settings option on WordPress, click on Redis.
Select Enable Object Cache located in Overview.
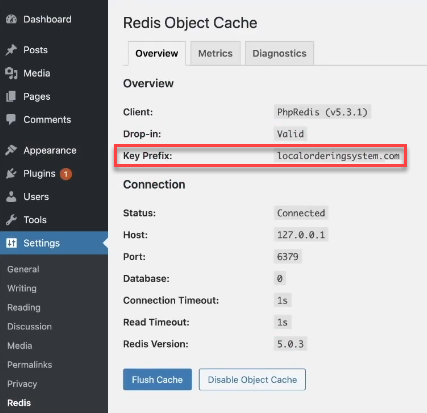
If your domain name exists on Key Prefix, this means that you’ve configured this to properly work on your WordPress site.
Step 6: Setting up a Content Delivery Network
To give your website an extra speed boost, the final step is to link it with a Content Delivery Network, also known as CDN.
This network helps in distributing your site’s content efficiently across multiple locations, reducing loading times for your visitors. There are three options for CDNs you can choose from:
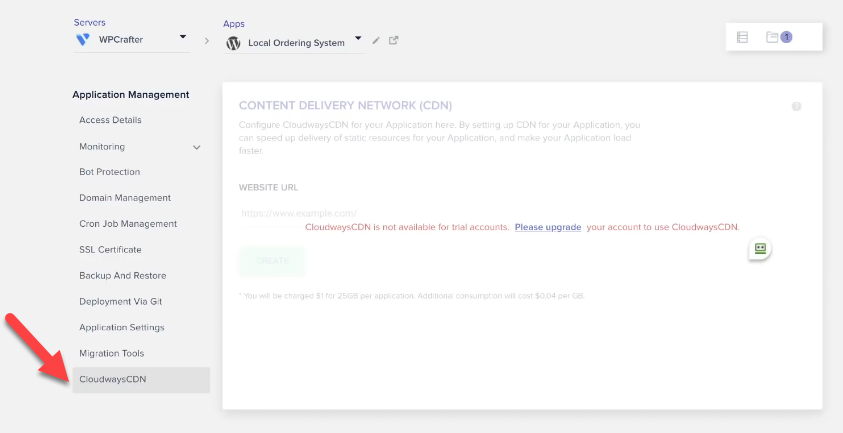
CloudwaysCDN: This is the simplest method, available directly through Cloudways. It’s cost-effective, requiring just about a dollar per month for every 25 gigabytes of data. To activate it, follow these steps:
- Go to the “Applications” section in your Cloudways account.
- Click on “CloudwaysCDN.”
BunnyCDN: Another option is BunnyCDN, which provides a fast and reliable CDN service.
Cloudflare: Cloudflare is a popular choice that offers both a free plan and premium options. It provides advanced security and performance features.
For now, let’s focus on enabling Cloudways CDN, which can significantly improve your website’s loading speed and overall performance.
An alternative to consider is using BunndyCDN.
This option offers excellent performance and is often more budget-friendly, making it a great choice for many website owners.
It’s known for its affordability and high-speed capabilities, making your website load faster for visitors. If you’re looking for an efficient and cost-effective CDN solution, BunndyCDN could be the right fit for you.
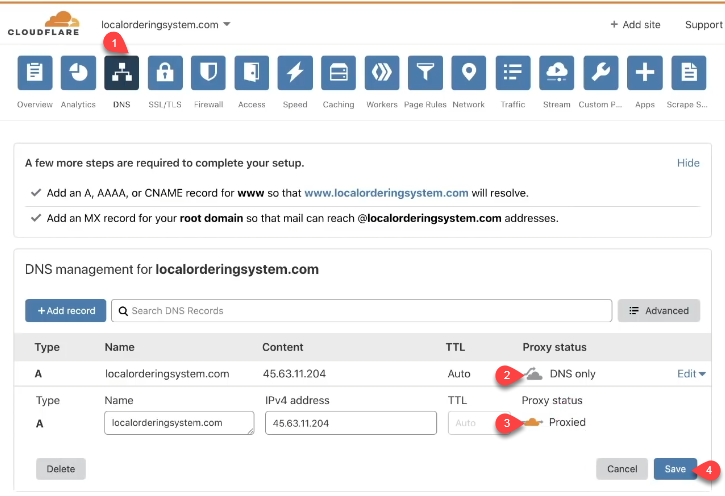
However, when considering another option, Cloudflare is worth exploring. By following this guide and useing Cloudflare to register your domain, you can take advantage of its free content delivery network (CDN). To activate it, follow these steps:
- Go to the DNS settings.
- Hover over the cloud icon next to your Type A DNS record.
- Click on it to switch it from DNS to Proxied mode.
- Save your changes.
By doing this, you’re enabling Cloudflare’s CDN features to enhance your website’s speed and performance.
Step 7: Checking Your Website Speed with GTmetrix
To assess your website’s speed, follow these steps using GTmetrix:
Copy and paste your website URL into GTmetrix. Click on “Test Your Site.”
In this demonstration, the results show excellent scores across the board. The total page size and number of requests are minimal.
These positive results are mainly due to using the Kadence theme, which is known for optimizing website performance.
I’d like to clarify a common misunderstanding that many people have.
In the “Page Details” section, you can find the result for “Fully Loaded Time.” This metric provides important information about your website’s overall performance.
It’s a common misconception to think that “Fully Loaded Time” represents the time it takes for your website to load on your screen. However, that’s not entirely accurate.
For instance, when I refresh this newly-optimized site, it practically appears instantly. Despite this, the reported “Fully Loaded Time” might show as 1.4 seconds. This is because there are several behind-the-scenes tasks happening when a website loads.
These tasks include hidden scripts running in the background, which don’t necessarily impact how quickly the website becomes visible to you, the user.
I am sure that I have tried my best to help and properly guide you to install WordPress on one of the fastest servers using Cloudways.
FAQ Related To Installing VPS on Cloudways
I think the following FAQs are necesseary to mention here to help you understand the importance of using VPS hosting for WordPress.
1. How do I install WordPress on a Cloudways VPS?
Cloudways provides a simple process to install WordPress on their VPS servers. You can follow their step-by-step guide or use their one-click installer for WordPress.
2. What are the advantages of using Cloudways VPS for WordPress?
Cloudways VPS offers better performance, scalability, and control compared to shared hosting. It also provides a user-friendly interface and managed services that saves a lot of time.
3. Can I migrate my existing WordPress site to Cloudways VPS?
Yes, Cloudways offers migration tools and assistance to help you transfer your existing WordPress site to their VPS environment.
4. Is technical expertise required to install WordPress on Cloudways VPS?
No, Absolutely not, Cloudways offers user-friendly tools and guides, making it accessible even for those with limited technical knowledge.
5. How does Cloudways manage security for WordPress installations on VPS?
Cloudways implements security measures such as firewalls, regular updates, and server monitoring to ensure the security of WordPress installations on their VPS.
6. Can I choose different VPS providers with Cloudways for WordPress hosting?
Yes, Cloudways allows you to choose from multiple VPS providers like DigitalOcean, Linode, Vultr, AWS, and more to host your WordPress site.
7. Is there a backup system for WordPress sites on Cloudways VPS?
Cloudways provides automated backups for your WordPress sites on their VPS servers. You can also create manual backups and restore points.
8. Can I customize my Cloudways VPS environment for WordPress?
Yes, Cloudways VPS allows you to customize various server settings, including PHP versions, caching options, and more, to optimize your WordPress site’s performance.
9. What happens if I face issues during WordPress installation on Cloudways VPS?
Cloudways offers 24/7 customer support to assist with any issues you encounter during the installation process or while managing your WordPress site on their VPS.
10. What kind of performance improvements can I expect after installing WordPress on Cloudways VPS?
By using Cloudways VPS for WordPress, you can experience faster loading times, better website performance, and improved scalability compared to traditional shared hosting. I have tested it using Kadence Theme and result were amazing, WordPress site was loading under 1 second.


Many thanks for the information.